If you’re new to video editing, you might have heard of DaVinci Resolve. What you may not know is that it’s quickly becoming the go-to recommendation for beginners. While it has a steeper learning curve than other editors like Premiere Pro, DaVinci Resolve offers more control and flexibility once you learn the ropes. On top of that, it also has a free version you can download instantly.
If you’re just getting started with video editing and looking for a beginner tutorial, you’re in luck. In this post, we’ll cover the basics of how to use DaVinci Resolve and explore the main tools you can use to start editing a project.
Note: The screenshots used in this article are from DaVinci Resolve 18.6. If you’re using a different version, some settings and tools may be in other locations.
Beginner tutorial: the basics of using DaVinci Resolve
To create a simple video with DaVinci Resolve, there are a few steps you need to understand. In a basic editing workflow, you need to create a project, add your media, cut and edit your clips, and export the final product. Let’s find out how each of these steps works in DaVinci Resolve.
How to create a new project
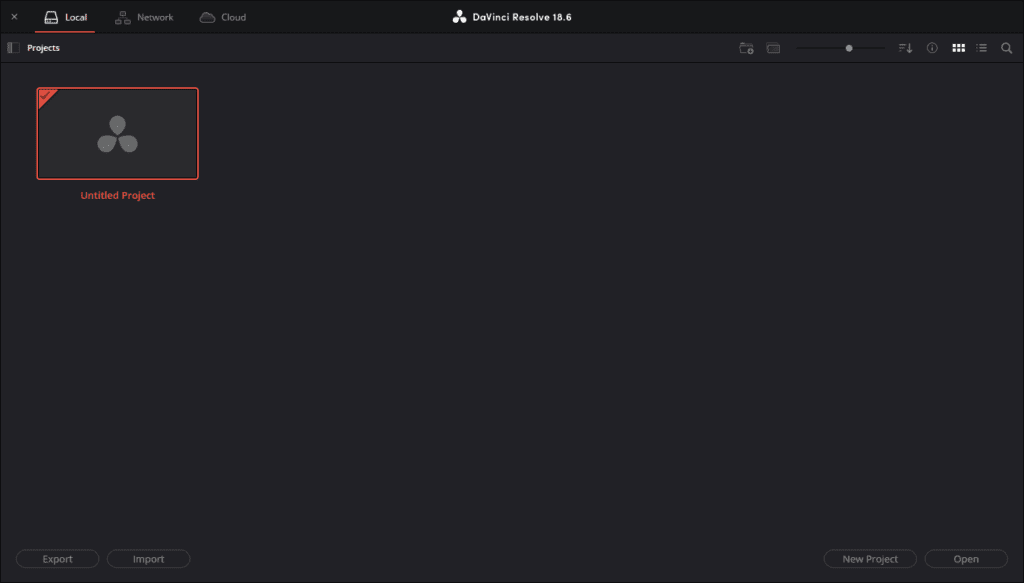
1. Select Untitled Project
To create a new project, open the DaVinci Resolve app and select Untitled Project or use the New Project button to create a new project file.
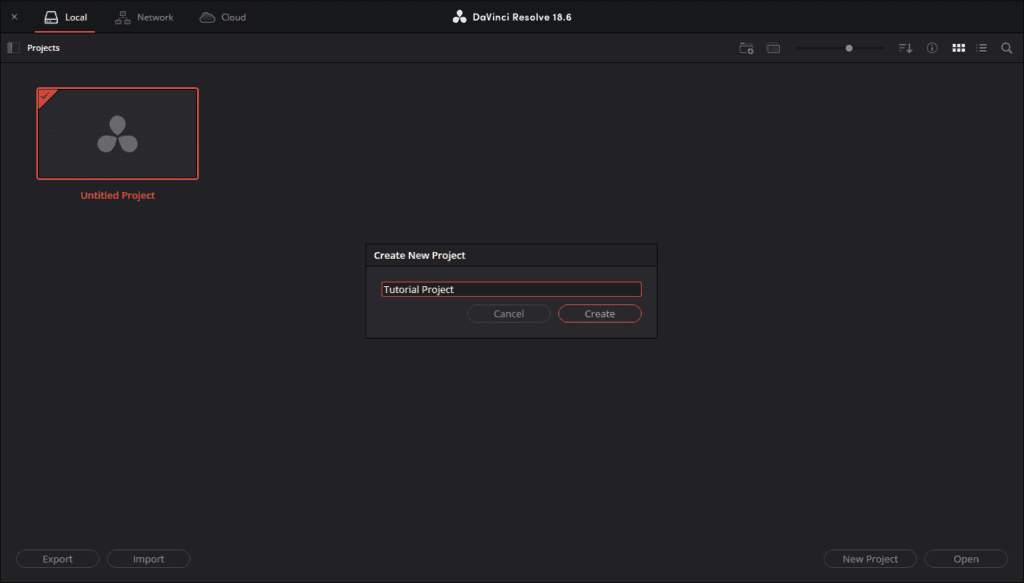
2. Name your project
Next, name your project, then hit Create.
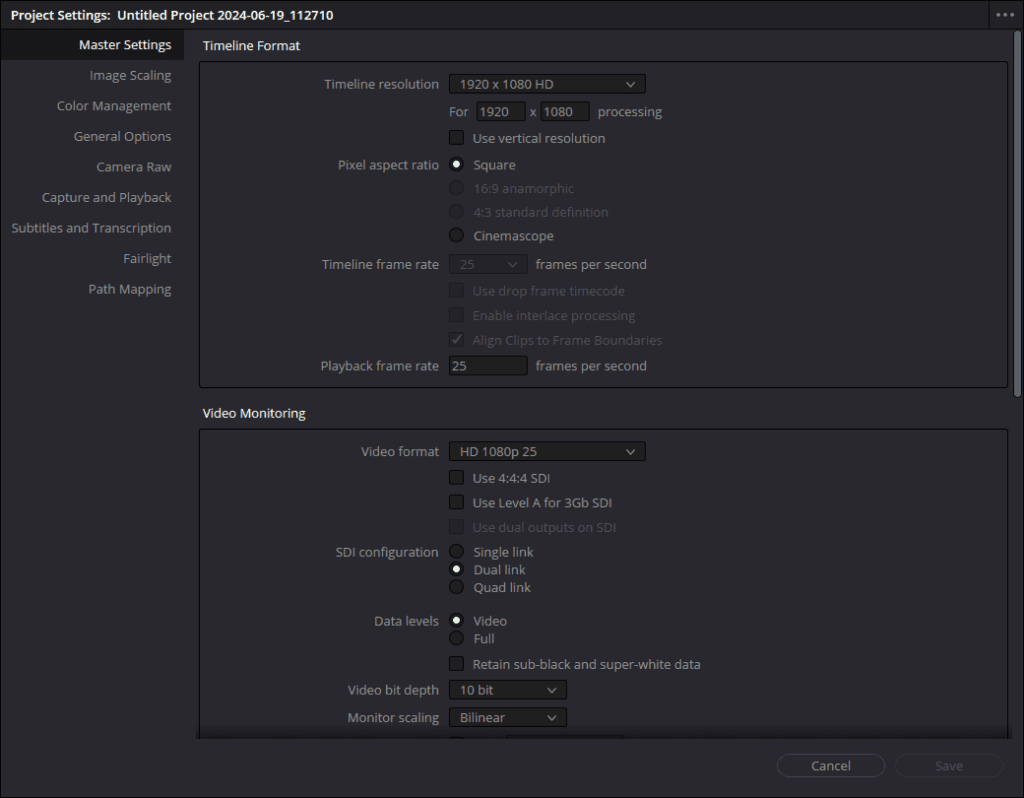
3. Adjust the Project Settings
Before you move to the next step, it’s wise to set your project settings. Go to File > Project Settings or click the gear icon at the bottom-right of the screen. You can ignore most of these settings for now. All you need to do for now is make sure your Timeline frame rate and Timeline resolution match the video files that you’re going to import. These can be found under the Master Settings section.
How to navigate DaVinci Resolve
Before you import and edit our video files, it’s important to understand how DaVinci Resolve’s interface and layout work.
DaVinci Resolve is organized so that each step of the editing workflow has its own workspace. These are found along the bottom of the screen and include Media, Cut, Edit, Fusion, Color, Fairlight, and Deliver. For this basic tutorial, we’ll focus on Media, Cut, and Edit.
The Media page
The Media page is where you’ll import and organize your media files. The purpose of this page is to help you get everything ready for the editing process. This is how the Media page is arranged:
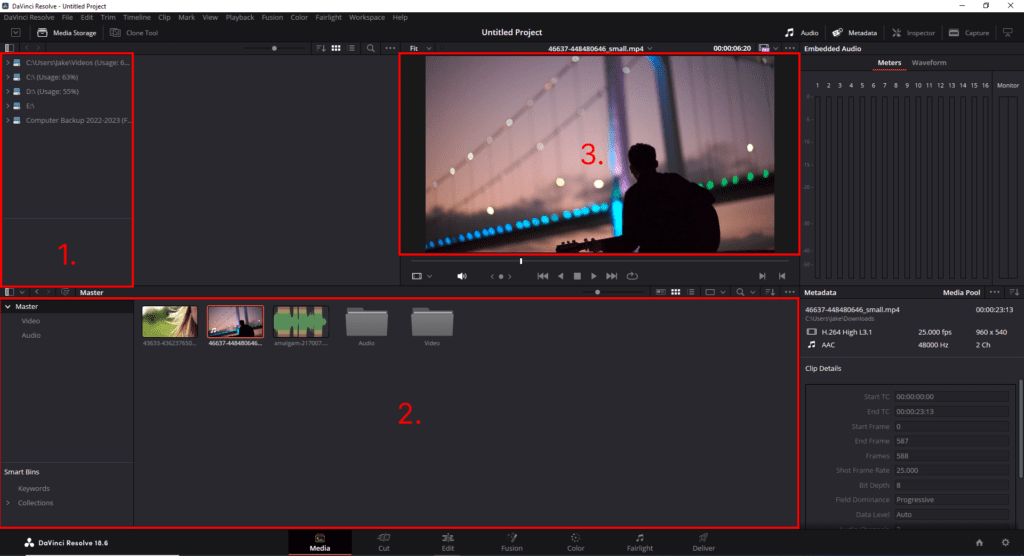
The most important parts of the Media page are:
- Media Storage: Found in the top-left pane, you’ll see your computer’s file directory. You can use this to navigate through your drives to quickly locate media you want to import.
- Media Pool: The bottom-central pane is where your imported media is displayed. You can organize your media into bins (folders within DaVinci Resolve) to keep everything tidy.
- Viewer: The Source Viewer is the top-central pane. It helps you preview clips while importing and organizing them.
The Cut page
The Cut page provides simple tools to help you cut up your video assets. It’s useful for quick edits and shorter projects where advanced features aren’t needed. On this page, you’ll find all of the basic tools you need to create a complete sequence from your raw media files.
Let’s take a look at the Cut page:
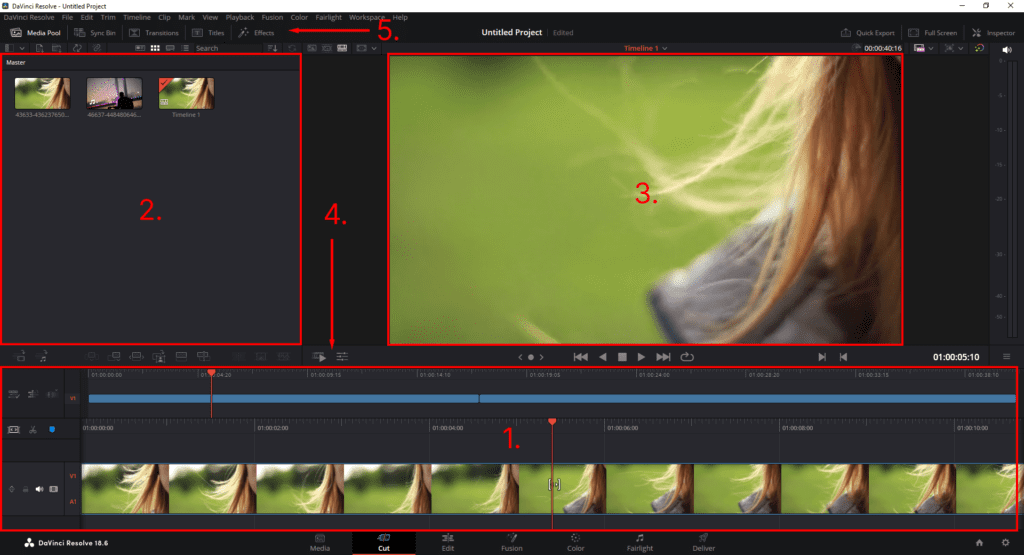
The key sections include:
- Timeline: The Timeline is the main section of the Cut page, found along the bottom of the screen. This is where you’ll add, cut, and arrange your media. DaVinci Resolve features a dual timeline where the upper timeline provides an overview of the whole project, while the lower timeline lets you make precise edits.
- Media Pool: Found in the top-left corner, this pane works exactly the same as it does on the media page. You can drag and drop clips from the Media Pool onto your timeline.
- Viewer: This is the video preview screen that takes up most of the Cut page. Here, you’ll be able to see the effects of your edits in real time. You can switch between Source Tape and Timeline modes to see your sequence as you build it.
- Toolbar: Just above the Timeline, you’ll see a toolbar with a stack of icons. Here, you’ll find basic tools that help you select, move, and cut clips in your Timeline.
- Transitions, Titles, and Effects: Along the top of the Media Pool pane, there are buttons for Transitions, Titles, and Effects. These let you apply specific video effects from the Resolve library, helping you to create a more professional-looking video.
The Edit page
The Edit page is a fully-featured workspace for professional video editing. It’s here that the majority of editors spend their time, with a comprehensive set of tools for fine-tuning footage, transitions, effects, and more.
Here’s what the Edit page looks like:
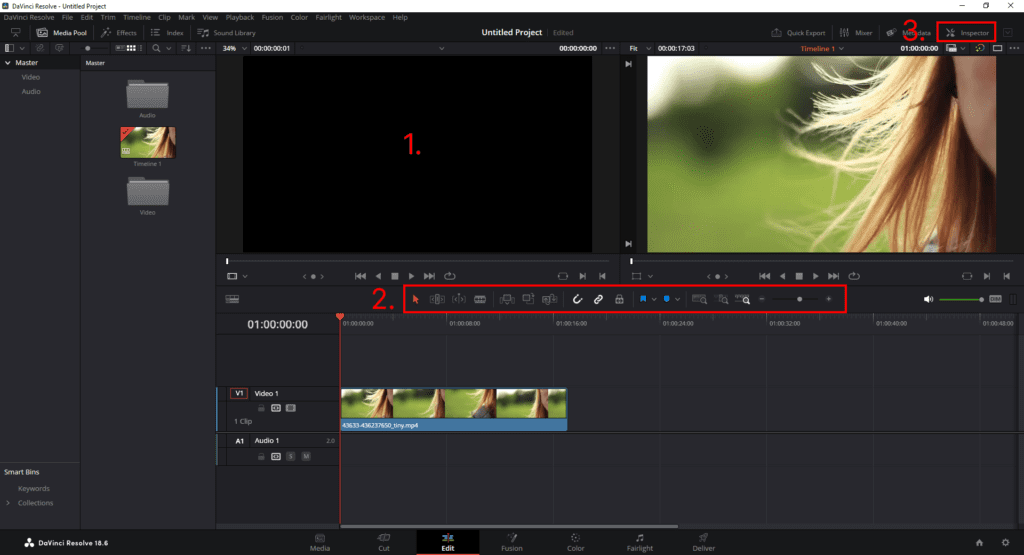
You should now be familiar with the Media Pool and Timeline. Here are some new sections to note:
- Source and Timeline Viewers: Unlike the Cut page, the Edit page has two viewers. On the left, the Source Viewer shows the clip you’re preparing to edit. On the right, the Timeline Viewer shows the sequence as you’re constructing it in the Timeline.
- Editing toolbar: Directly above the Timeline, there’s a toolbar with several tools that help you import, trim, and snap clips together in the sequence.
- Inspector panel: At the top-right corner, you’ll see the Inspector panel. This panel has a range of editing tools, effects, and transitions you can add to your clips. From here, you can rotate, zoom, flip, and change the position of your clip. And that’s not all—there are also options to crop, stabilize, add lens corrections, and more.
By now, you hopefully have a basic understanding of the Media, Cut, and Edit pages. We recommend taking some time to get familiar with each page as it’ll make editing much faster when you can remember where everything is.
As you get better with DaVinci Resolve, you can start to explore the Fusion, Color, and Fairlight pages. These pages will give you everything you need to enhance the colors, sounds, and effects in your videos. And don’t forget, you can use DaVinci Resolve LUTs and intro templates to take these features even further.
How to add audio and video to your project
Now that you know how the Media, Cut, and Edit pages are laid out, it’s time to import your audio and video files and start editing.
As we go through some of these steps, we’ll be including both the actions along with the keyboard shortcut in Resolve. Using keyboard shortcuts is a great way to learn the program and edit faster. Our complete guide to DaVinci Resolve keyboard shortcuts is a great resource to use as you’re learning the program.
DaVinci Resolve supports a wide range of video and audio file types, which makes importing media to your project straightforward. While there are a few ways to import your media, the easiest way is to simply drag and drop your files into the Media Pool.
In the Media page, open Media Storage and navigate to where your files are found. Drag and drop the files from the directory structure into the Media Pool.
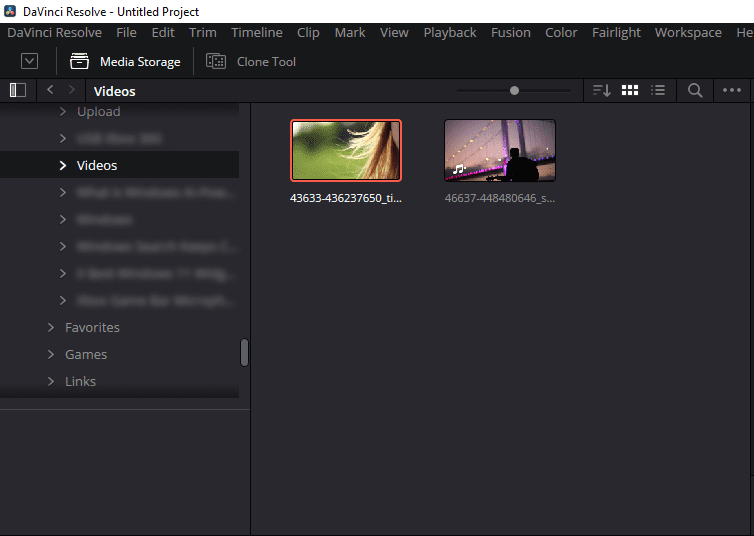
You can also import media directly from the Cut and Edit pages. To do so, right-click inside the Media Pool and select Import Media. Navigate to your desired files, then click Open.

How to split clips in DaVinci Resolve
Splitting clips creates a break that lets you isolate parts of your footage, remove unwanted segments, and rearrange your videos.
To split clips in DaVinci Resolve, open the Edit page and navigate to the part of your sequence that you want to split. Press B or click the Blade Edit Mode icon (it looks like a razor blade). Then, click inside your sequence to create a split.
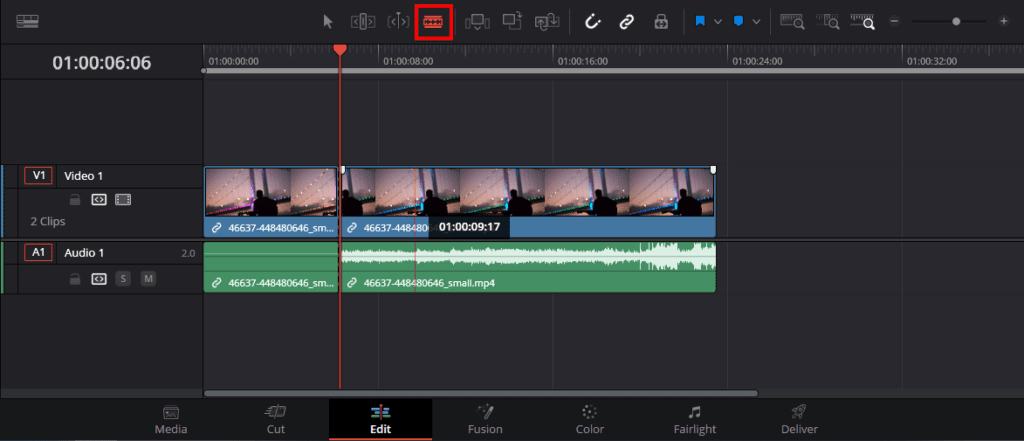
You can also split clips within the Cut page by using the Split Clip tool. Move the playhead to the part of the clip you want to clip, then click the Split Clip icon to create a break.

How to crop in DaVinci Resolve
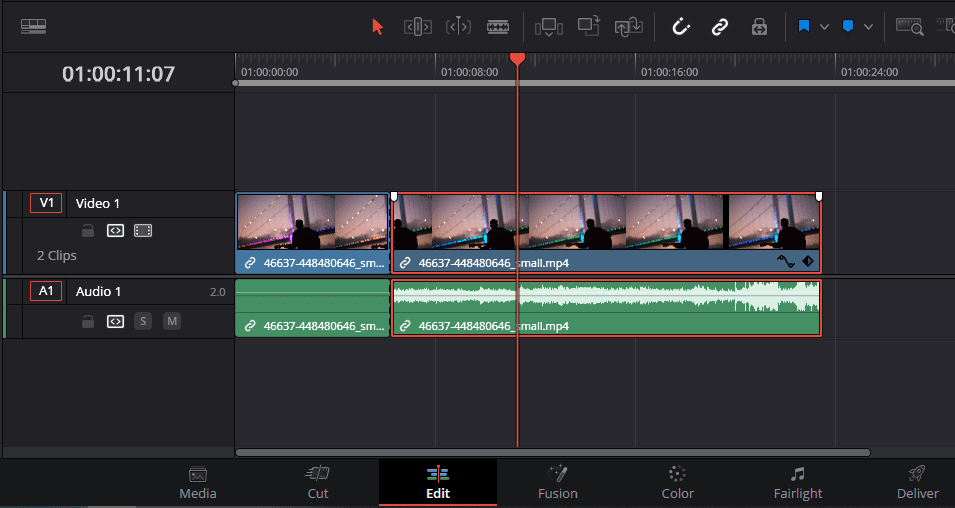
Cropping a video lets you remove unwanted edges, focus on a specific part of the frame, or resize the aspect ratio. You can crop your footage within the Edit page, where you’re given tools to adjust specific parts of your video. Here’s how to do it:
1. Select the clip
Make sure you’re on the Edit page, then select your clip in the timeline to highlight it.
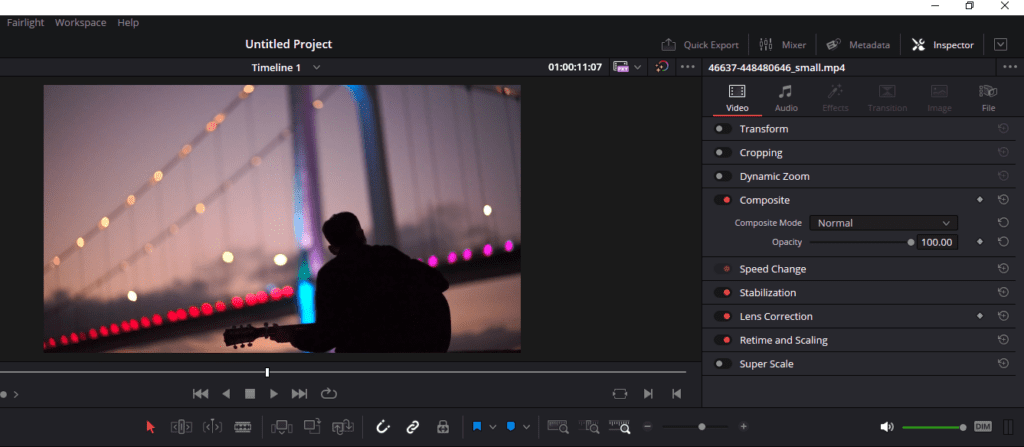
2. Open the Inspector panel
If the Inspector panel isn’t already open, select the Inspector button at the top-right corner of the interface.
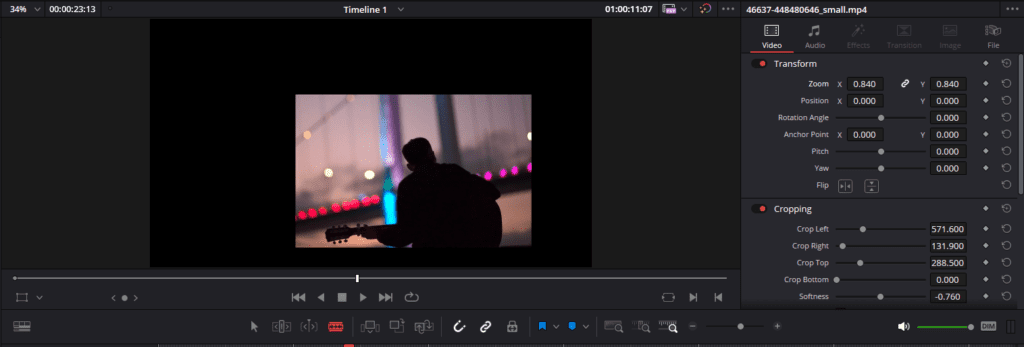
3. Adjust the cropping settings
Select the Cropping header to expand the settings, then adjust each slider until you have the crop you’d like. Each directional slider (crop left, right, top, and down) will crop inwards by a specific number of pixels. The further you drag the slider, the more it’ll crop.
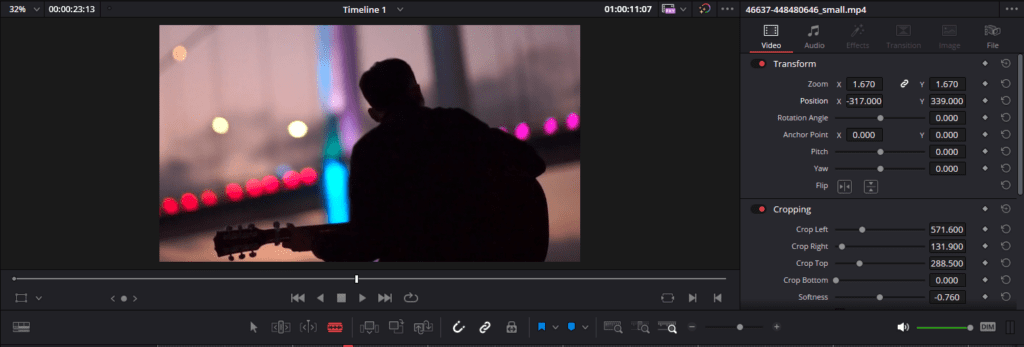
4. Reposition and scale your footage
If you still want the cropped footage to take up the entire frame, you can reposition and scale the clip. In the Transform section, use the Position tool to center your clip. Then, use the Zoom tool to expand your clip until it fills the frame.
How to undo and redo in DaVinci Resolve
Undoing and redoing actions in DaVinci Resolve is a quick way to correct any mistakes you might make during the editing process. DaVinci Resolve offers simple keyboard shortcuts and an extensive edit history to help you quickly undo or redo your actions.
Here are the keyboard shortcuts:
- Windows/Linux: Press Ctrl + Z to undo the last action and Ctrl + Shift + Z to redo the last previously undone action.
- Mac: Press CMD + Z to undo the last action and CMD + Shift + Z to redo the last previously undone action.
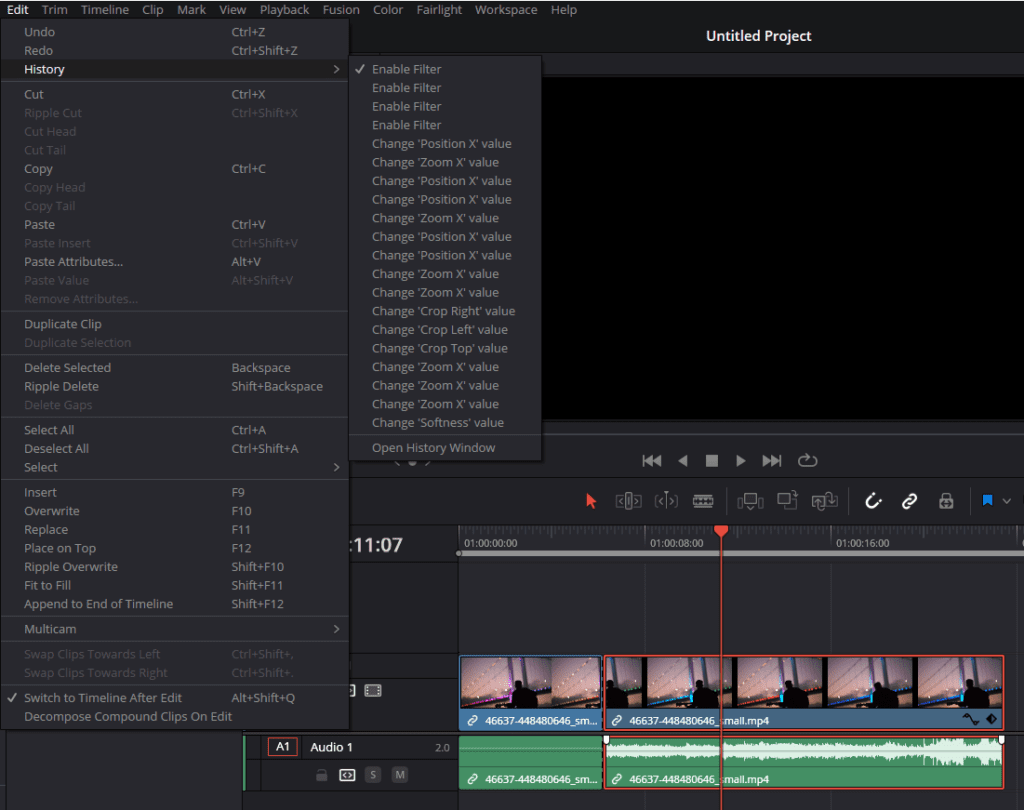
You can also go to the top bar and select Edit > History to see a list of your recent actions and select which point you want to revert to. This is extremely useful if you’ve made a series of edits that you want to take back, as it effectively acts as a backup.
How to add text in DaVinci Resolve
DaVinci Resolve offers several options for text customization, from simple captions to more complex animations. Here’s how to add text in DaVinci Resolve using the Edit page:
1. Import your media (if needed)
If you’re going to overlay the text onto the video, make sure your clips are already placed in the timeline.
2. Access the Effects Library
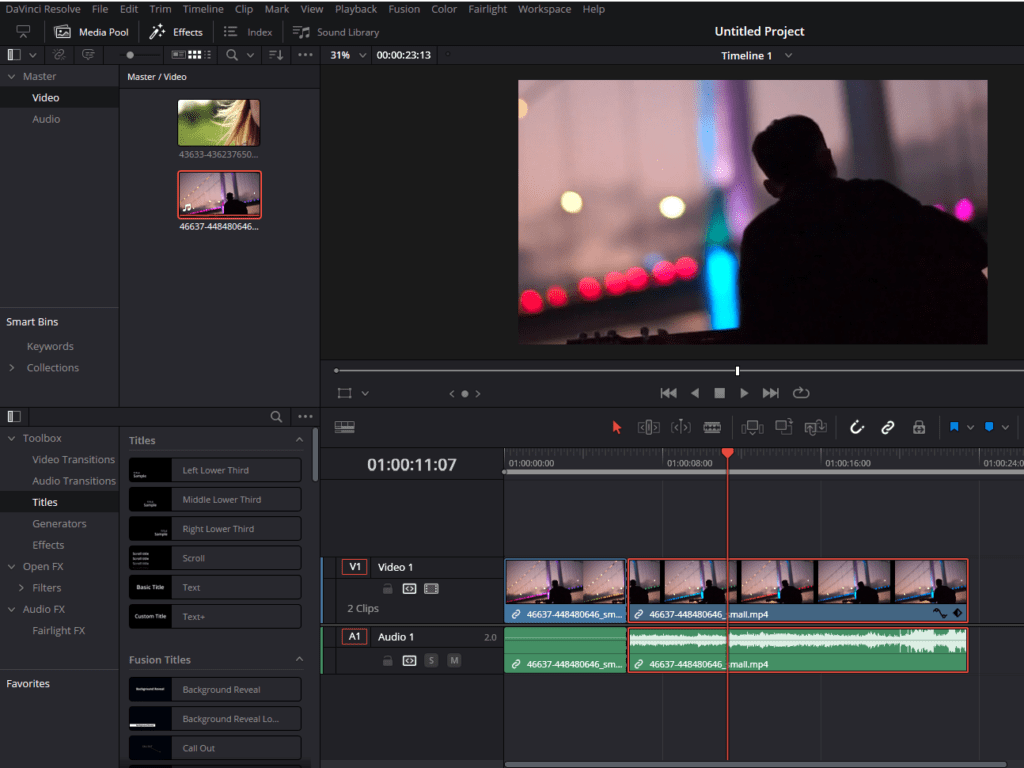
Select Effects in the top-left corner and navigate to Titles, under the Toolbox category.
3. Choose a text effect
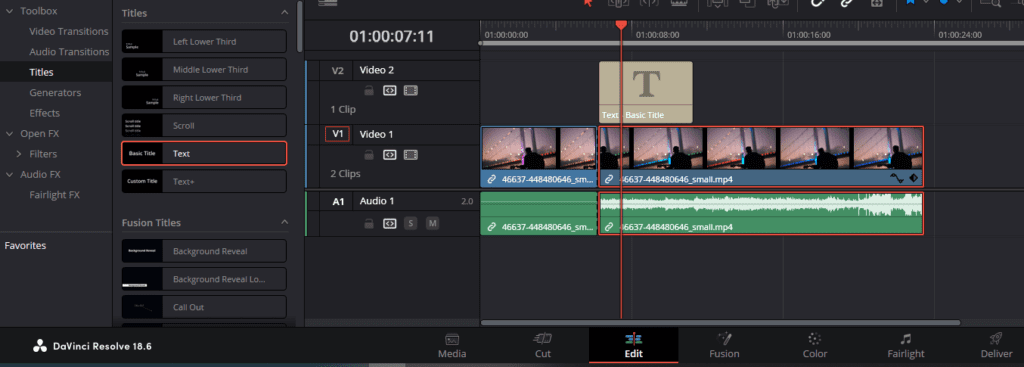
If you just want simple text, drag and drop the Text effect from the Titles section onto the timeline above your video track. If you want more customizable and advanced features, drag the Text+ option onto your timeline instead. You can also choose from the other preset title animations provided by DaVinci Resolve.
4. Edit the text
Select the text in the timeline, then navigate to the Inspector panel. Here you can change the font, size, color, and other basic properties as you see fit. If you use the Text+ effect, you’ll also be able to change tracking, line spacing, color, shading, and animation options.

Enhance your edits with Storyblocks assets
There you have it—all the basic features you need to learn how to use DaVinci Resolve. Once you’re comfortable with everything we’ve covered here, you can move on to more advanced work like how to render and export your project. If you’re noticing lag while you’re editing, check out our tips for how to make Resolve run faster.
Using DaVinci Resolve templates is a great way to get familiar with the program, as all of the hard work has already been done for you.
Sign up to Storyblocks for unlimited downloads of thousands of pre-made, customizable templates for DaVinci Resolve. Even better, you’ll get access to over 2 million royalty-free 4K and HD clips, exclusive music, sound effects, images, and more to use in your projects.


