Over the last decade, DaVinci Resolve has evolved from a standalone tool used only by professional colorists into an all-around powerhouse for the entire post-production pipeline—sans image editing. While the software engineers at Blackmagic have ensured that DaVinci Resolve will perform well (and arguably better than Premiere Pro and Final Cut Pro), there may still be instances where you find the performance is laggy and the software could be performing better.
So if you’re constantly finding yourself wondering, “Why is DaVinci Resolve is so laggy?”, we’re here to help. In this article, we’ll explore a few reasons why you may experience lag and fixes for how to make DaVinci Resolve less laggy. Keep reading to learn more, or watch our video tutorial below.
Table of contents
- How to tell if DaVinci Resolve is lagging
- 7 steps to make DaVinci Resolve run faster and get rid of laggy playback
- 1. Check that your system meets DaVinci Resolve’s system requirements
- 2. Check your graphics card and drivers
- 3. Optimize DaVinci Resolve’s memory and GPU settings
- 4. Upgrade your GPU
- 5. Change timeline resolution to address lag
- 6. Adjust preview resolution for better performance
- 7. Use optimized media and proxy media
- Edit even faster in DaVinci Resolve with a Storyblocks subscription
How to tell if DaVinci Resolve is lagging
Before we get into ways to fix laggy performance in DaVinci Resolve, we first have to define it. Ultimately, lag should be something you feel when you edit. When you hit play, does the timeline play immediately? Or is there a slight buffer before the video starts? If it’s the latter, that’s performance lag.
Likewise, you can also see it when you make edits. If DaVinci Resolve is lagging, the reaction time of your edits will stutter, deletions will have a delay, and even importing video clips can feel like you’re waiting for the internet to load on dial-up.
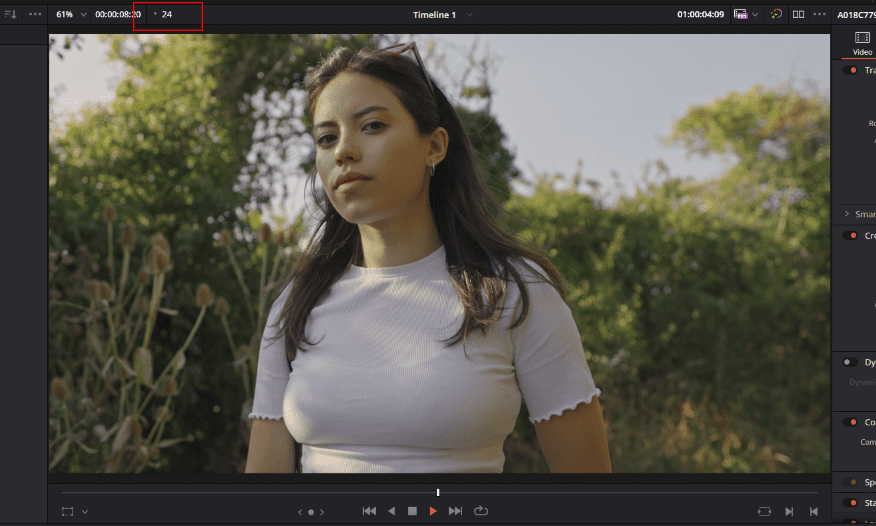
Outside of obvious stuttering, how do you know if Resolve is running smoothly? One way is to check your frames per second (FPS) counter in the top left of your viewing monitor.
Checking frames per second
The FPS counter has an indicator that will tell you how smoothly your video is playing. If you’re editing at 24 frames per second and see a green light when you hit play, DaVinci Resolve is running smoothly.
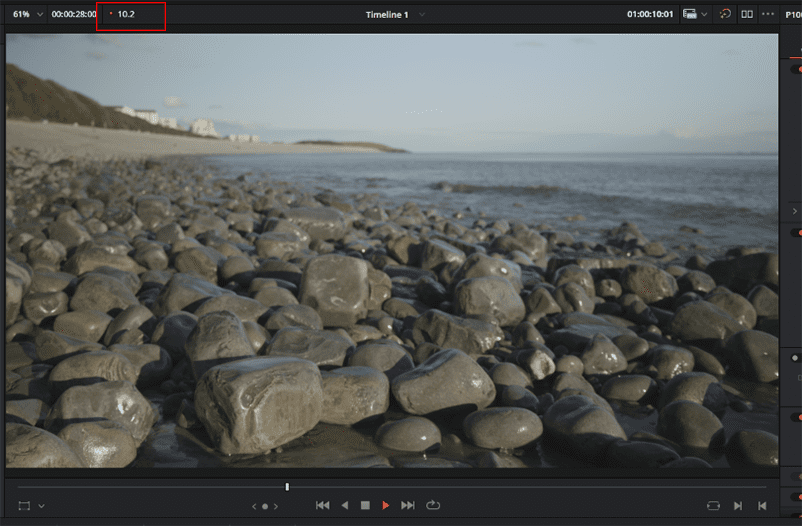
But if you press play and see the FPS drop to 10 or 15 with a red light, that’s a sure sign of laggy playback. There’s a number of ways you can fix this issue, but a good place to start is making sure that your computer meets DaVinci Resolve’s system requirements.
7 steps to make DaVinci Resolve run faster and get rid of laggy playback
1. Check that your system meets DaVinci Resolve’s system requirements
Much like IT telling you to turn a faulty device on and off, the first thing you should check is that your system meets the minimum system requirements for DaVinci Resolve. If you’re experiencing laggy playback, it might be that your system simply isn’t up to scratch.
Minimum system requirements for Mac OS
- macOS 12 Monterey
- 8 GB of system memory. 16 GB when using Fusion
- Blackmagic Design Desktop Video version 12.0 or later
- Integrated GPU or discrete GPU with at least 2 GB of VRAM
- GPU which supports Metal or OpenCL 1.2
Minimum system requirements for Windows
- Windows 10 Creators Update
- 16 GB of system memory. 32 GB when using Fusion
- Blackmagic Design Desktop Video 10.4.1 or later
- Integrated GPU or discrete GPU with at least 2 GB of VRAM
- GPU which supports OpenCL 1.2 or CUDA 11
- NVIDIA/AMD/Intel GPU Driver version – As required by your GPU
If your system meets the minimum requirements, but DaVinci Resolve is still lagging, go ahead and move onto the next step. But if your system doesn’t meet them, you’ll need to upgrade your computer to fix the problem.
2. Check your graphics card and drivers
Before we dive into issues within Resolve itself, I need to ask: Are you using a PC? If so, what graphics card are you using? If it’s NVIDIA, you need to know that NVIDIA GPUs have two types of drivers: gaming and studio drivers.
Now, it’s not as if these two drivers are entirely different tools. The studio and game-ready drivers are technically the same. However, the studio driver goes through testing before release, whereas the game-ready drivers come out frequently when a big new game is released. For example, a game-ready driver may be released every week, whereas the studio driver would be released at the end of the month after all the new updates have been tested for use with creative applications.
So if you have the game-ready driver installed, you may be using an unstable installation, which could affect the performance of DaVinci Resolve. But don’t worry – it’s easy to switch to the studio driver.
How to switch your studio driver
1. Open GeForce Experience from the notification panel by right-clicking the NVIDIA icon and selecting NVIDIA GeForce Experience.
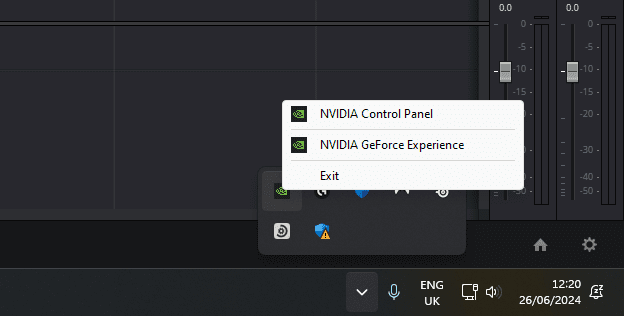
2. Select the driver tab.
3. Click the vertical dots next to “Check for updates” and switch to the Studio Driver.
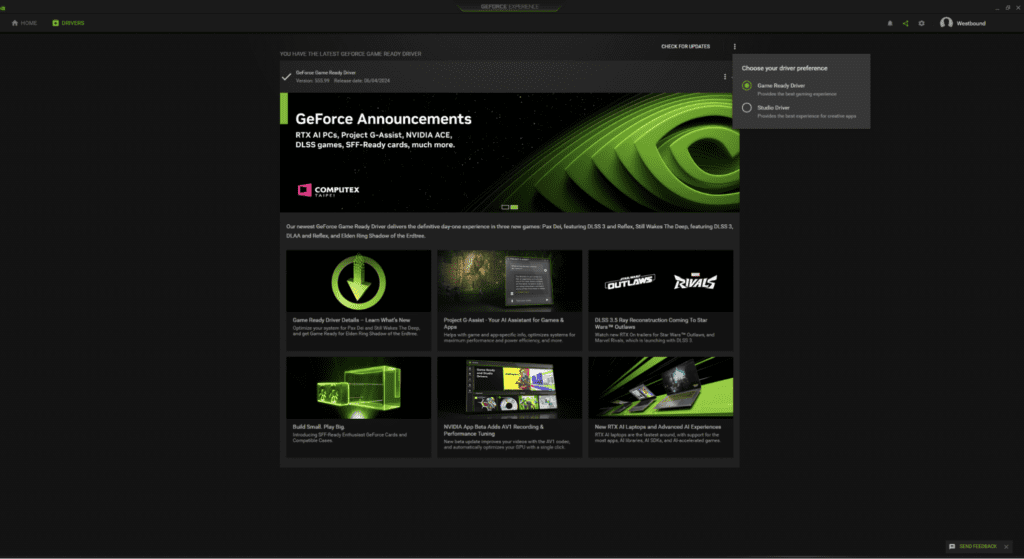
Once you’ve done that, go back into DaVinci Resolve and see if it’s any less laggy. Moving to the studio driver may provide the performance boost needed for smoother operation. But if you’re still experiencing lag, it’s time to dive into Resolve’s settings.
3. Optimize DaVinci Resolve’s memory and GPU settings
When it comes to GPUs, there are a few settings in Resolve’s system preferences that can significantly enhance performance. You can access these by navigating to the DaVinci Resolve menu tab, selecting Preferences, and then going to Memory and GPU.
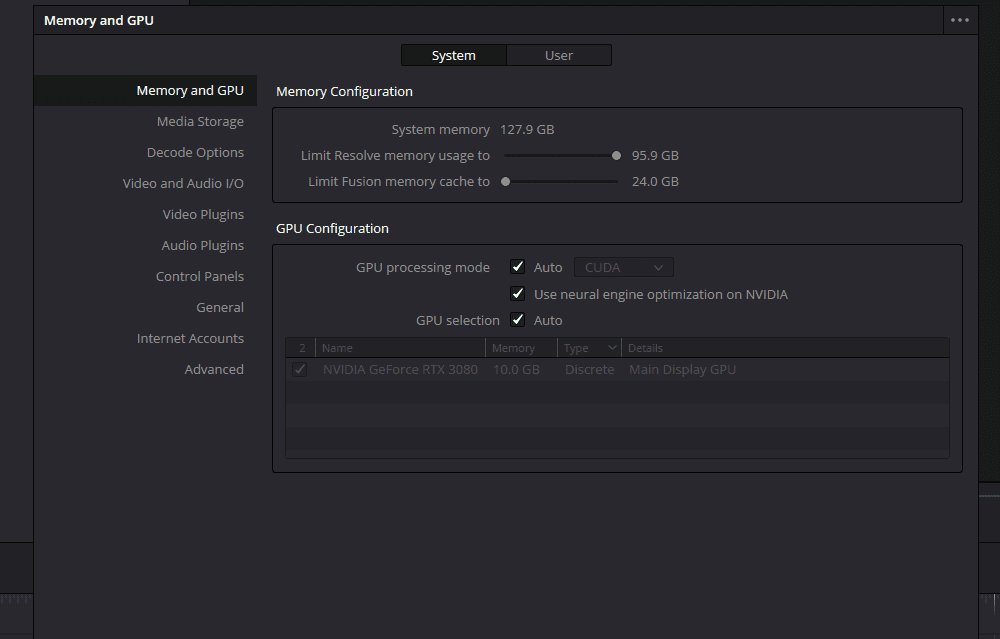
Here, you can increase the amount of system memory that Resolve has access to (RAM) and ensure the GPU configuration is set up correctly.
In most cases, selecting Auto for both the GPU processing mode and GPU selection will be sufficient to ensure your system is ready for editing. This setup helps maximize the performance and efficiency of DaVinci Resolve.
4. Upgrade your GPU
DaVinci Resolve is a GPU-oriented software. This doesn’t mean it doesn’t use the CPU at all; it just relies more heavily on the GPU to power the editing process. In comparison, Premiere Pro is more of a CPU-intensive software.
So if Resolve is lagging, it’s often one of two issues: either your GPU needs to be upgraded because the software is overtly powerful, or the footage is too demanding for your current GPU. Although these issues may sound similar, there are different ways to address them.
If your GPU isn’t up to the task—such as a GTX 1080, which is several generations old—it may be time to upgrade. Even if you’re editing 2k footage from a performance-friendly codec like BRAW, an older GPU can struggle with general processing tasks due to outdated hardware. Newer models like the 3080 series can offer substantial performance improvements and are relatively affordable.
Using the Speed Test tool will show you what Blackmagic footage you can edit without issues. While it is focused on those shooting with BRAW, it will give you a good idea as to where you stand with your current system by benchmarking your GPU.
5. Change timeline resolution to address lag
But even if you have one of the newer GPUs on the market, shooting with a high-resolution, high-data-rate camera like the RED V-RAPTOR demands significant processing power. Often, you’ll find that even the most robust GPUs can’t process the footage in its native format.
If you’re facing this issue, it can be frustrating and overwhelming. Despite having invested in top-of-the-line hardware, the sheer volume and complexity of the data can be too much for Resolve to handle, resulting in lag.
In this case, the best way to make DaVinci Resolve run faster is to adjust the timeline resolution to 1080p. Even if your final delivery is in 6K, working in 1080p allows Resolve to deliver a preview that is significantly less than the resolution of a 6K video file, improving playback performance and making your editing process smoother and more efficient.
However, it’s important to note that this practice isn’t just for combating lag; it should be a standard part of your workflow. Consistently maintaining lower timeline resolutions can ensure a more responsive and efficient editing environment.
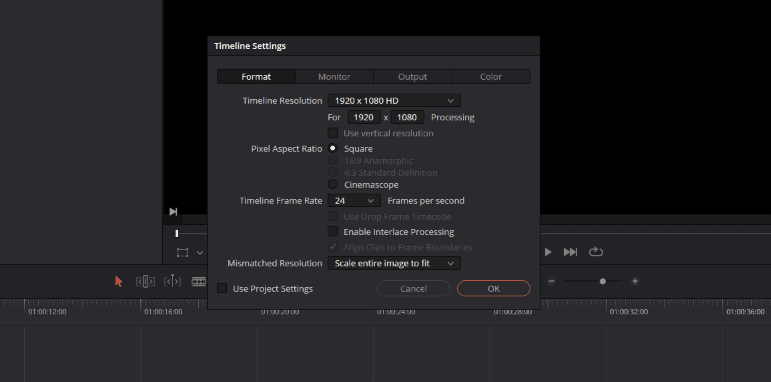
1. To change your timeline resolution, right-click on the timeline file within the media pool to bring up the Timeline Settings menu.
2. Then update the Timeline Resolution to 1920 x 1080 HD from the drop-down menu and click OK.
6. Adjust preview resolution for better performance
If you’re dealing with incredibly data-rich footage, like the heavy 6K files from a Panasonic S1H, even scaling down to a 1080p timeline isn’t enough to decompress the footage efficiently. Which means you need another solution to fix the lag.
In this case, you can change the preview resolution to improve performance.
1. First, go to your top navigation and select Playback > Timeline Proxy Resolution
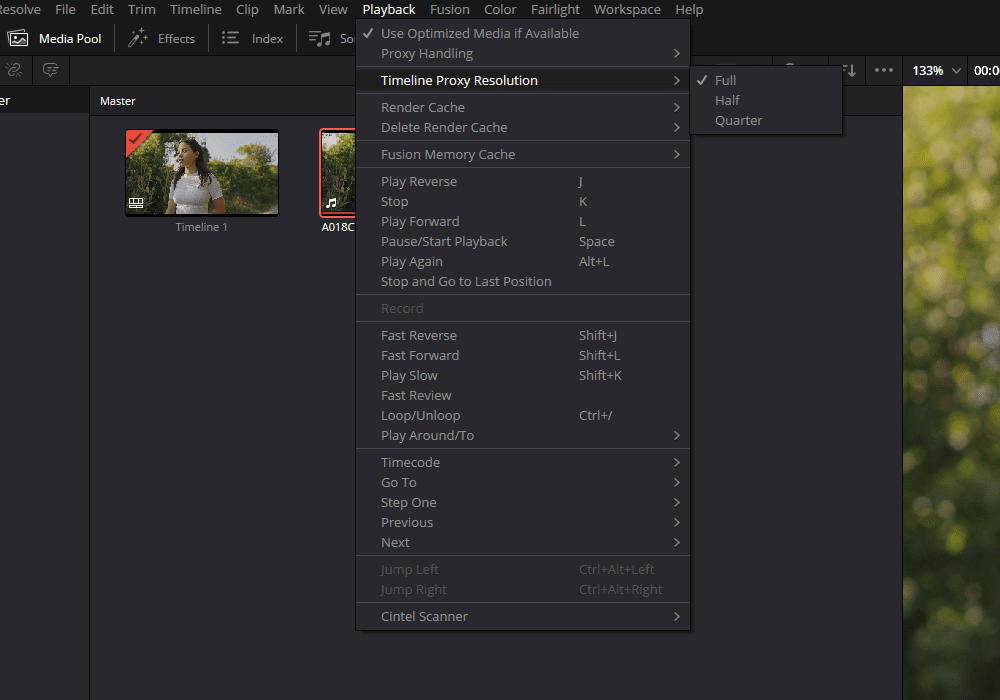
2. Then, change it from half or quarter. This adjustment provides a proxy preview by reducing the preview resolution.
It’s important to note that depending on the original scale of your footage, decreasing it to a quarter resolution on a 4K or 1080p timeline could significantly lower the quality. As a result, editing will harder because you won’t be able to see the true quality of the footage. So it’s not an ideal fix, but it will help DaVinci resolve run faster.
7. Use optimized media and proxy media
At this point, If you’re still struggling with playback and Resolve is still laggy, we need to fix the media itself. This involves generating a lower-resolution file format that can be played back and edited. Otherwise, editing is going to be a huge pain. There are two ways to do this: you can either generate optimized media or proxy media.
Both processes do similar things: they create a playable and editable version of the media file that was too dense for your machine to handle. However, the way in which they create an adjusted file differs.
If you’re looking for a single answer as to which one to use, I tend to opt for proxy media when making my initial edit. In my opinion, having a fluid editing experience is more important than seeing the finer details on the first draft.
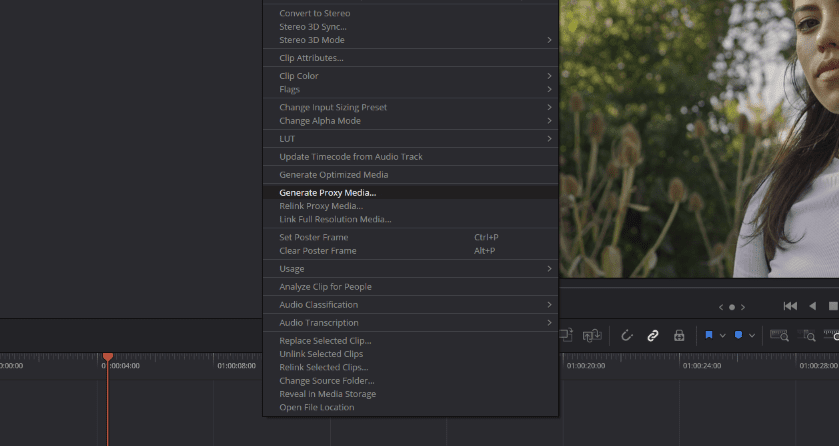
You can turn either of these settings when you right-click a media file within the media pool, then select either Generate Proxy Media… or Generate Optimized Media.
Optimized media
When you use Optimized Media, it creates a media file that is easier to play back by transcoding the original files into a more editing-friendly format. Optimized media retains a high quality and is stored in a location specified by the user. Even though it can maintain your original resolution, which may be a large-scale resolution like 8K, your computer can easily handle it because it doesn’t have inter-frame compression.
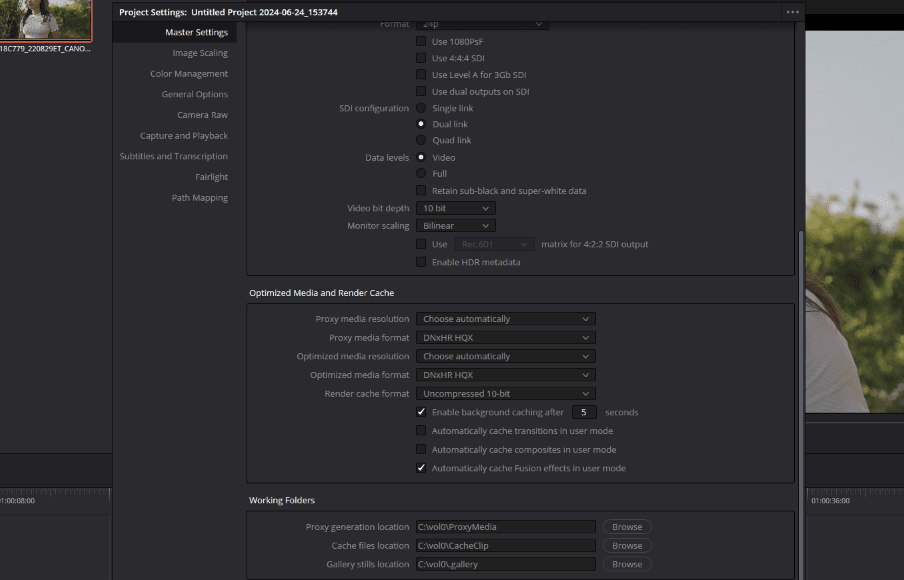
You can adjust the settings for optimized media by going to DaVinci Resolve > Preferences > User > Playback Settings. Here, you can choose the resolution and format for the optimized media, balancing quality and performance according to your needs.
Proxy media
Proxies are lower-resolution versions of your original clips designed to be lightweight and easy to edit, especially when working with high-resolution footage. There will be a loss of clarity with proxies, and you may also see some color shifts. But the goal of proxies is to take heavy footage and make lightweight versions with minimal footprint.
Note: Remember that when creating optimized media, Resolve will be storing these somewhere on your desktop. So if you don’t have a lot of space on your computer, this may cause an issue.
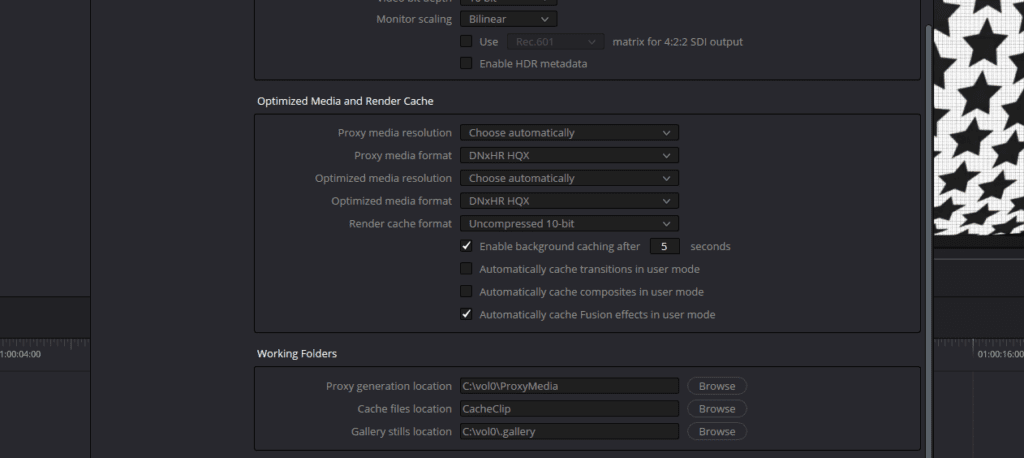
You can also specify the settings for proxy media under DaVinci Resolve > Project Settings > Master Settings > Optimized Media and Render Cache.
As a side note, it’s important to know that when you’re using proxy media or optimized media, you are no longer within the original color space and codec of the file the camera generates. So if you’re using optimized media or proxy media on the color page, you aren’t grading the true version of your footage.
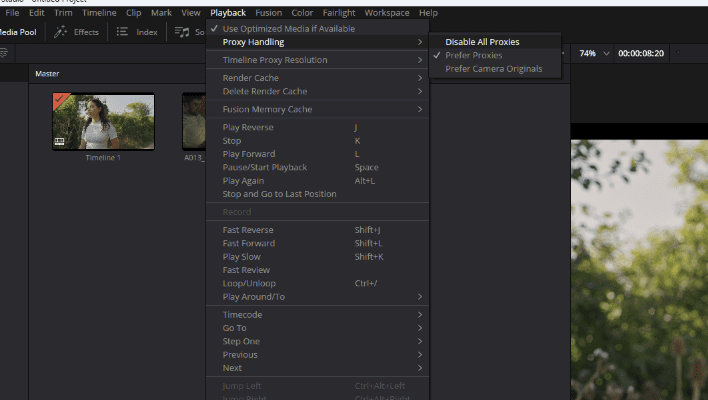
Before you move on to color grading, you should first turn off using optimized media, which you can do in the playback menu by either disabling the proxies or unchecking the Use Optimized Media if Available setting.
Edit even faster in DaVinci Resolve with a Storyblocks subscription
The fine folks at Blackmagic have made DaVinci Resolve one of the standout tools for video editing in 2024. There’s undoubtedly a big reason why YouTube has been inundated with “Why I’m switching to DaVinci Resolve” videos over the last few years. If you’re new to DaVinci Resolve, you can check out our tutorial on the basics and how to export/render your videos.
However, that doesn’t mean it’s all smooth sailing. If you experience laggy performance, following these steps will get you to a completed edit with less of a headache. Looking for more ways you can work faster? Check out our recommended plugins for DaVinci Resolve and top DaVinci Resolve intro templates.
If you want to increase your editing efficiency even further, then DaVinci Resolve templates are an excellent way to save time and increase productivity. You can discover thousands of templates available in the Storyblocks library – sign up today and start downloading!


