Rendering and exporting is the final step of creating your video, but it can be tricky to navigate, especially if you’re new to DaVinci Resolve or have a large project.
While it can be intimidating at first, learning how to render and export your projects is an essential skill that gets easier the more often you do it.
In this post, we’ll cover how to export DaVinci Resolve videos, along with some common issues you might encounter during the render process and how to troubleshoot them.
Table of contents
How to render your video in DaVinci Resolve
Rendering is where DaVinci Resolve processes your project and creates a final, watchable video file. It adds all of your effects, transitions, LUTs, and color grades to the video, according to the settings you’ve chosen.
You can render your timeline quickly by pressing File > Quick Export. DaVinci Resolve will offer a handful of preset export settings you can choose from. Select the one you want, then press Export.
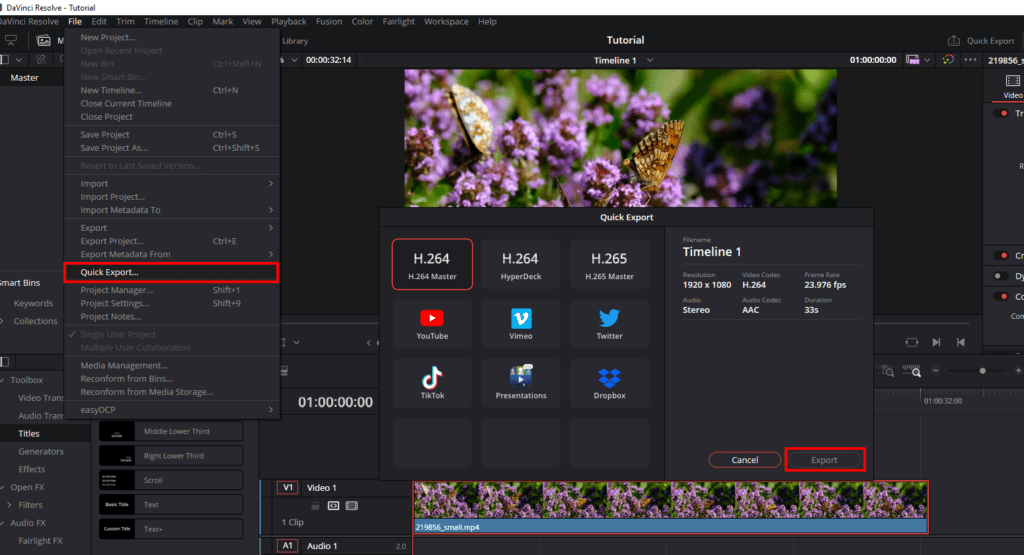
In the next section, we’ll explain how to export your video in more detail, or you can watch the video tutorial below.
Note: In DaVinci Resolve, there’s a difference between the render cache and rendering the timeline. The render cache is a feature that improves playback by pre-rendering parts of your timeline that are computationally intensive. This is useful when your clips have complex effects, transitions, or color grades that your computer struggles to play back.
How to export your video in DaVinci Resolve
Let’s take a quick look at the Deliver tab where exporting takes place in DaVinci Resolve.
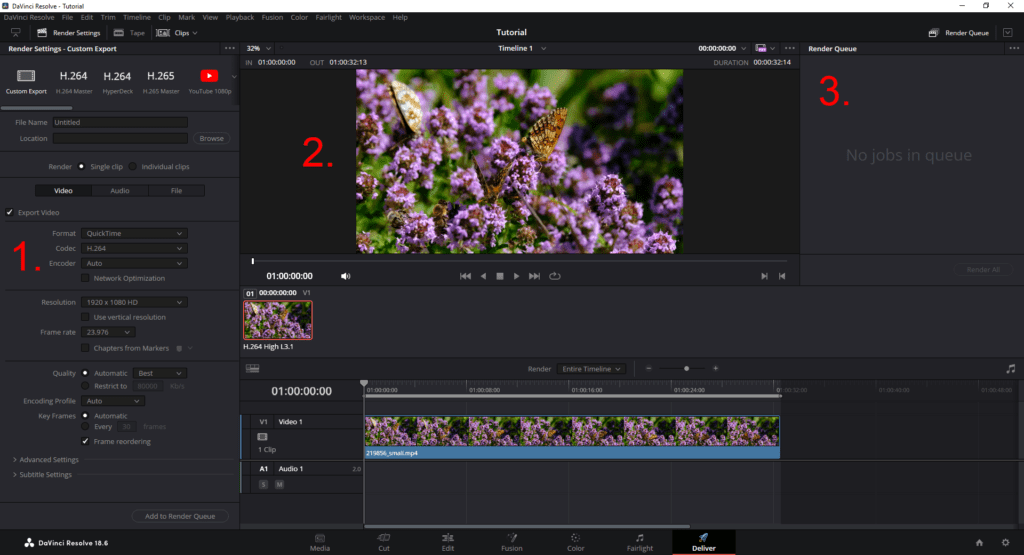
The main parts to pay attention to are:
- Render Settings: In the top-left of the page, you’ll see the Render Settings panel. This is where you set the video format, resolution, file types, and audio settings.
- Preview Window and Timeline: You can move through your Timeline and watch the playback in the Preview Window. While you can’t edit the Timeline on this page, you can add In and Out markers to render specific clips.
- Render Queue: At the top right-hand corner, you’ll see the Render Queue. This panel displays all of the videos you’ve queued up to export.
Now that you know what you’re looking at, here are the 8 steps to export a video file in DaVinci Resolve:
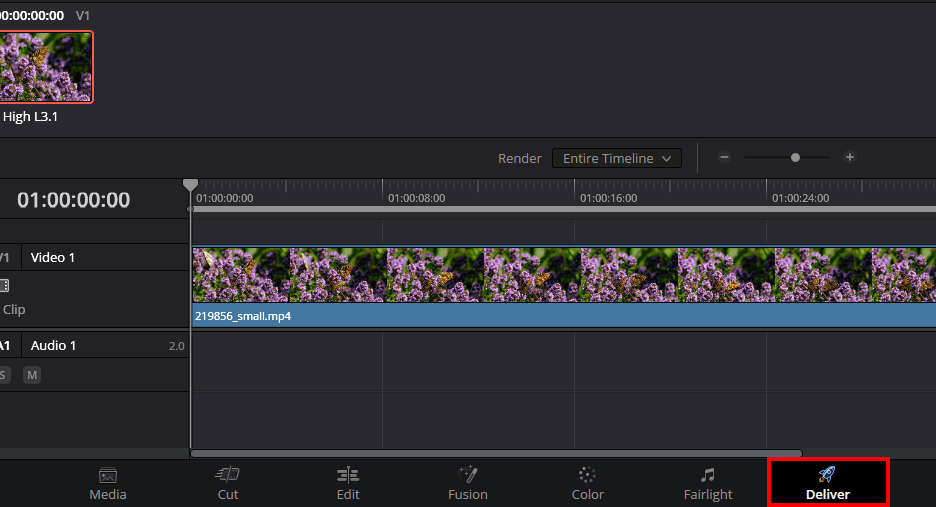
1. Select the Deliver tab
Click Deliver in the bottom panel of the DaVinci Resolve interface.
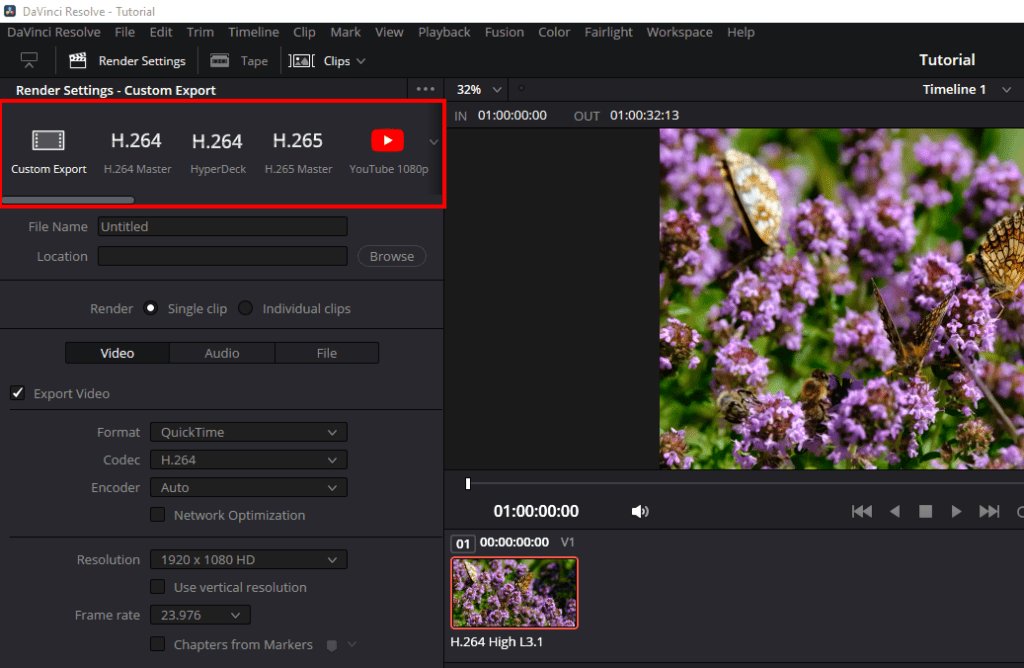
2. Choose a preset or select Custom Export
In the Render Settings panel in the top-left corner, select a preset or press Custom Export to create your own. The presets include a range of export settings that are optimized for different platforms, but you can often get better results by setting your own.
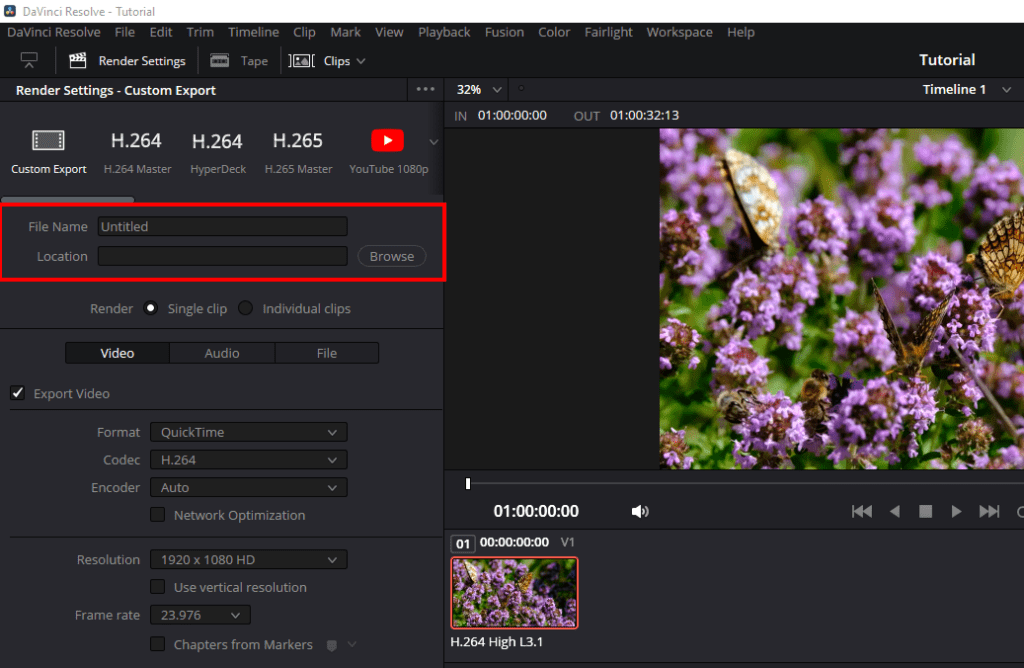
3. Set your filename and destination location
Next, name your filename and choose the folder location where DaVinci Resolve will export your video file.
4. Select your video format and codec
Select the drop-down menu next to Format and Codec and choose your desired settings. This is how to export DaVinci Resolve as MP4, one of the most popular formats.
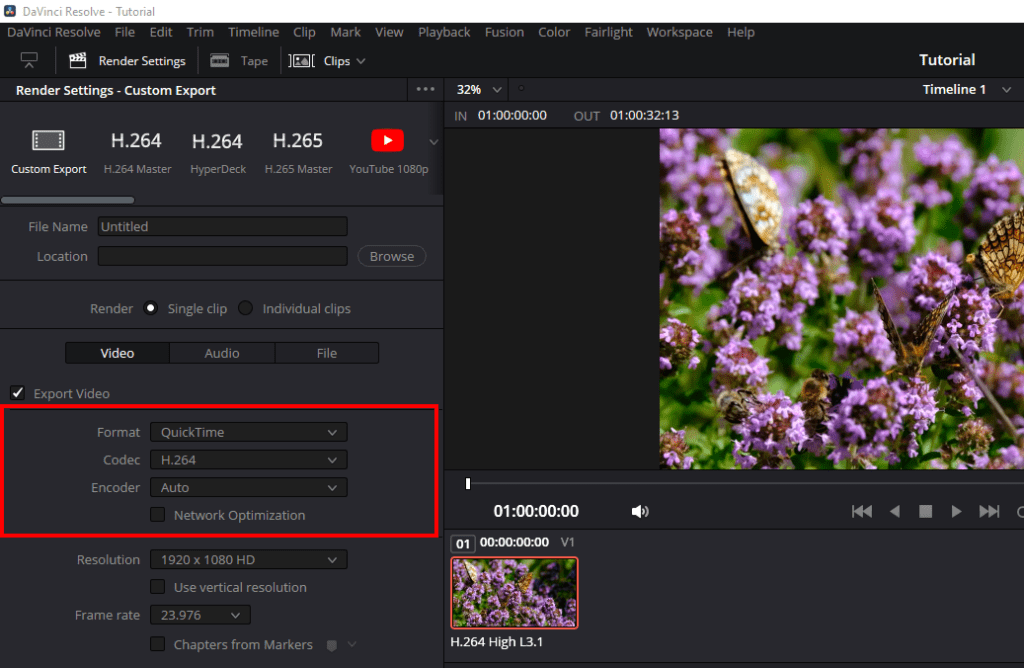
The format is like the container that holds different parts of a video file, like video, audio, and subtitles. The codec determines how Resolve encodes the audio and video streams. Together, they determine the quality and file size of exports, as well as what programs will be able to play the file.
Here’s a quick breakdown of the two most popular video formats:
- MP4: A widely used form that balances quality and file size. Suitable for YouTube, web uploads, and social media. DaVinci Resolve exports MP4 files with the H.264 or H.265 codecs.
- QuickTime: Another popular format developed by Apple and used for high-quality exports. Used with DNxHD/DNxHR and ProRes codecs for high-end productions.
If you’re planning to upload your video to social media or YouTube, we recommend using MP4 or QuickTime with the H.265 codec. If you still aren’t sure which is best for your project, learn more about MP4 vs MOV.
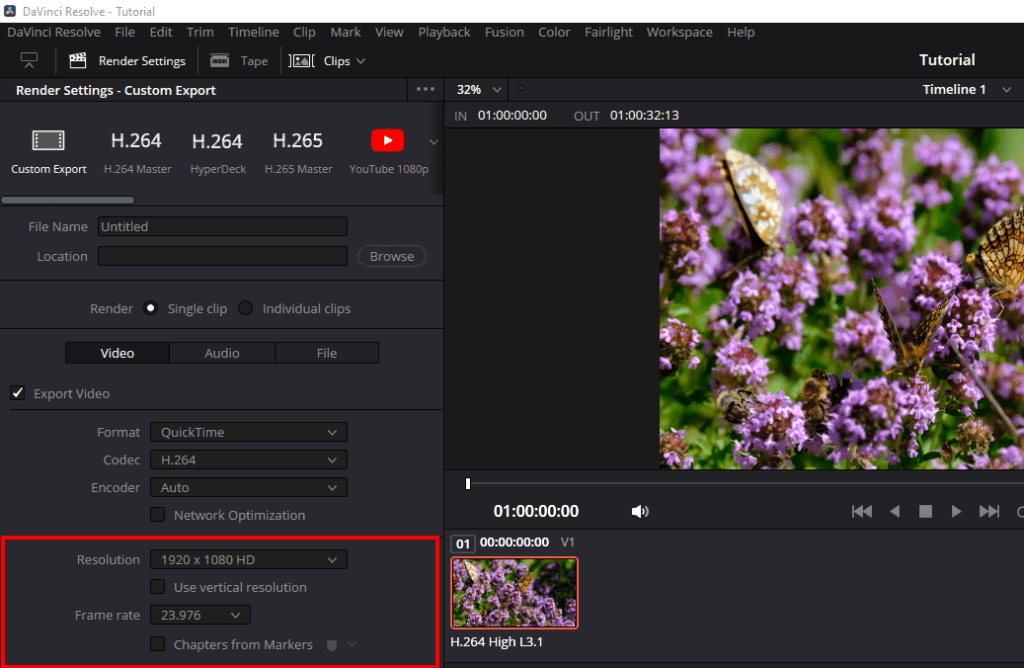
5. Choose your resolution and frame rate
Set your resolution and frame rate according to your timeline settings. If you’re working on 4K footage at 60 fps, your render settings should reflect that. Trying to export footage that’s higher resolution than the footage in your timeline will cause an error to appear.
If you need to check what your timeline settings are, select the Media tab, right-click your timeline, and choose Timeline Settings.
6. Restrict the bitrate
In the Quality section, tick the box next to Restrict to then type in your desired bitrate.
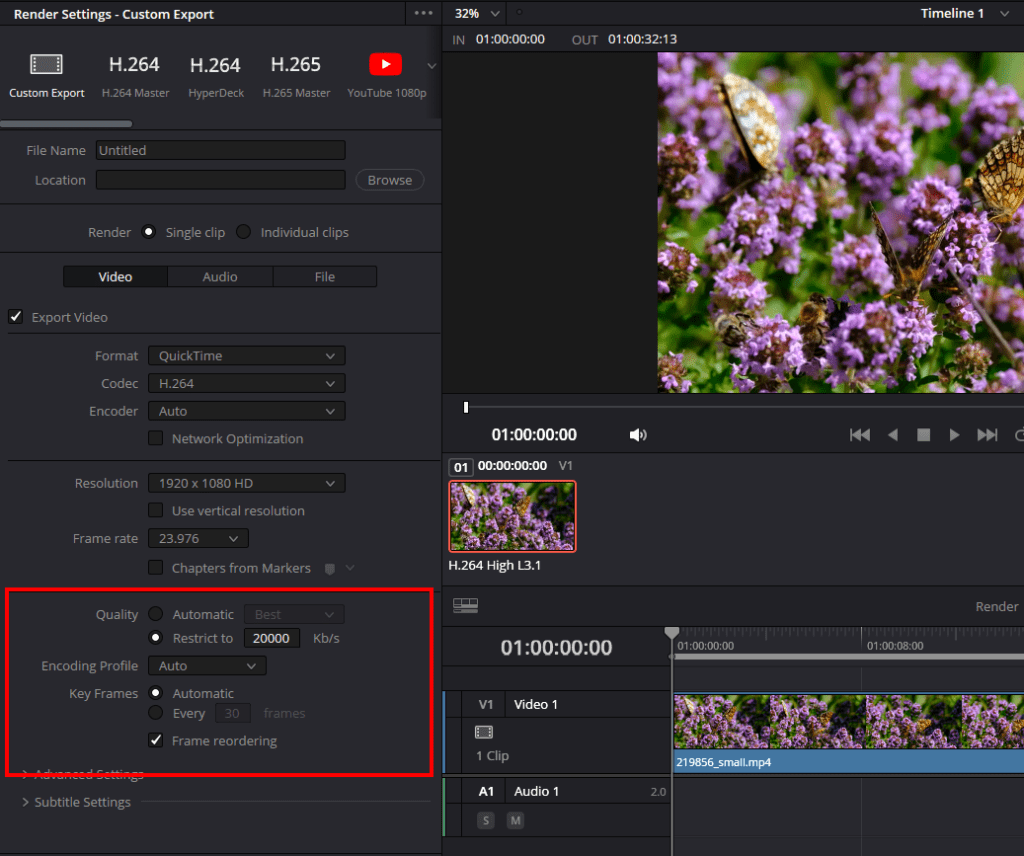
The bitrate is the amount of data transferred every second. The higher the bitrate, the more information is contained in the video. For high-resolution and frame-rate videos, you’ll need a higher bitrate to maintain video quality after export.
Here are YouTube’s recommended video bitrates for standard dynamic range videos:
- 2160p (4K): 35,000–45,000 kb/s for 30 fps and under, 53,000–68,000 kb/s for over 30 fps.
- 1440p (2K): 16,000 kb/s for 30 fps and under, 24,000 kb/s for over 30 fps.
- 1080p: 8,000 kb/s for 30 fps and under, 12,000 kb/s for over 30 fps.
- 720p: 5,000 kb/s for 30 fps and under, 7,500 kb/s for over 30 fps.
If you set a high bitrate, you’ll get a better quality export but the file size might be too large. We recommend playing around with the different options to work out the optimal bitrate for your footage.
7. Add to render queue
Next, scroll down and select Add to Render Queue.

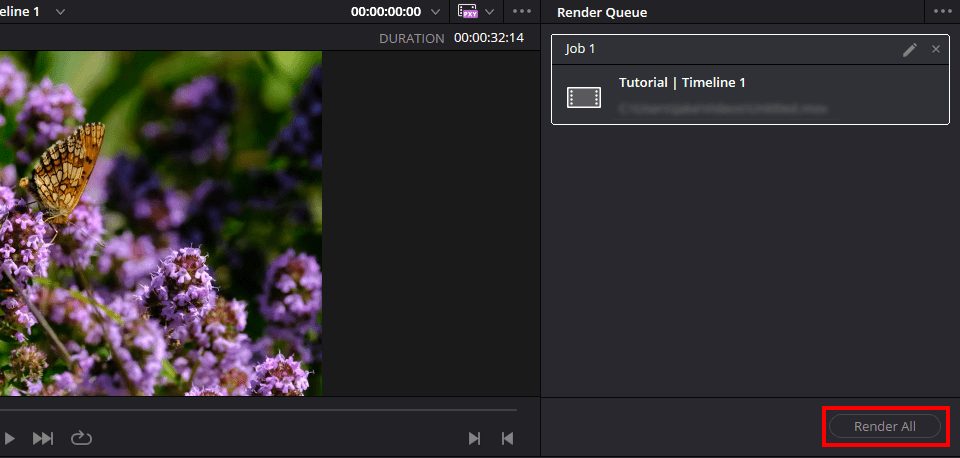
8. Select Render All
Finally, in the Render Queue window, select Render All. After this, DaVinci Resolve will begin to export your file. This may take some time depending on the video length, resolution, and format, but once it finishes, your video is finished! Be sure to watch it back once it finishes rendering to ensure there aren’t any issues.
Troubleshooting render issues in DaVinci Resolve
Here are five of the most common render problems and how to solve them.
The render fails or stops halfway through
The rendering process stopping is one of the most common exporting errors in DaVinci Resolve. It may occur due to corrupted media or the effects and transitions in that part of the timeline.
To fix this problem, note where the render stops and find that place in your timeline. Replace the media and export the project again. If that doesn’t work, try disabling any effects and transitions and then see if the clip will render.
A failed render may also happen when your hard drive has run out of space. Make sure you’ve got plenty of room for the video file you’re exporting, then try again.
The audio and video are out of sync
If you export DaVinci Resolve files and the audio and video are out of sync, there are three common culprits you should look into:
- Corrupt audio clips. To fix corrupt clips, re-import your audio files or convert them to a different format.
- Frame rate mismatches. To avoid mismatches, make sure that your project, timeline, and export settings all have the same framerate. DaVinci cannot handle variable frame rate footage, so you’ll have to convert this type of footage to fixed frame rate using an app like Shutter Encoder.
- Out-of-date software. Update the DaVinci Resolve program and make sure you’re using a compatible codec and audio file format.
Once you’ve made these changes, export a new file and check whether the video and audio are still out of sync. If it is, you could try converting your video files into formats that work better with DaVinci Resolve (like MP4 or MOV). If all else fails, you might be able to fix the sync issue by moving each clip to the left or right, aligning video and audio manually in the timeline.
Render artifacts appear in the final video
Render artifacts can include glitches, color shifts, black screens, and other incorrect problems with the final video. This can occur for several reasons, including temporary bugs and out-of-date graphics card drivers.
To fix it, try changing the render codec or format. Some codecs might be more prone to artifacts if your computer doesn’t have enough processing power. If your computer struggles to run DaVinci, check out our article all about how to make Resolve run faster. Finally, make sure your graphics card is up to date, then try exporting the file again.
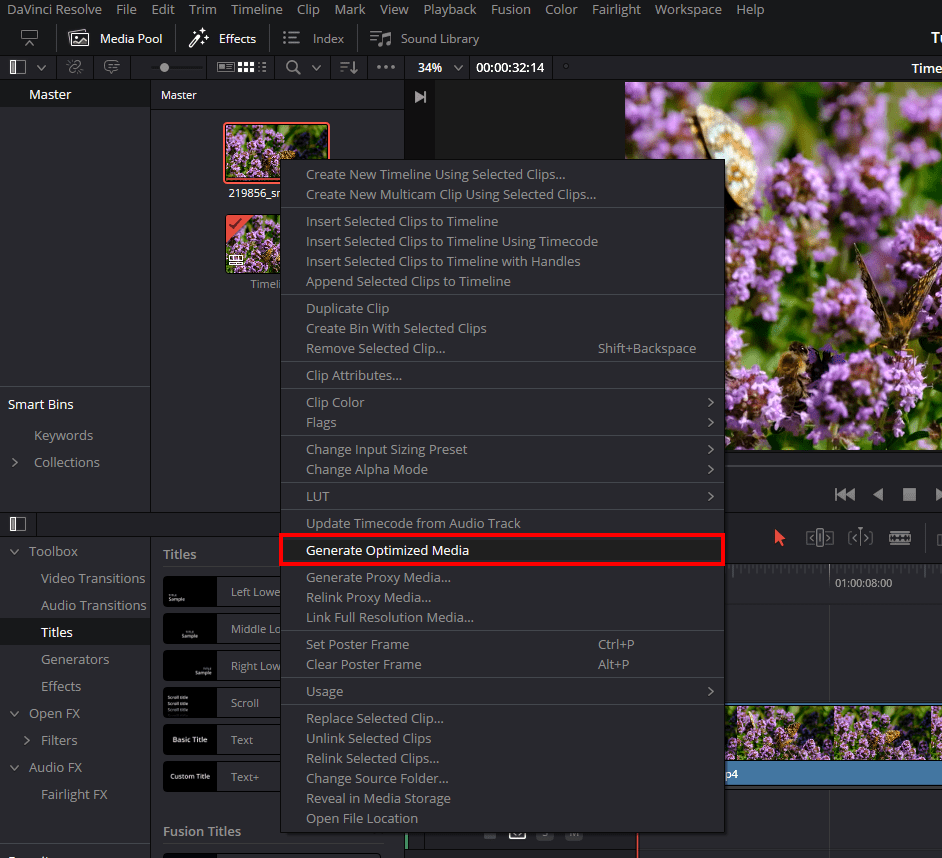
Another possible fix for rendering artifacts is to render using optimized media. Enter the Media or Edit tab, then select your media in the Media Pool. Right-click these files and select Generate Optimized Media. Wait for the files to optimize, then try exporting once again.
There’s no sound in the exported file
This glitch is a frequent error when learning how to render your timeline in DaVinci Resolve. Here are some common causes for your exported file not having sound:
- Missing or incorrect audio tracks
- Incorrect audio output settings
- Incorrect project settings
Double-check that your audio files are correct, then scan your output settings in the Deliver tab. Make sure the audio settings are correct and that you’re using a supported audio codec. Lastly, check your project settings and make sure they match the audio format that you’re trying to export.
The file size is larger than expected
If your rendered file is much larger than you were expecting, it’s a sign that you’ve set the bitrate too high. A higher bitrate generally increases file size, while a lower bitrate will reduce it. Lower the bitrate to something more manageable, like 20,000 kb/s.
Learn how to do even more in DaVinci Resolve
Congratulations! Now that you’ve rendered and exported your video, you’re ready to share it with the rest of the world. Learn how to do even more in DaVinci Resolve with our other articles, including the top intro templates, plugins, keyboard shortcuts, color grading, and more.
Edit faster and create even better videos with unlimited downloads of DaVinci Resolve templates from Storyblocks. One subscription plan gives you all of the 4K and HD royalty-free stock footage, music, sound effects, templates, and more for all of your projects.


