Adding subtitles or captions in DaVinci Resolve helps you reach a larger audience with your videos, including those with hearing impairments. And with 41% of Americans preferring subtitles when watching content online, learning how to add them to your projects is well worth the time.
In this post, we’ll walk you through how to add DaVinci Resolve subtitles with the free and Studio version, along with other options for creating subtitles.
How to add subtitles in DaVinci Resolve
If you have the free version of DaVinci Resolve, you can manually add subtitles to your footage using subtitle tracks. While it’s also possible to add subtitles using the text tool, we don’t recommend it as using subtitle tracks makes the process much simpler, easier, and enjoyable.
If you’re looking for a way to automatically generate subtitles, that’s only available in DaVinci Resolve Studio, the paid version of the software.
Let’s take a closer look.
How to add subtitles manually
Here’s how you can add subtitles in DaVinci Resolve in just six steps:
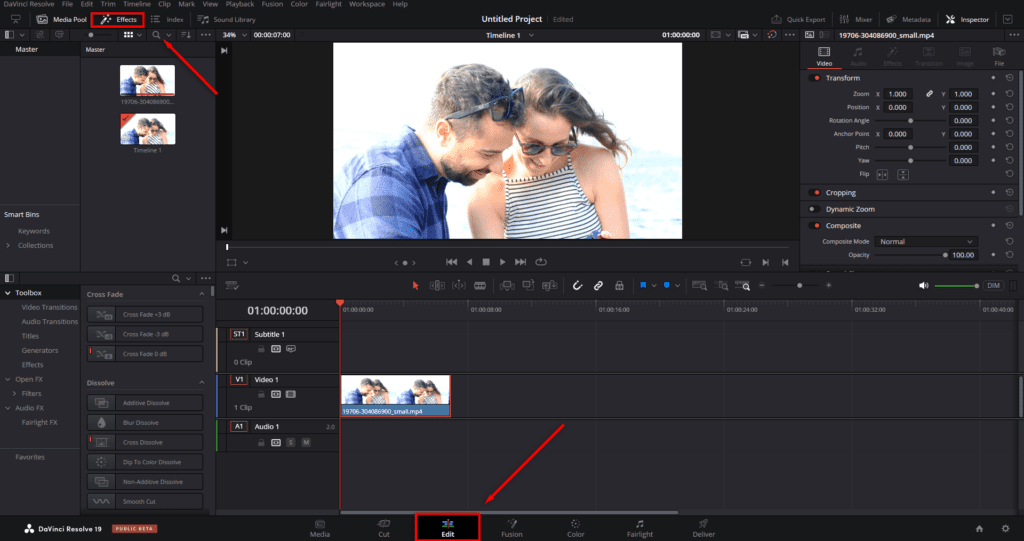
1. Navigate to the Edit workspace
In the Edit workspace, select the Effects tab.
2. Add a subtitle track
From the Effects window, select Titles and then scroll to the bottom of the list. Click and drag Subtitle into the subtitle track just above your timeline.
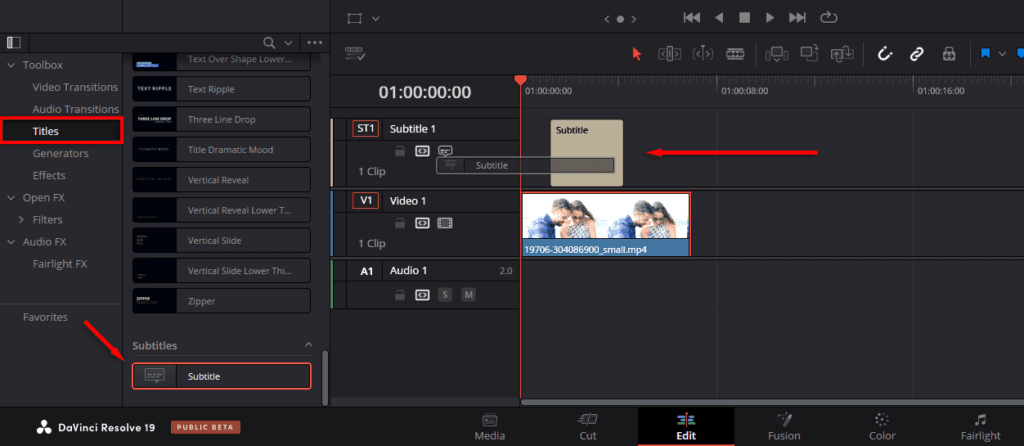
Alternatively, right-click above your Timeline and select Add Subtitle Track. Move your playhead to where you want the subtitle to begin, then right-click the subtitle track and select Add Track.

3. Add your subtitle text
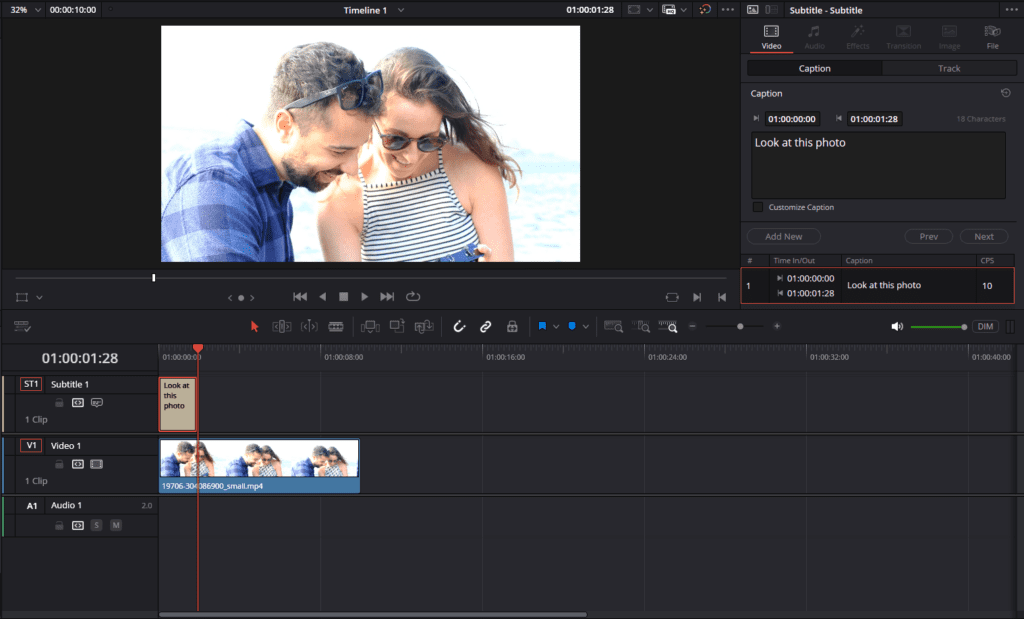
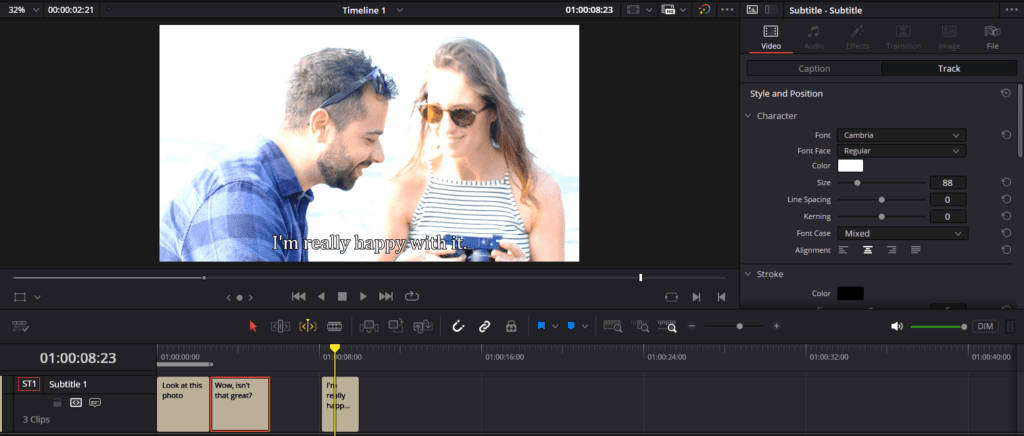
Select the Subtitle, then navigate to the Inspector tab. Under “Caption”, type the dialog that matches your current frame.
4. Adjust the length of your subtitle track
Change the length of the subtitle to sync it with the audio track. To do so, click and drag from the right-hand edge of the subtitle track until it lines up with where the audio begins and ends.

5. Repeat for the rest of your subtitles
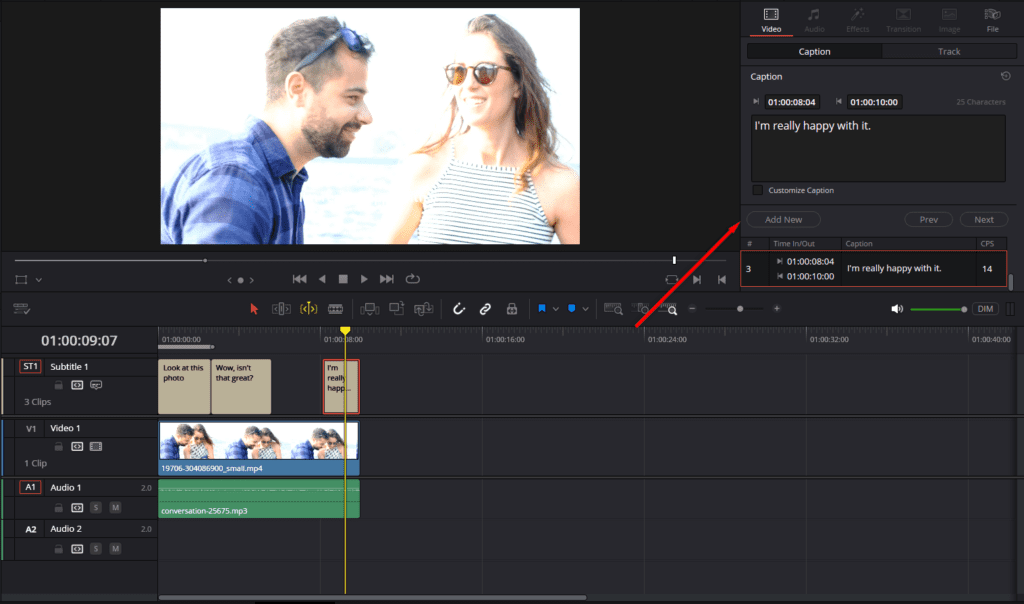
In the Inspector window, select Add New to add another subtitle where your first one finishes. Repeat the steps above until you have manually added subtitles to your entire video.
6. Stylize your subtitles
With your captions included, you can now customize them so that they’re legible and match your desired style. In the Inspector window, select the Track tab. Here, you can change the font, stroke, and position. You can also add effects like background colors or drop shadows to make your subtitles stand out.
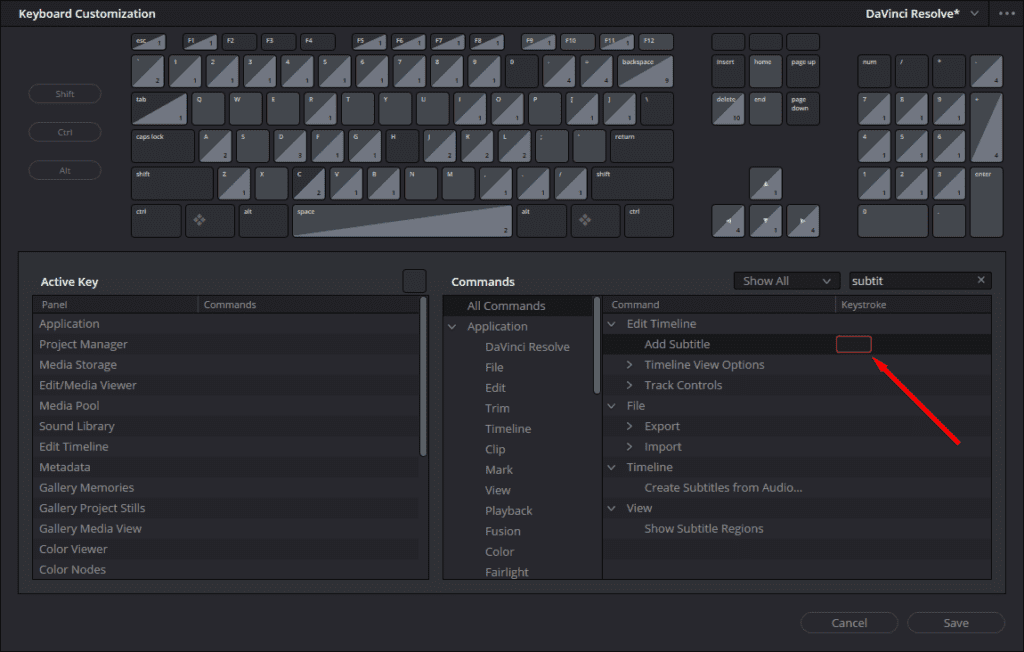
Note: Unfortunately, as of DaVinci Resolve 19, there are no keyboard shortcuts to help with editing subtitles. By default, adding subtitles and switching between them still requires using your mouse.
However, you can add your DaVinci Resolve “add subtitles” keyboard shortcut for adding by pressing Ctrl + Alt + K, finding the “Add Subtitle” option, and adding a custom keystroke.
How to create subtitles from audio automatically (Studio exclusive)
If you own the Studio version of DaVinci Resolve, you can use the automatic subtitle generation feature. This feature uses voice recognition technology to automatically process your audio and create subtitles, saving you a ton of time.
1. Create your subtitles
Select the Timeline drop-down menu and choose Create Subtitles from Audio. In the pop-up window, choose your Language, Caption Preset, and the maximum number of characters that appear per line. Press Create then wait for the process to complete. Depending on your system, this could take anywhere from a few seconds to multiple minutes.
2. Stylize your subtitles
Select your subtitle track, then choose the Inspector panel. Customize your font, outlines, and effects until you achieve the look you want for your subtitles.
Third-party options for creating auto-captions or subtitles
As of writing this article, the best DaVinci Resolve plugin available for creating automatic subtitles in DaVinci Resolve is an extension from Simon Says. It can automatically transcribe your clips and color code them per speaker, allowing you to add the transcript as subtitles or captions.
This free DaVinci Resolve auto-caption extension is available for Mac and Windows. However, it’s only available for DaVinci Resolve on Mac—Windows users will require Resolve Studio. As of writing this article, there aren’t any plugins for auto-captions that work with the free version on Windows.
To use the Simon Says extension, you’ll first need to download it from the official website and install it on your PC. Once installed, press Workspace > Scripts > Simon Says. Choose 2 Subtitle-Caption Timeline and wait for the project file to export. Finally, select Transcribe, wait for the transcription to complete, and then drag it into your Subtitle Track.

Alternatively, you can use third-party software to generate an SRT subtitle file and then import that file into Resolve. Once you have the file, it’s as simple as dropping it into your timeline panel. It will automatically become a subtitle track.
Final thoughts
Manually adding subtitles to DaVinci Resolve videos can be a time-consuming process, so it’s worth exploring third-party options or considering upgrading to the paid version. Learn how to do even more in Resolve with our in-depth tutorials—find out everything from the basics of how to use DaVinci to in-depth color grading tips.
Create even faster in DaVinci Resolve with thousands of pre-made, customizable templates available in the Storyblocks library. A subscription gives you unlimited downloads of royalty-free stock templates, footage, music, sound effects, and more. Explore our plan options and sign up today to start downloading instantly.


