Table of contents
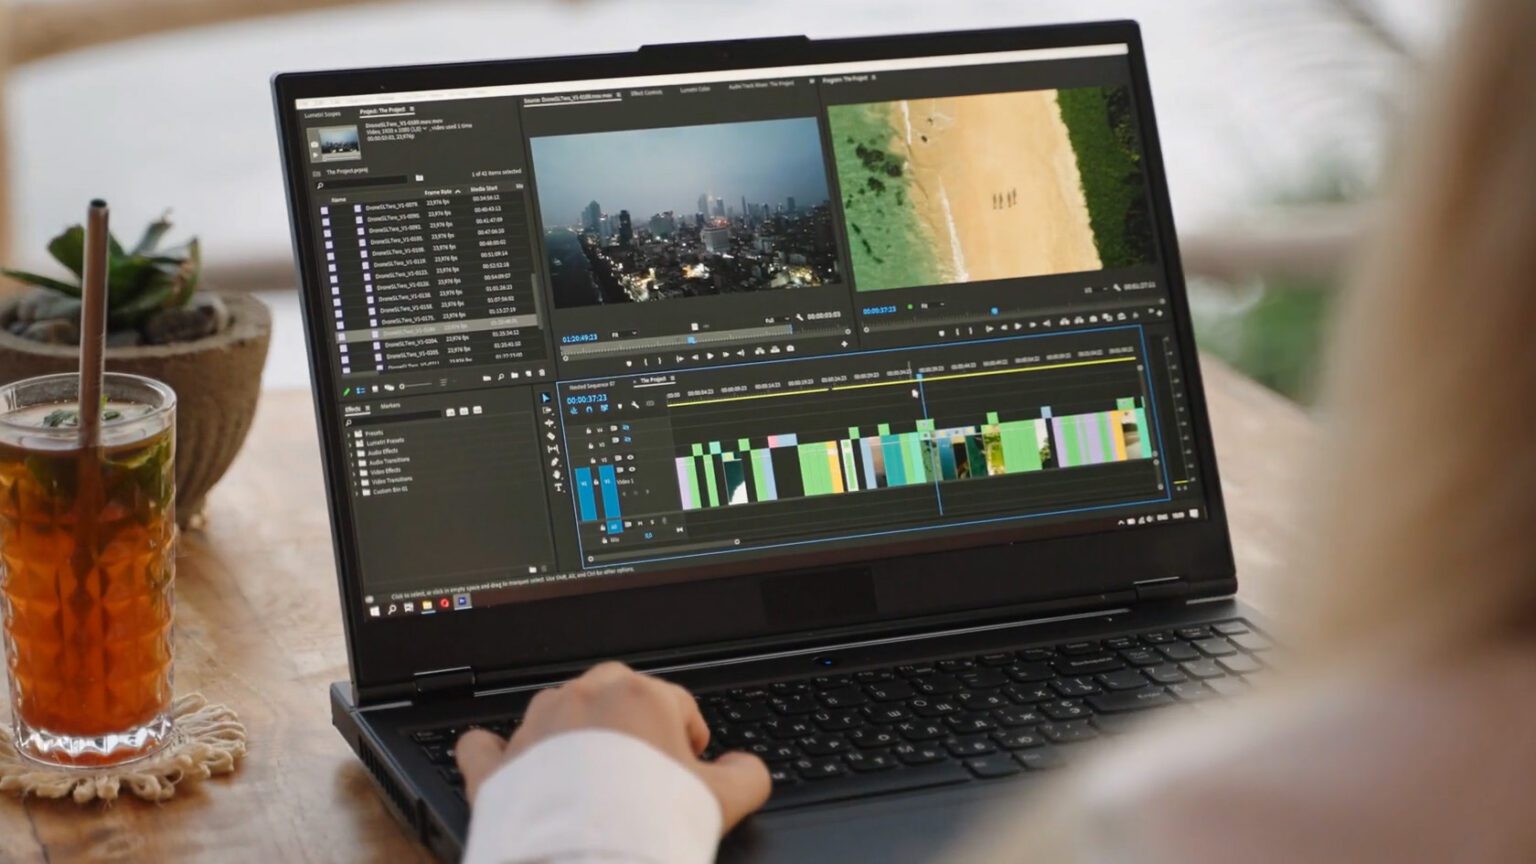
Anyone who’s used Premiere Pro knows it can be a bit sluggish at times. Whether it’s the playback stuttering or the whole interface dragging, there are a bunch of reasons why Premiere Pro might be lagging. Luckily, there are a few quick and easy solutions that can make your video editing experience much smoother.
We’ve put together a list of solutions that come straight from Adobe’s own resources and experienced users on the community forums. Keep reading to find out how you can make Premiere Pro run faster in no time at all.
Check your setup
Premiere Pro needs a fairly powerful machine to run smoothly. One of the most common reasons for Premiere Pro lagging is that your computer doesn’t have the required system specifications to run the application.
Before you try any fixes, take a look at Adobe’s recommended system requirements (there’s a page for both Windows and macOS). Compare your computer’s specifications with the recommended ones to see whether your PC is up to scratch.
For Windows, Adobe recommends:
- An Intel 11th Generation or AMD Ryzen 3000 CPU (or newer)
- 16 GB RAM for HD and 32 GB for 4K
- 4 GB of GPU memory for HD and 6 GB for 4K and higher
- Windows 10 or Windows 11
For macOS, the recommended specs are:
- An Apple Silicon M1 processor (or newer)
- 16 GB of Apple silicon unified memory
- macOS Monterey (or newer)
Note: These are the recommended requirements for editing in HD, 4K, and higher resolutions. Follow the link above to read about the minimum requirements for editing in HD.
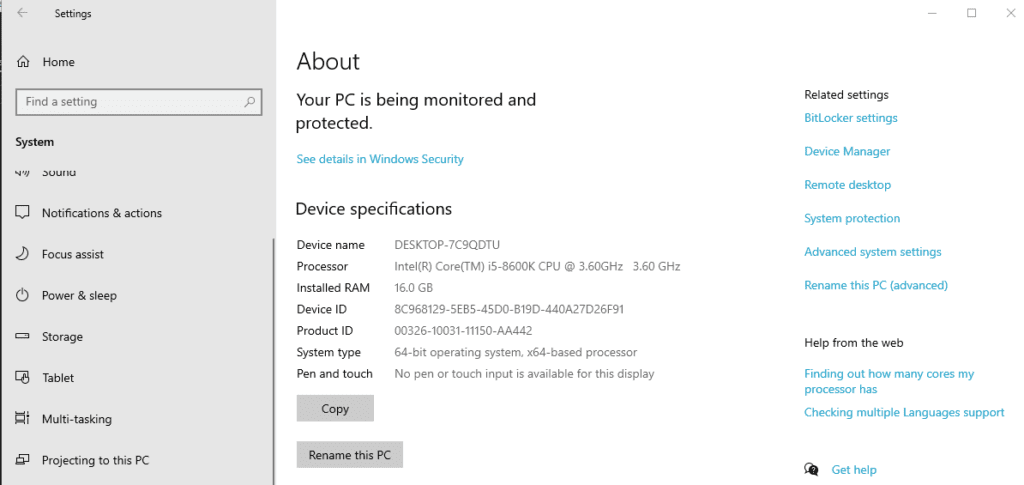
To check your computer’s specs on a Windows PC
Press the Windows Key + I to open Settings. Select System > About and check the Device specifications section to see your computer’s specs.
To check on a macOS device
Select the Apple Menu > System Settings. Choose General in the sidebar, then press About. Finally, click System Report and scan your computer’s specs.

If your computer doesn’t match these specs, it might be time for an upgrade. But it’s still worth trying the solutions we’ve listed below, as they might help you speed up Premiere Pro just enough to work.
How to speed Premiere Pro up quickly
If you need to stop Premiere Pro lagging quickly, we’ve got you covered. Here are three quick and easy ways to improve Premiere’s performance.
1. Use a lower playback resolution
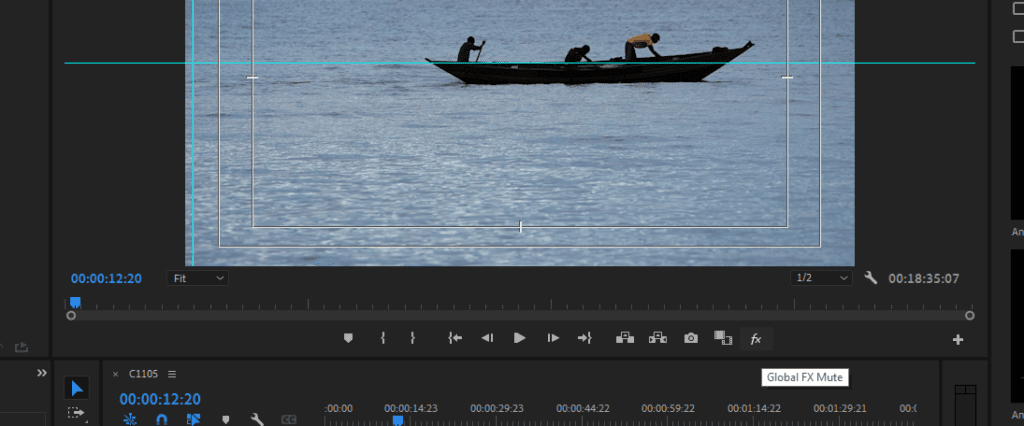
The easiest way to fix choppy playback in Premiere Pro is to lower the playback resolution. Once done, the Program Monitor will display your video with a fraction of its original resolution. This means Premiere will need less processing power to play the video, speeding up playback.
To change the playback resolution, select the drop-down menu in the bottom-right corner of the Program Monitor, then choose either 1/2, 1/4, or 1/8. Whenever you want to see a higher-resolution preview, just revert the setting to full resolution.
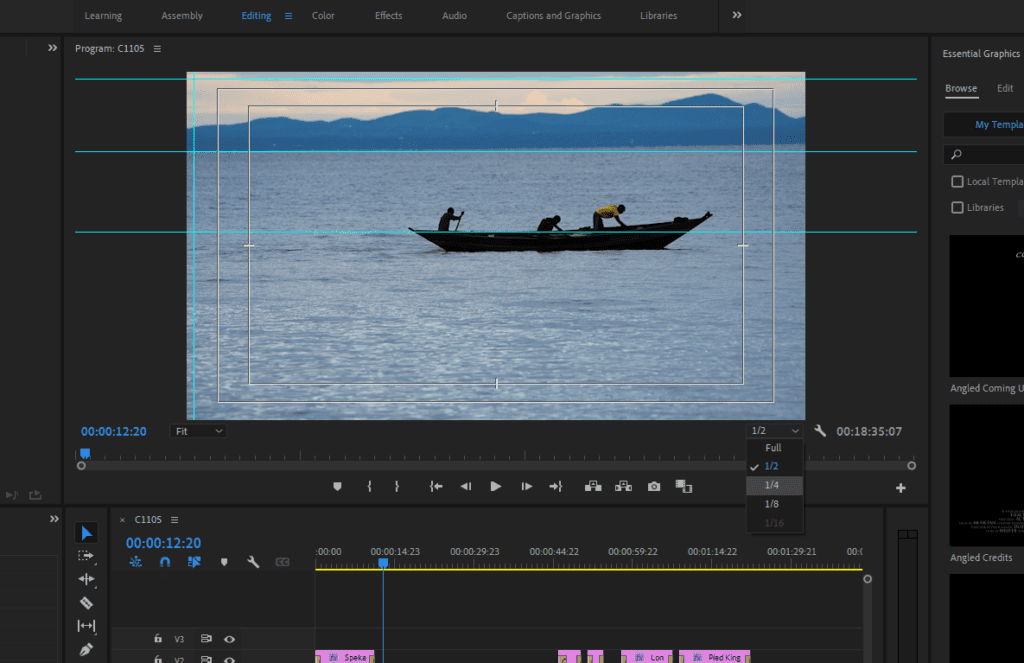
Keep in mind that changing the playback resolution won’t affect the resolution of your exported media, it just changes the Program Monitor.
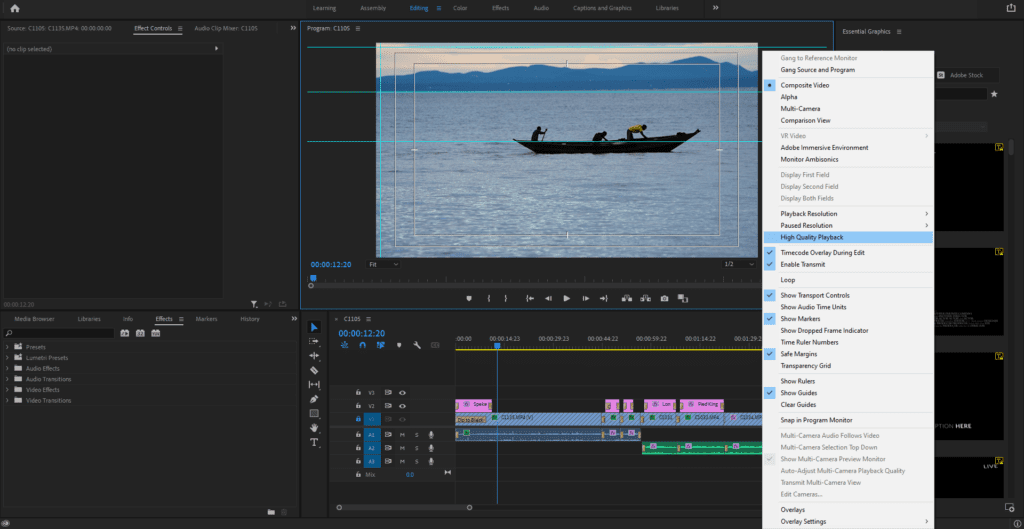
To speed up playback further, you can also disable high-quality playback. In the Program Monitor, select the Wrench icon and uncheck High-Quality Playback.
2. Enable GPU acceleration
GPU acceleration lets Premiere Pro spread out a lot of processing power to your graphics card, rather than leaving it all to your CPU. In addition to speeding up playback, it also helps display certain effects in real-time, without needing to render them first.
To enable GPU acceleration, press File > Project Settings. Select the drop-down menu next to Renderer and choose Mercury Playback Engine GPU Acceleration (OpenCL/CUDA/Metal).
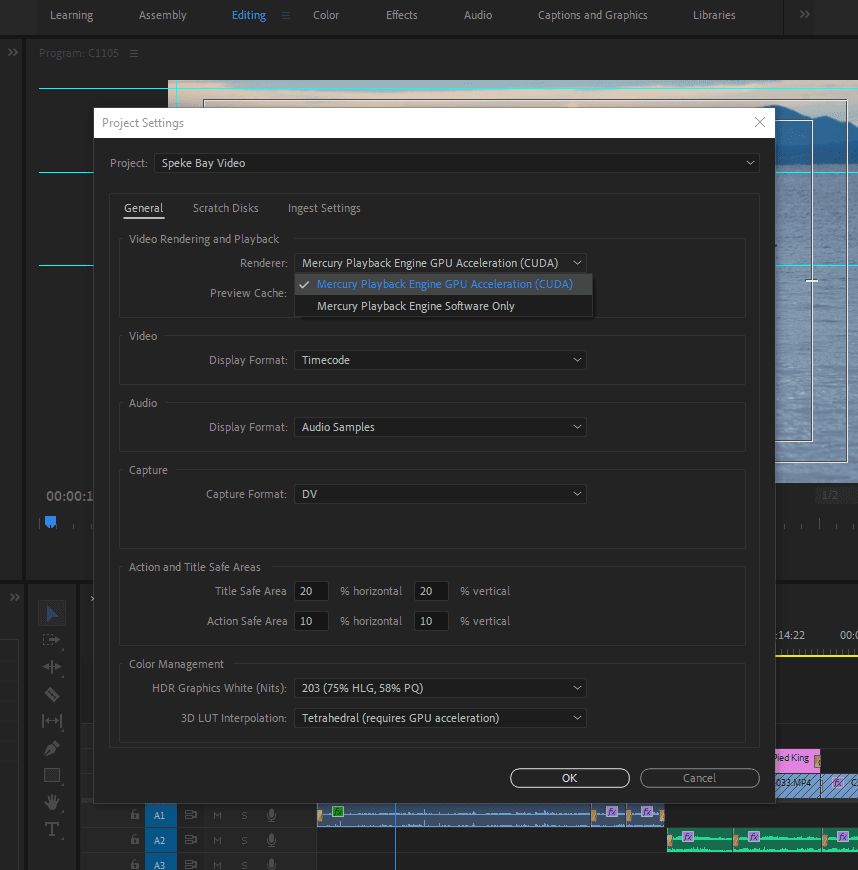
Note: To use GPU acceleration, you must have NVIDIA drivers that support CUDA 9.2 (or newer). This also means you need a GPU with at least 4GB of VRAM for 1080p and 6GB for 4K. For more info regarding GPU acceleration and Premiere’s required system specs, check out Adobe’s GPU acceleration and hardware page.
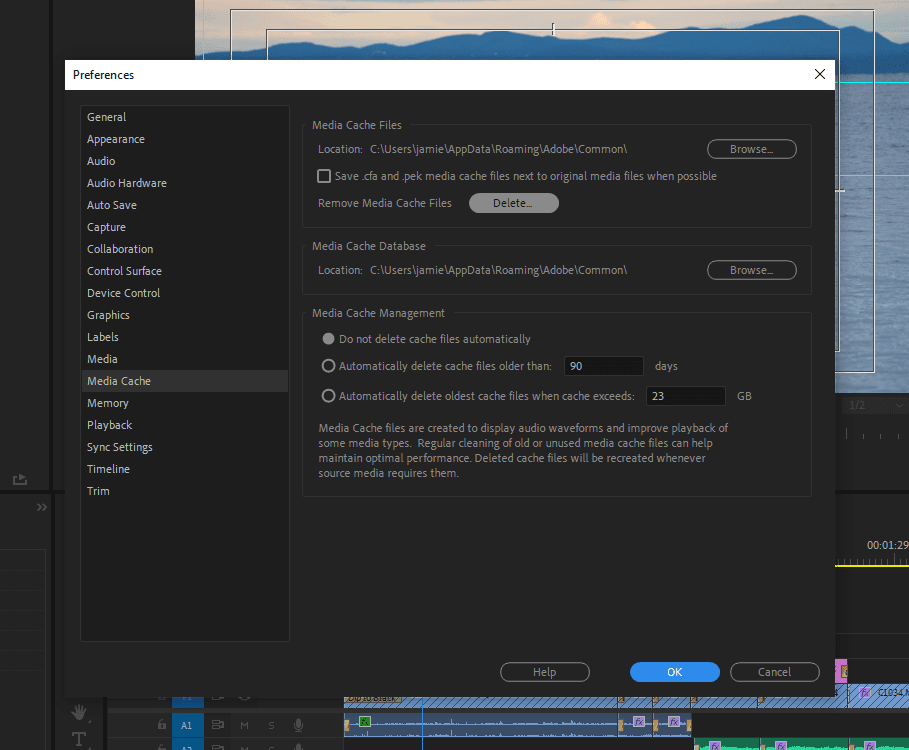
3. Delete and manage media cache files
When was the last time you cleaned out your media cache? Cached files can become corrupted, leading to increasing performance issues over time. To fix this, all you need to do is delete the cached media files. To do so, press Edit > Preferences and choose Media Cache. Under, “Media Cache Files,” select Delete Unused.
Another cache-related trick that can improve performance is saving your media cache files to a secondary drive. This is especially useful for older, slower hard drives, as it means Premiere Pro can access files from multiple drives simultaneously (rather than trying to get it all from a single drive, which can cause bottlenecks).
To change the location of your cached files, head to Edit > Preferences > Media Cache. Under “Media Cache Files,” select Browse and choose the new folder location. Do the same for the “Media Cache Database.”
How to set up Premiere Pro for speed
Optimizing your settings and workflow is the most effective way to stop Premiere Pro running slow. First, let’s take a look at how you can change your settings to improve performance.
Managing files that tend to grow in size
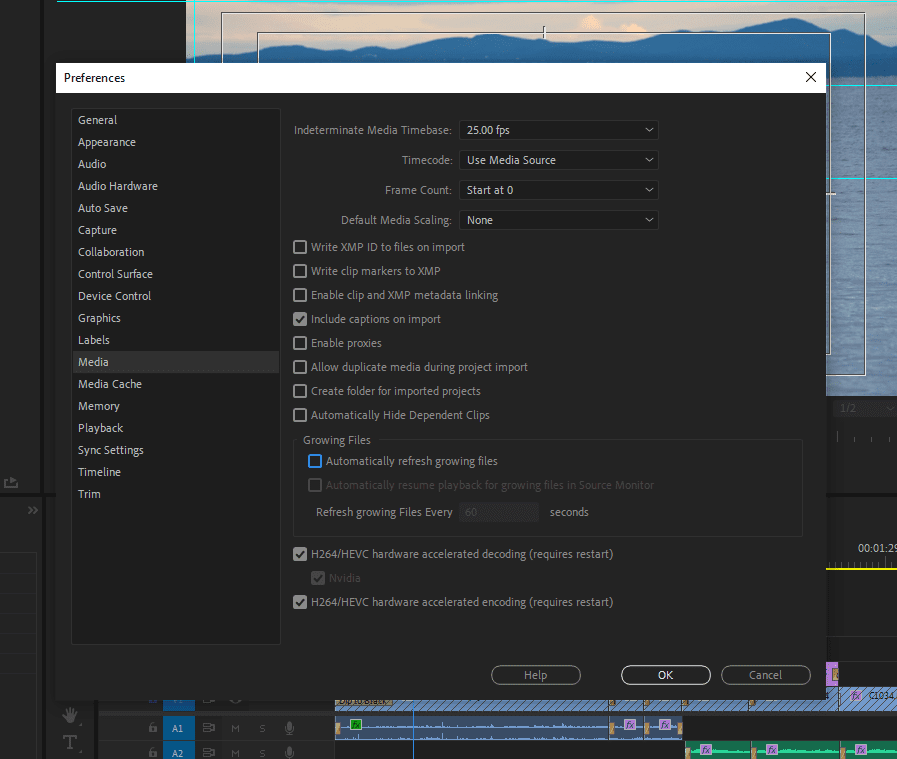
When broadcasting live footage, the media file is constantly growing as you record. Premiere Pro lets you access these files as they grow so you can start cutting together that footage before the broadcast is over.
To help manage this, Premiere Pro has a setting that automatically refreshes the growing files to preview newly recorded footage. But if you’re not editing growing files, this setting can cause performance issues.
To turn it off, head to Edit > Preferences > Media. Scroll down and untick the checkbox beside “Automatically refresh growing files.”
How to optimize rendering
To help it run faster, Premiere Pro lets you optimize rendering for performance or memory. Optimizing for performance is generally the better setting, as it ensures that your computer’s hardware is being used to its maximum potential.
To tell Premiere Pro to optimize for performance, hit Edit > Preferences > Memory. Then, select the “Optimize Rendering” drop-down box and choose Performance.
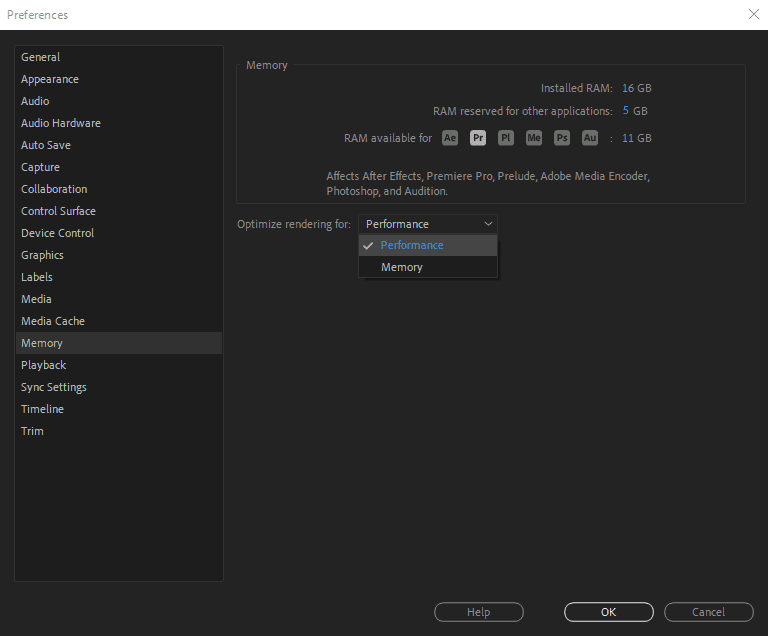
However, it’s important to note that every system is different and you may need to experiment with this setting. By optimizing for memory, Premiere Pro will be more conservative in its use of system resources.
You should optimize for memory if you’re experiencing low memory warnings, or you have an older, less powerful PC. In these cases, you’ll get a more stable, albeit slower, editing experience.
Disable auto-save
Autosaves are useful if you’re prone to forgetting to save your projects as you edit. But they can also cause performance issues – especially if Premiere Pro starts updating the software in the middle of some intensive work. Autosave has caused many untimely Premiere crashes, as many people have unfortunately found out (myself included).
To turn off the autosave feature, head to Edit > Preferences > Auto Save. Then untick the checkbox next to “Automatically save projects.” And don’t forget to use keyboard shortcuts (like Ctrl + S or Cmd + S for saving your project) that can speed things up a bit.
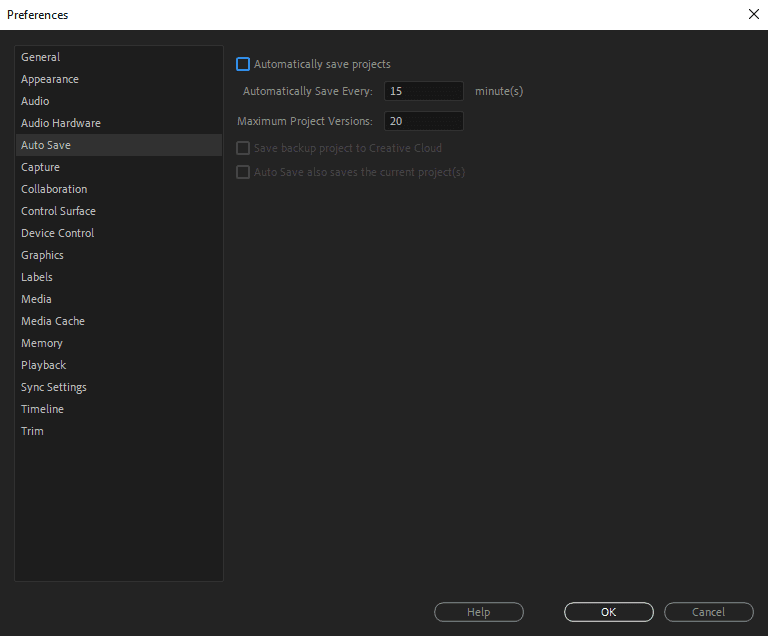
Note: Keep in mind that by turning off Auto Save, you risk losing your progress if something else goes wrong and you forgot to save manually. For more powerful systems, the autosave feature works well and rarely causes problems.
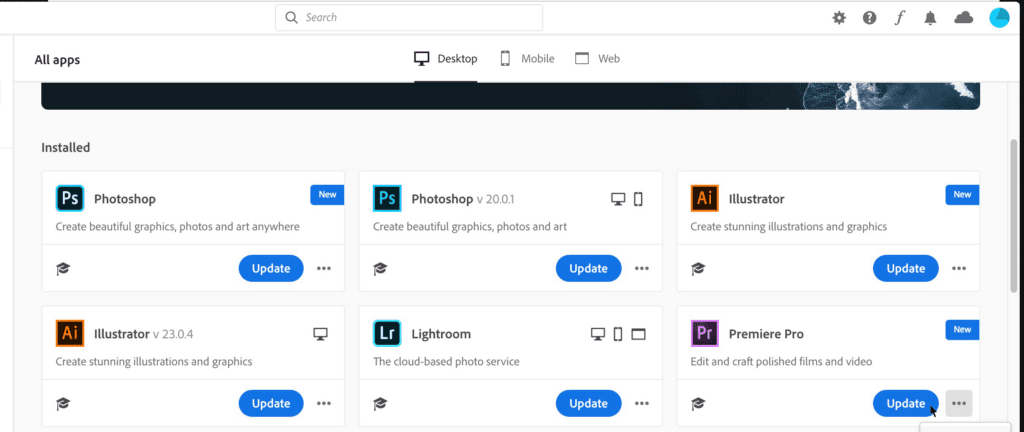
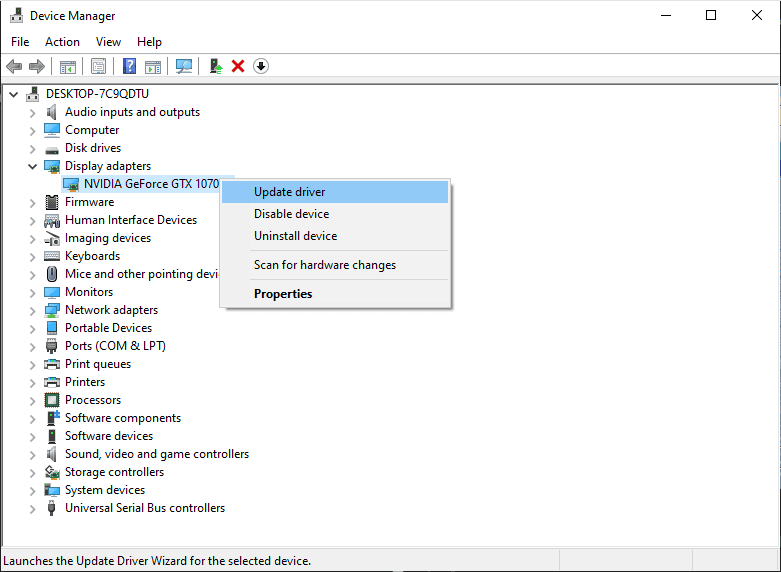
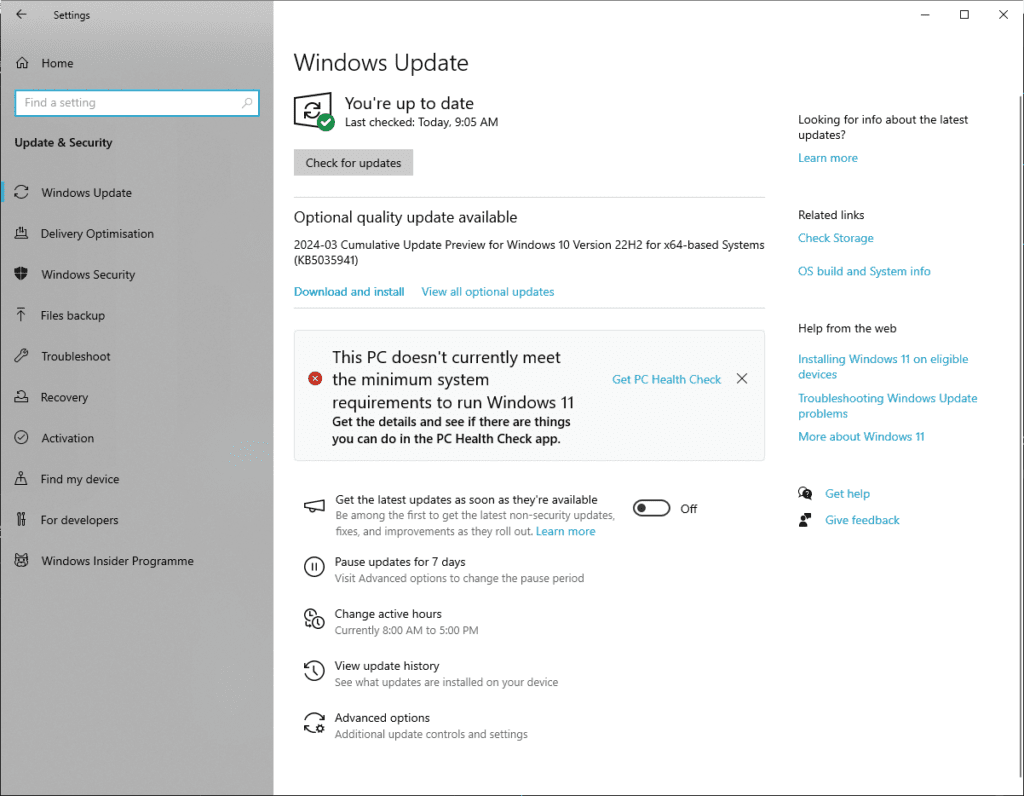
Keep your software up to date
If you’ve been putting off updating Premiere, now’s the time to finally do it. Software and driver updates often include bug fixes, patches, and performance improvements. If Premiere Pro is lagging or acting buggy, check for updates for Premiere Pro itself, as well as your operating system and graphics card drivers.
To update Premiere Pro: Open Creative Cloud, find Premiere Pro and select Update (if the option is available).
To update your graphics card drivers: Open the Start Menu and search for “Device Manager.” Select Device Manager, then double-click Display adapters. Right-click your GPU and select Update Driver, then choose Search automatically for drivers.
Note: On a Mac, there’s no way to manually install graphics drivers – they’ll be automatically installed alongside routine system updates.
To update your operating system: On Windows, press the Windows key + I to open Settings. Select Update & Security, then press Check for updates. If any are available, download them and follow the on-screen instructions.
To update a Mac, select the Apple Menu and choose System Settings > General. Press Software Update then Update (if available).
Note: It’s never a good idea to update Premiere Pro during an edit. Occasionally, the update will introduce errors or compatibility issues that can bring your project to a halt. Instead, wait until completing your current projects before updating.
Enhance your workflow
Now that you’re using the best settings to help Premiere Pro run faster, let’s take a look at how you can improve your workflow to prevent bottlenecks and create content fast.
When to use video effects and when to turn them off
Turning off or temporarily disabling video effects can help prevent choppy playback in Premiere Pro. This can be useful if you’re experiencing stuttering but don’t want to remove effects from your clips.
The easiest way to turn effects off is by using the Global FX Mute setting. This is a button that says “fx,” located in the Program Monitor’s toolbar just below the preview video.
If you can’t find the Global FX Mute button, you can add it by pressing the Plus icon (in the Program Monitor’s toolbar) and then dragging and dropping the Global FX Mute button into the Program Monitor’s toolbar.
How to edit with proxy files
Proxy files are lower-resolution versions of your footage. By editing these instead of your full-resolution files, you can get far smoother playback. This is especially useful for high-resolution, high-bitrate footage that takes a lot of processing power to render.
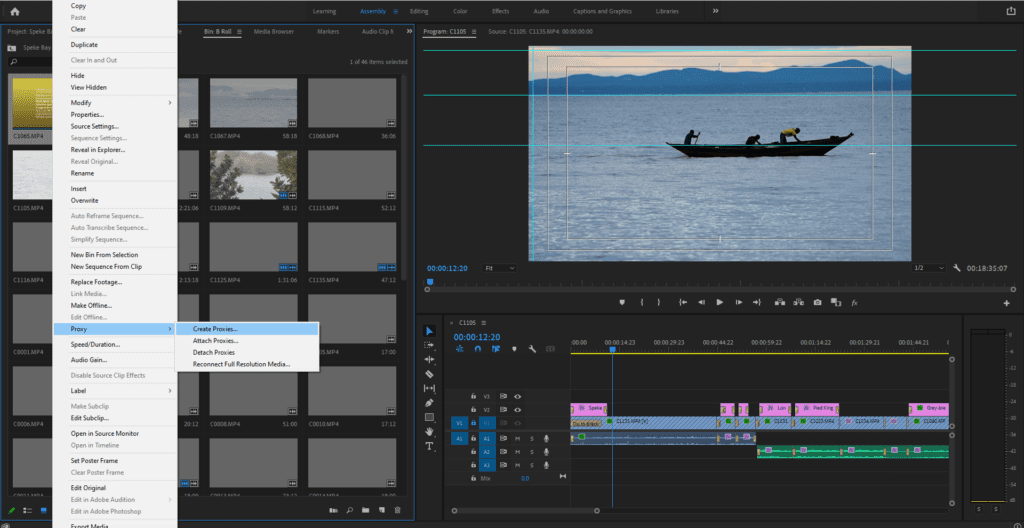
To use proxy files, you need to right-click your video files in the Project panel and select Proxy > Create Proxies. This will open the Media Encoder and give you the options for proxy presets. Once created, they’ll link up to your original clips but let you edit using the lower-resolution files.
How to avoid compressed codecs
Compressed codecs reduce the amount of space that video files take up on your hard drive. This is great when you want to upload footage, but they’re much harder to edit because Premiere has to decompress them before playing them back.
Formats like Apple ProRes, Avid DNxHD/DNxHR, or uncompressed RAW formats take up more space on your hard drive but are much friendlier to your editing workflow. However, you can avoid this problem altogether by using proxy files.
Using render and replace
Clips with multiple effects, color grading, or dynamic links to After Effects compositions can make Premiere Pro slow down. You can speed things up by replacing these sequences with pre-rendered video files that are much easier for Premiere Pro to handle.
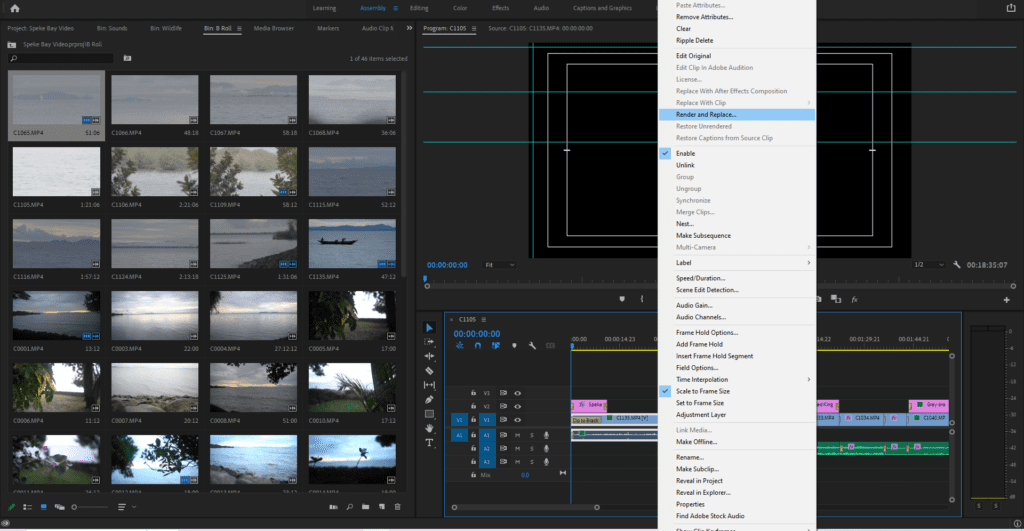
To use this technique, right-click your effects-heavy clips in the timeline and select Render and Replace.
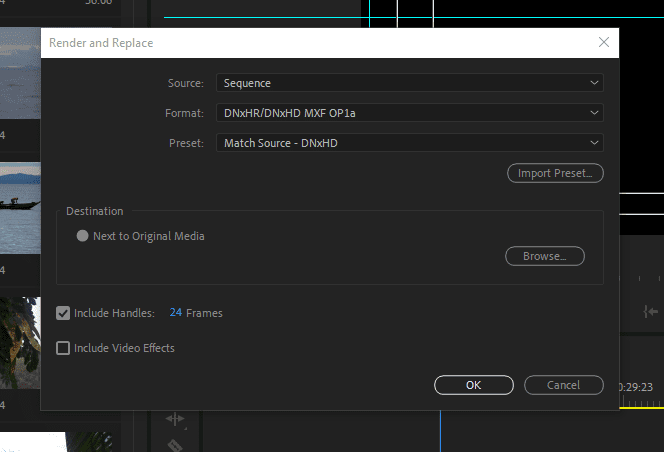
This will open a dialog box where you can choose the format and video settings for your rendered file. Make sure these line up with your project requirements, then press OK. Premiere will render the clips into a standalone video file and swap them out in the timeline.
Bonus tips to speed up Premiere Pro
Here are some additional tips on how to make Premiere Pro run faster:
- Render your previews. Unlike Final Cut Pro which uses background rendering, Premiere Pro requires manual rendering. You can pre-render your timeline by right-clicking a track and selecting Render In to Out. This will provide smoother playback for sections that are sluggish.
- Close other applications. Having other programs open means Premiere has to share CPU with them. By closing all unused applications on your PC, you free up more processing power for Premiere Pro.
- Use fast storage media. The faster your hard drives, the better. For performance and efficiency, high-speed NVMe solid-state drives (SSDs) are a good choice.
- Disable media tracks when not in use. If you’re not using all of the audio and video tracks in your sequence, disable them to free up some processing power. To do this, right-click the track header and select Disable.
Speed up your Premiere Pro workflow even more
Improving Premiere Pro’s performance can help you get projects completed quicker and with less frustration. By making sure your computer’s specs are up to speed and tweaking a few key settings within Premiere, you can easily reduce lag and smooth out playback.
You can speed up your editing workflow even more by using Storyblocks’ extensive library of royalty-free stock footage, Adobe Premiere Pro templates, music, and more. Not to mention the Storyblocks plugin for Adobe Creative Cloud, which brings our library right into Premiere Pro to help you stay focused and work faster. Pick a plan that meets your creative needs and start making high-quality videos in no time at all.