Subtitles and captions have become an essential part of creating content online, and many social media platforms now offer auto-caption features. If you’re not including captions or subtitles in your videos, you could be limiting your reach and growth potential.
In this post, we’ll explain how to add subtitles in Premiere Pro, helping you create more engaging and accessible content for your online audiences.
Why should you include subtitles or captions in your videos?
Subtitles are becoming far more popular, especially on social media. According to Preply, up to 41% of Americans prefer subtitles when watching content online. This social media trend is even higher for younger generations, with 70% of Gen Z and 54% of millennials preferring subtitles.
Captions give you the ability to understand what’s happening in a video without needing to turn your volume up. This means you can follow along in noisy environments or public places where you can’t have your volume on.
Captions also make your videos more accessible to people with hearing impairments or auditory processing disorders. Subtitles can open up your videos to those from different countries and those who can read a language, but not understand it when it’s spoken.
This is one of the major benefits of creating a video podcast rather than using an audio-only medium, as it opens your content up to a broader audience.
How do captions and subtitles differ?
Subtitles and captions both display text on-screen to help viewers understand what’s happening in a clip. Here’s the difference:
- Subtitles: Creators use subtitles to translate videos into various languages, showing all of a video’s dialog as text along the bottom of the screen. They generally only include spoken dialog and not other sounds or noises.
- Captions: Captions show a much broader range of important audio information, including dialog as well as descriptions of sound effects and even background noises. They make content more accessible for people who are deaf or hard of hearing and are required by law in many countries.
How to add captions in Premiere Pro
Premiere Pro includes a captions workspace which makes transcribing your content and adding captions quick and easy. Let’s take a look at how to add captions automatically, manually, or by importing them from a third-party app.
Adding captions in Premiere Pro automatically
Premiere Pro offers Speech to Text, a built-in captioning feature that automatically transcribes your video and creates a caption track you can edit. Here’s how to use it:
1. Navigate to the Captions workspace
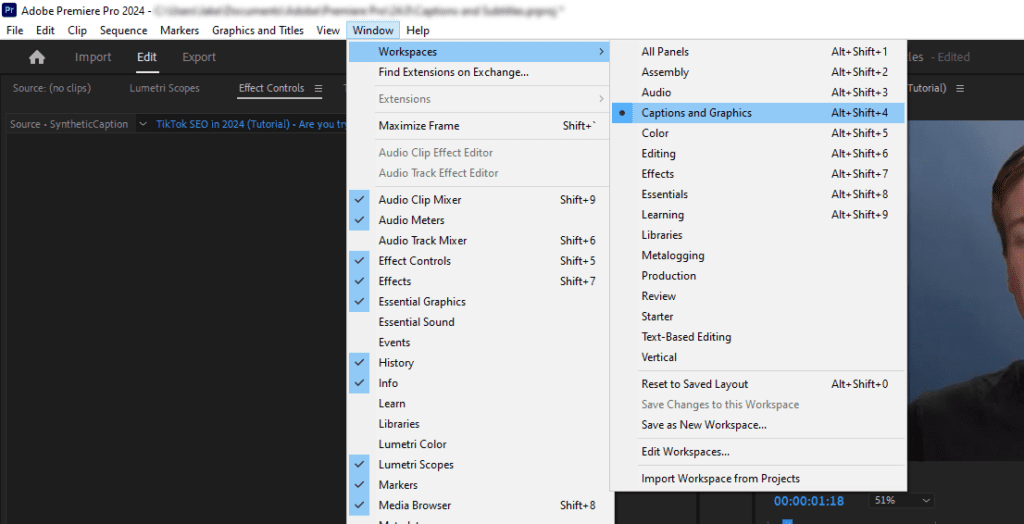
Once your video files are ready to go, select Captions and Graphics from the toolbar at the top of the interface. If it isn’t there, press Window > Workspaces > Captions and Graphics.
2. Open the text panel
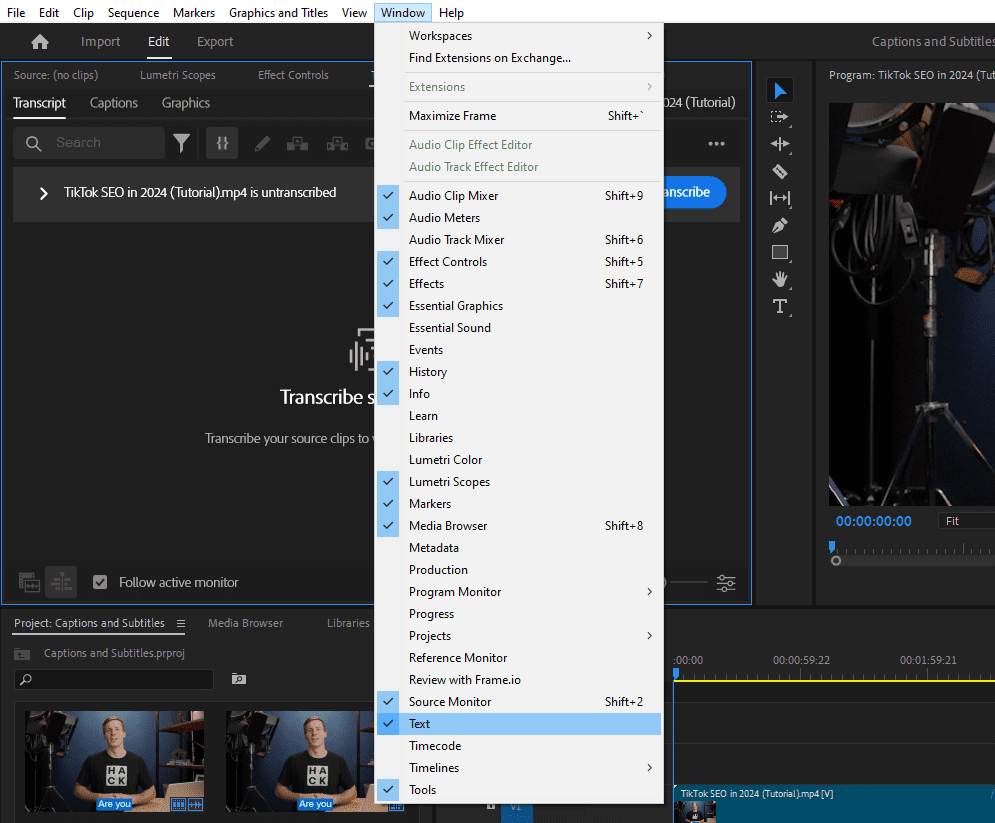
The text panel should automatically open with the Captions and Graphics page—if it doesn’t, select Window > Text to open it.
3. Generate a transcription
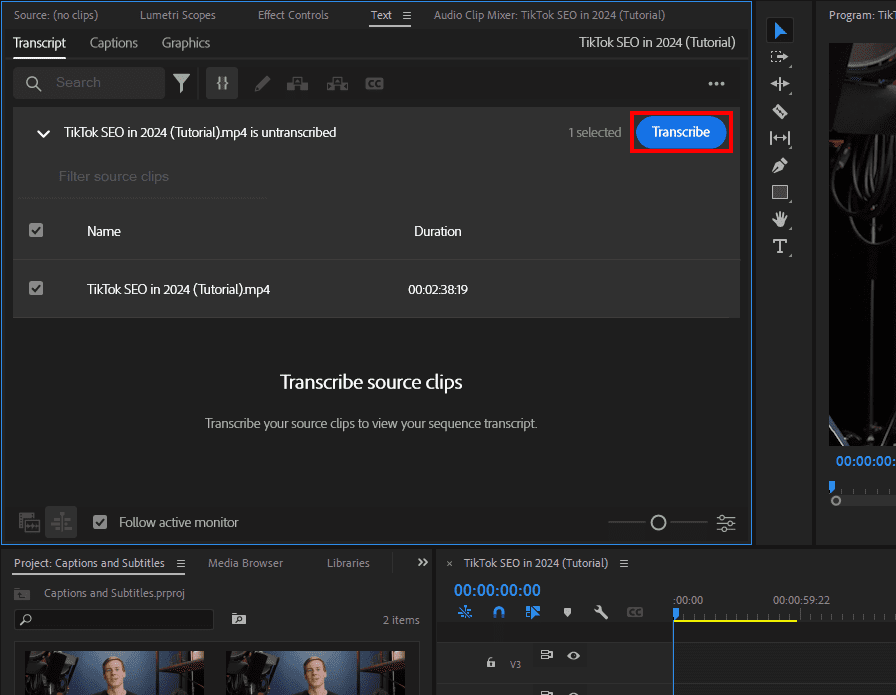
Next, press Transcribe sequence.
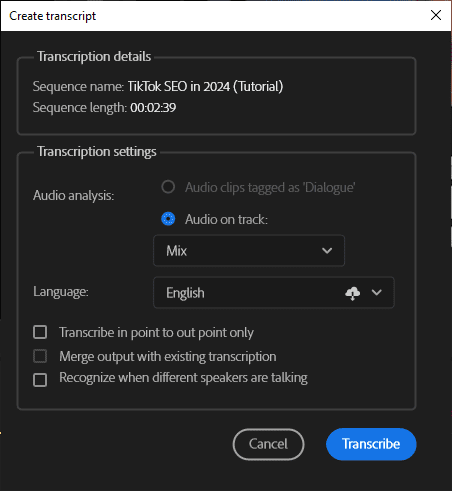
A pop-up menu will appear with settings. If there’s only one speaker, you probably don’t need to change anything here. Select the sequence and press Transcribe. If you have more than one speaker, select Recognize when different speakers are talking, then hit Transcribe.
Wait for the transcription to complete, then head to the next section.
4. Edit your captions
Once Premiere Pro generates your transcription, you’ll be able to see it in the Text panel. Click inside each text box to edit the captions and make sure everything is correct before moving on to the next step. While this process can take a while for longer videos, it’s worth taking time to review since the auto-transcription feature isn’t perfect and can make mistakes.
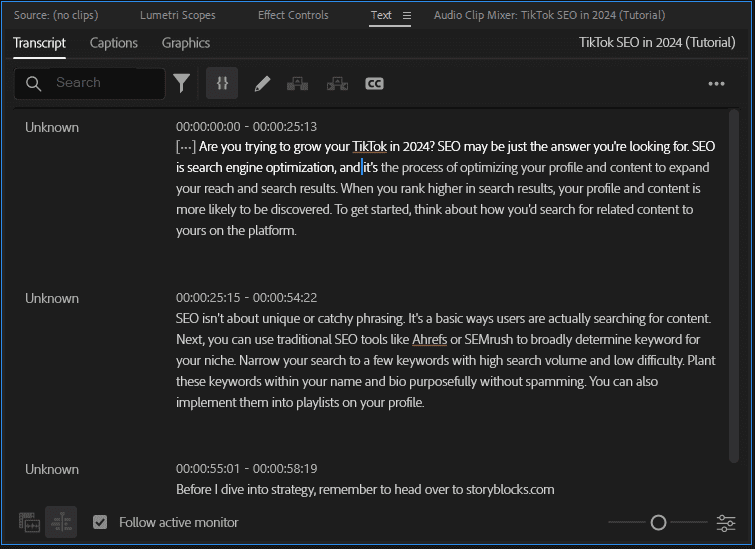
4. Create a captions track
Next, select Create captions. The button is at the top of the Text panel and looks like a “CC” in a box. A window will appear with settings for your captions.
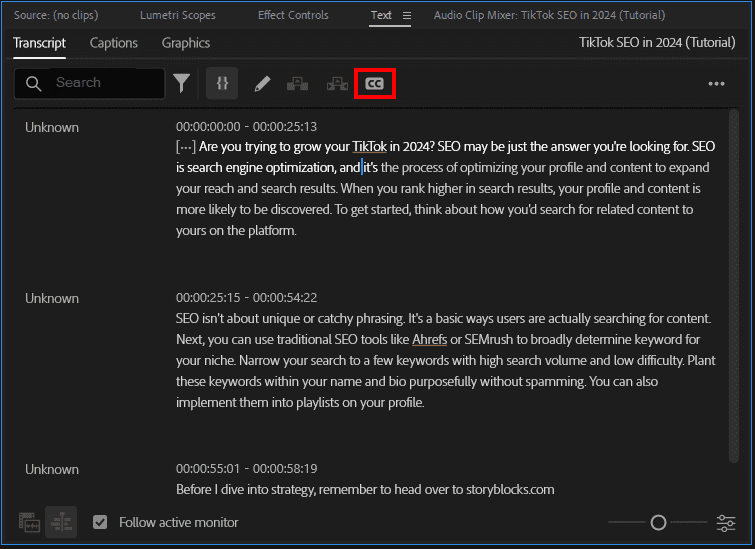
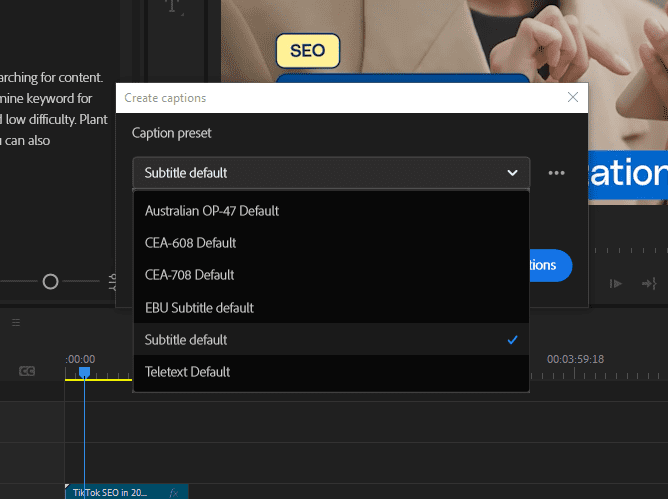
5. Choose your caption preset
When the window opens, select the drop-down menu and choose your preferred Caption preset. Here’s how each caption preset differs:
- Australian OP-47 default is used for australian broadcasting and media content distributed in Australia.
- CEA-608 is an older standard for closed captions, originally used for analog TV broadcasts and not often used nowadays.
- CEA-708 is the updated standard for closed captions on digital TV broadcasts. It supports a broader range of colors, fonts, and special characters.
- EBU Subtitle Default is used for television broadcasters across Europe and ensures compatibility in different systems.
- Subtitle Default is a general-purpose preset that features a range of styles and designs for digital content.
- Teletext Default is an older standard for news, information and subtitles before digital broadcasting.
CEA-708 is the preferred format for broadcast and TV, but Subtitle default is your best option if you post online as it gives you a range of design controls.
6. Change your caption preferences
Next, click Preferences to open the drop-down menu. Next, change the Format to Subtitle, then choose your preferred settings for how your captions will appear.
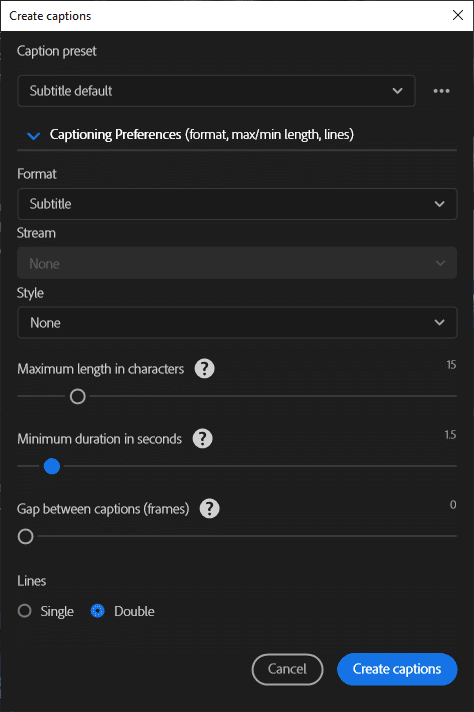
Here’s what the other settings mean:
- Maximum length in characters is how many characters of your captions will appear on-screen at once. If you’re posting to social media, the video is going to be in a narrow, vertical orientation. Set it below 30 so that they won’t overrun your screen.
- Maximum duration in seconds is how long your captions will appear on screen. It might take some trial and error to find the sweet spot, but 1-2 seconds is a good starting point.
- Gap between captions is how many frames will pass before the next caption appears. Set this to 0 for fast-paced dialog.
When you’re done, press Create captions. This will turn the transcribed sequence into a captions track that sits above your video and audio tracks in your sequence.
7. Stylize your captions to make them look better
Finally, open the Essential Graphics panel and select all of your captions in the timeline. In the Essential Graphics window, there’s a range of settings you can use to change how your captions appear, including font, font size, caption positioning, outlining, and more. Experiment a bit to find the caption style that best suits your video.
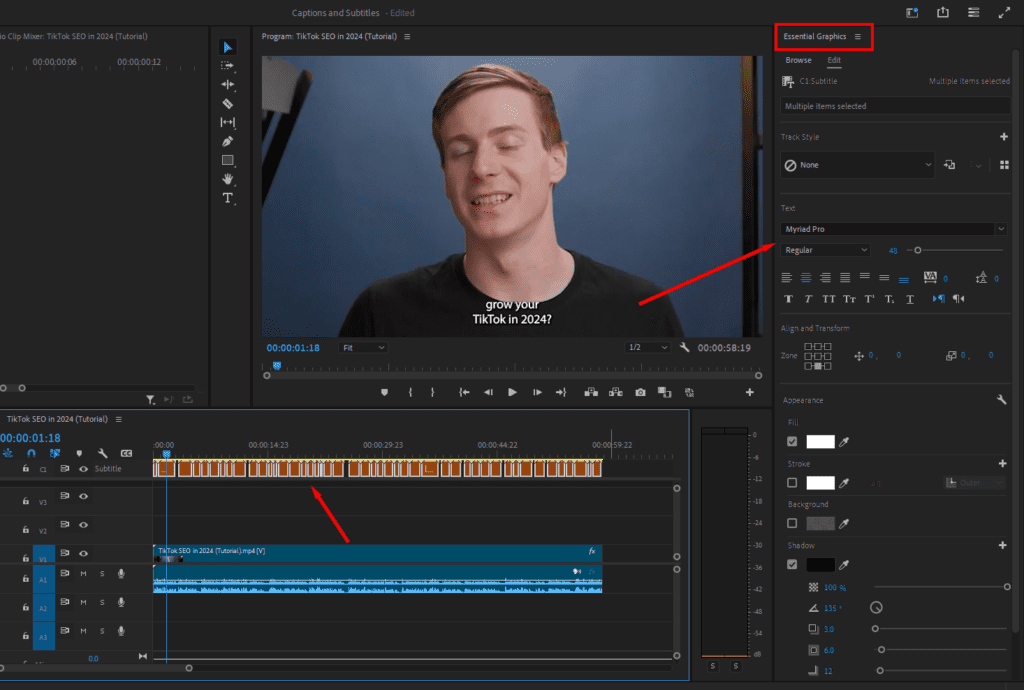
Premiere offers a range of fun and engaging text effects that can really make your captions stand out. To get the most out of Premiere Pro’s text options, check out our guide on how to add and create text effects.
How to add captions in Premiere Pro manually
As handy as the feature is, Premiere Pro’s automatic transcriptions can make mistakes. Sometimes it’ll have incorrect spelling, punctuation, or completely wrong phrases. If you want to avoid this by adding captions manually, here’s how you can create them yourself.
1. Open the Captions and Graphics workspace
First, open Premiere Pro, then select Captions and Graphics in the top toolbar or click Window > Workspaces > Captions and Graphics.

2. Create a new caption track
In the Text panel, select Create New Caption Track.
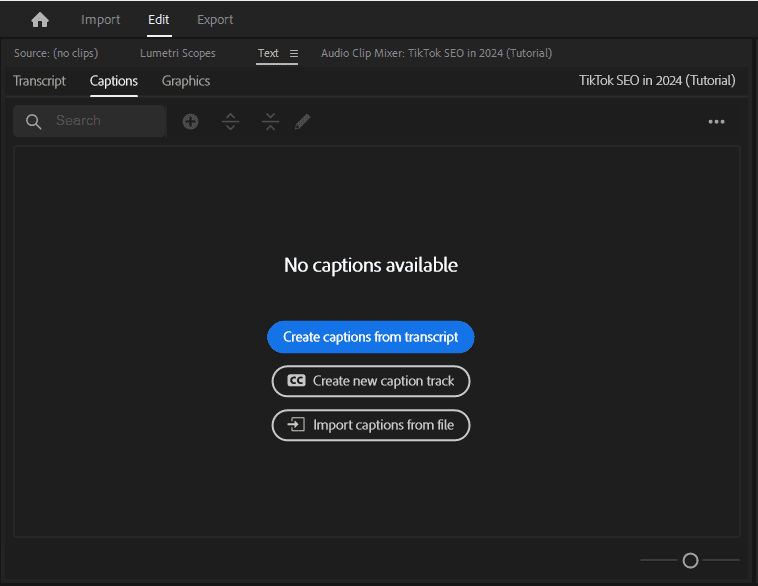
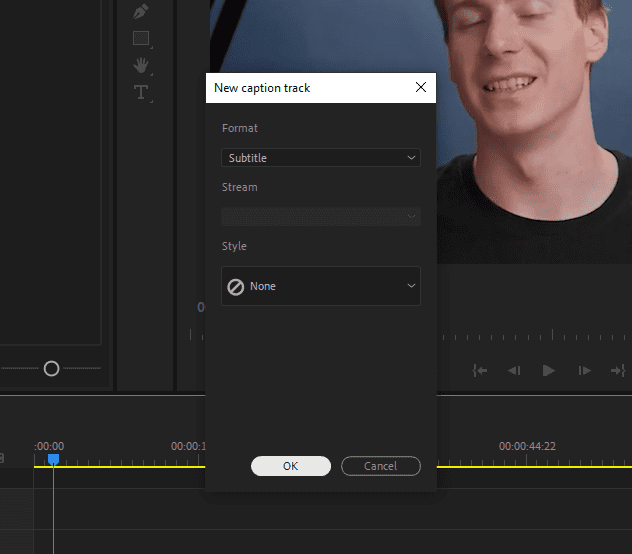
Make sure the format is set to Subtitle, then press OK.
3. Add your captions
Next, move your playhead to where your dialog begins and press the + icon to add a new caption line.
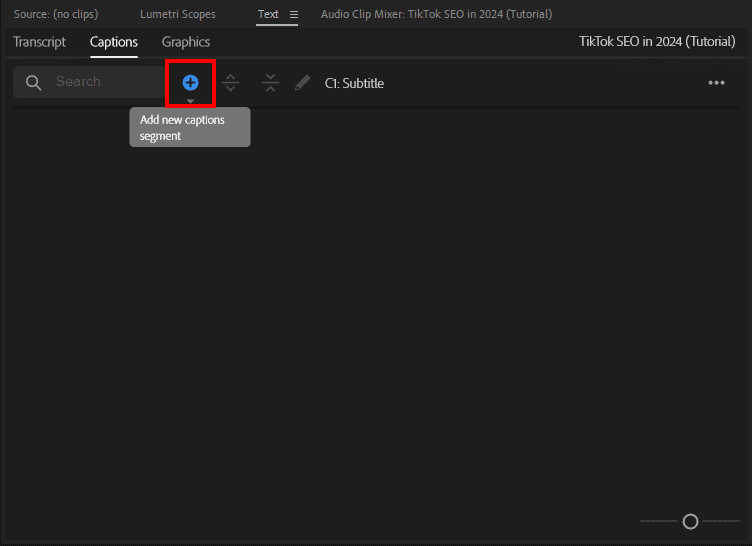
After that, listen to the segment and write in the dialog word by word. Repeat this for the entire video.
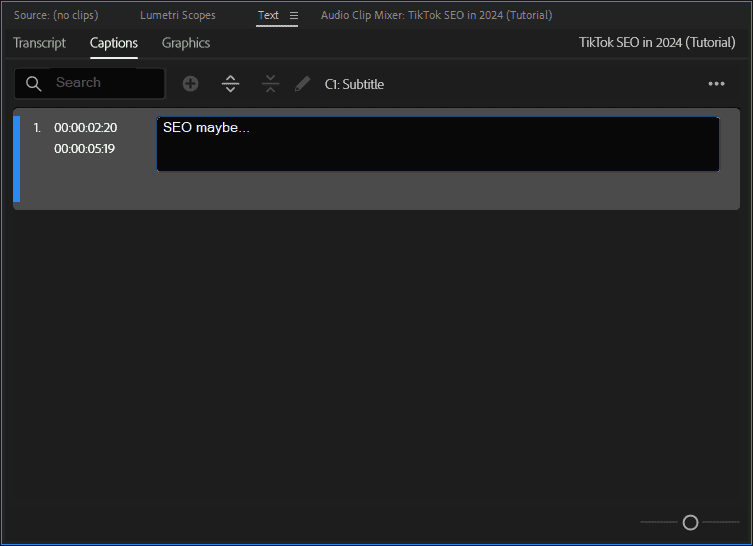
Depending on how long your video is and how much dialog there is to caption, this can be a pretty tedious process. If you want to caption a long video with a lot of dialog, using Premiere’s Speech-To-Text and editing the captions for any mistakes will go a lot faster than adding them manually.
How to import captions to Premiere Pro
For our third and final option, we’ll go over how to import captions into Premiere Pro.
Many people use third-party AI tools or plugins to transcribe their sequences, as they can be quicker and more accurate than Premiere Pro’s built-in transcription process. If you use one of these programs, it’s easy import your captions into Premiere Pro. Here’s how.
1. Import the SRT file into your Premiere Pro project
You should have a subtitles (.SRT) file from your third-party transcription service. Transfer this into your Premiere Pro project by dragging and dropping it or using the Media Browser.
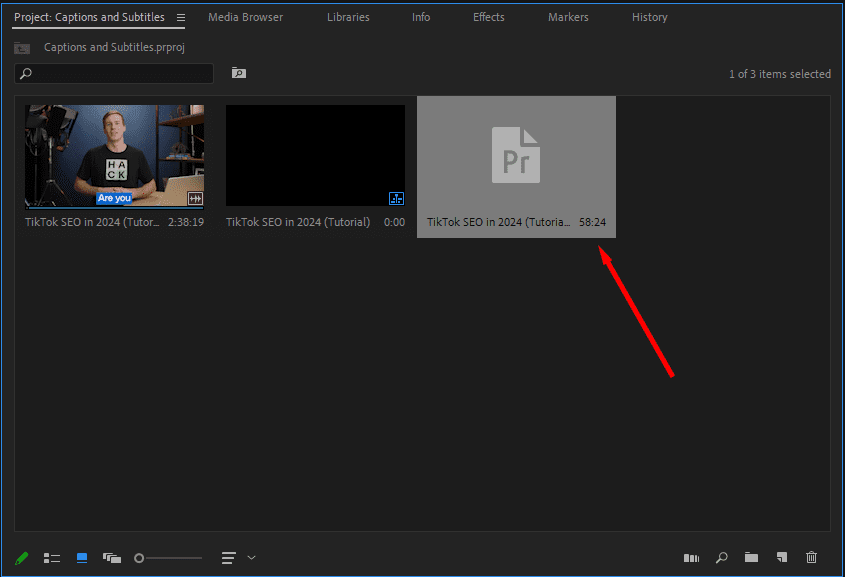
2. Add the SRT file to your sequence
Drag and drop the SRT file onto your sequence. Premiere Pro will create a new caption track with your transcribed captions ready to go.

Final thoughts
There you have it—now you know how to add subtitles to a video in Premiere Pro. Using captions and subtitles is a powerful way to expand your audience by making your videos more engaging and accessible.
To improve your content even more, check out Storyblocks affordable plans. Our unlimited subscription gives you access to over 2 million royalty-free stock assets to help you improve the quality of your videos and create faster than ever, including 4K and HD footage, music, sound effects, Premiere Pro templates, and more.


