
Color correction is an essential step in the post-production process that can make or break the look and feel of your videos. If you want to fix white balance issues, create a specific mood, or make your footage look more polished, mastering color correction is crucial.
In this article, we’ll explain the basics of Premiere Pro color correction and how you can use the Lumetri Color panel to enhance colors, saturation, brightness, and contrast to create a consistent and professional final video. You can also follow along with our video tutorial here.
To find footage to practice color correction on and take your editing skills to the next level, check out Storyblocks for even more video editing tutorials, royalty-free music, stock footage, and more.
What is color correction?
Color correction is the process of fixing or ‘correcting’ the colors and brightness in footage so that they appear natural and consistent in a final video edit. This can mean adjusting the brightness of a clip, changing the overall color temperature, or adjusting several color parameters between clips for a better match.
Here’s an example of color correction in action:
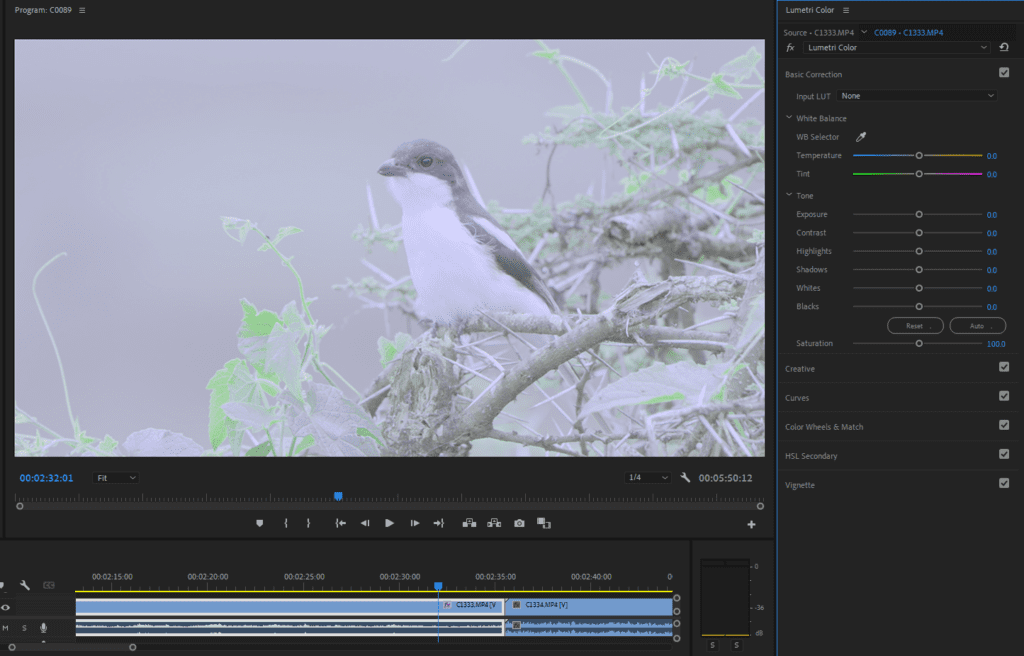
In the “before” image, there’s an overall blueish cast to the footage.
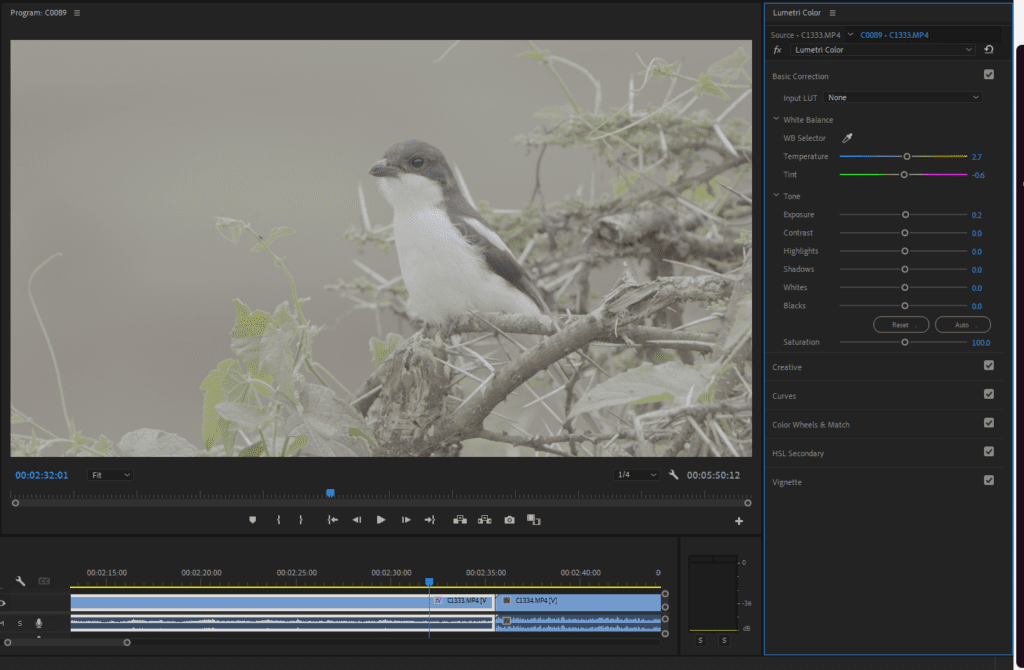
As you can see, the footage was slightly overexposed and captured with an incorrect color temperature—it appears bluer than it should be. In the color-corrected image, you can see how it looks much more natural.
How to color correct in Premiere Pro
To correct the colors in your footage, you need to adjust the white balance, exposure, and saturation until it has the look you want. Here’s how to color correct in Premiere Pro:
Open the Lumetri Color panel
With your footage imported into Premiere Pro and a sequence created, open the Lumetri Color panel window by going to Window at the top of the Premiere screen, then click on Lumetri Color.
Open the Basic Correction tab
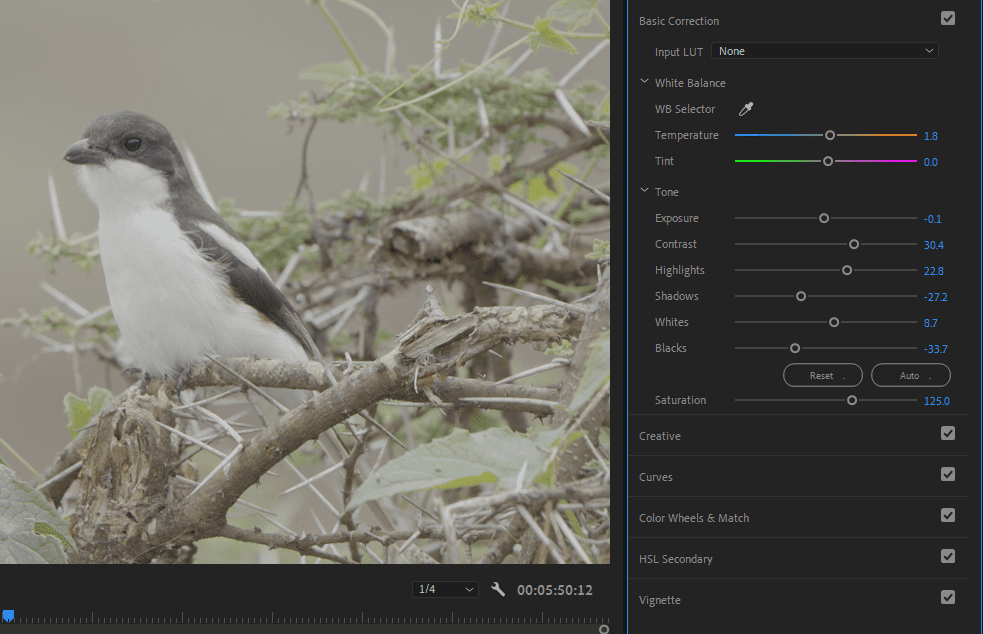
Open the Basic Correction tab inside the Lumetri Color panel window to reveal all of the main color correction options.
Change the color temperature
To color-correct your clip, you need to make sure it has the correct white balance or color temperature. You’ve probably seen videos that have a particular color cast, like being too yellow or blue. To correct them, you need to adjust the color temperature slider in the opposite direction.
Open the Lumetri Color Basic Correction tab. If your clip is too blue, adjust the Temperature slider to a warmer tone (orange side) until the areas in your footage that should be white change to pure white. This will balance the white in your footage, so the overall color temperature or white balance looks natural.
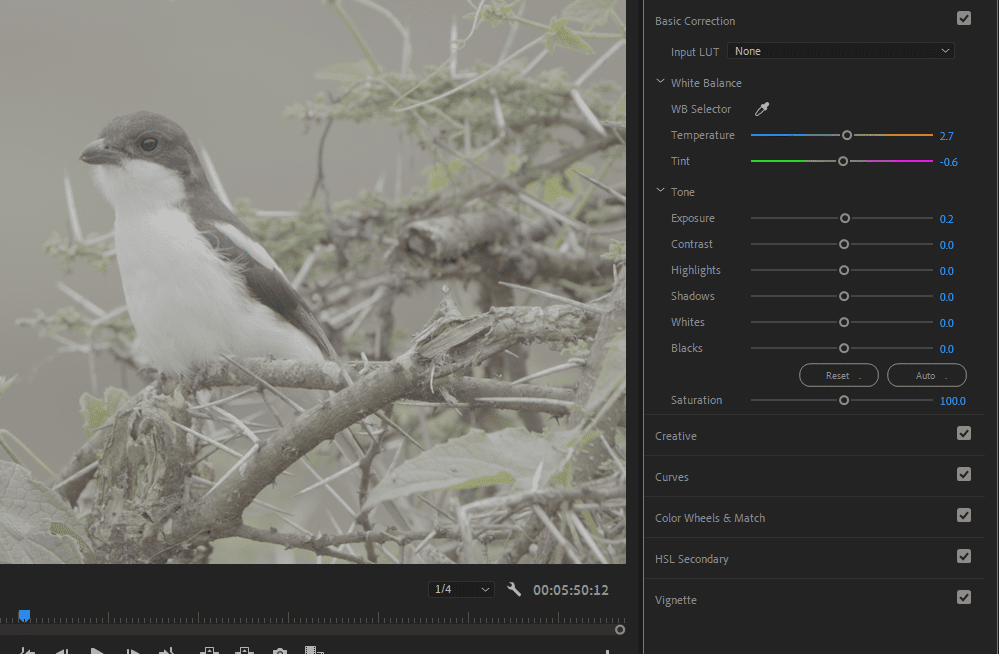
Likewise, if your footage is too green or purple, adjust the Tint slider until the white areas are properly white.
Using auto color correction in Premiere Pro
If you have an object in the frame that is pure white, you can use the eyedropper tool next to WB Selector and Premiere will do its best to automatically balance these colors for you. You may still need to tweak after this result.
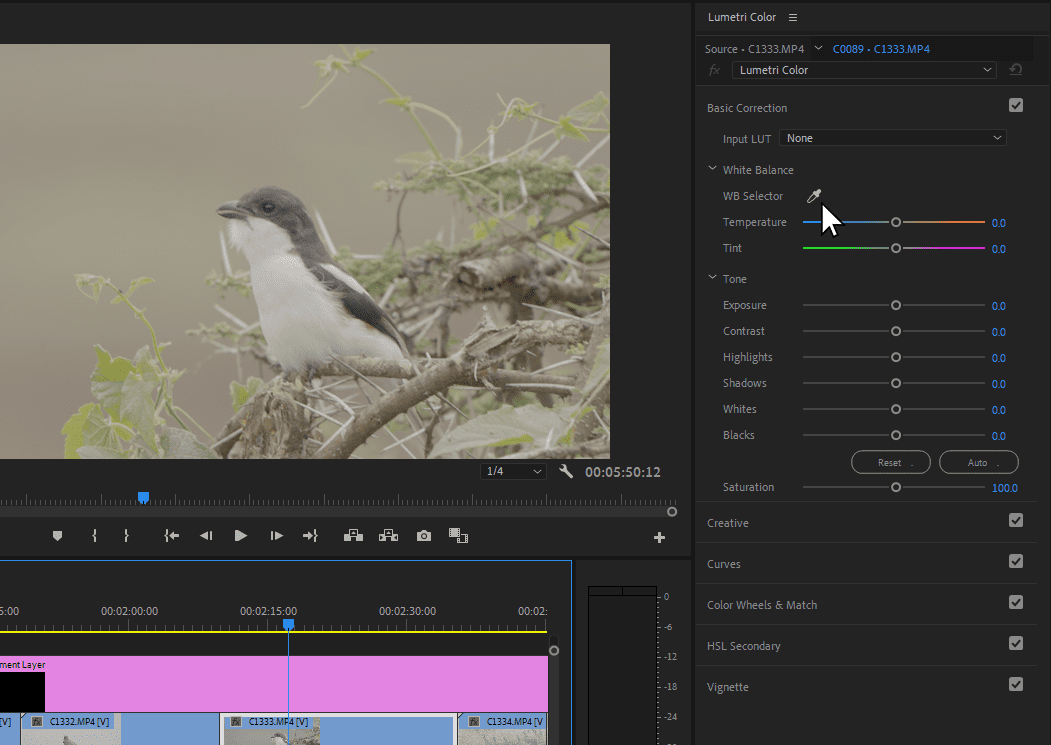
This is useful for beginners, as it can save you a lot of time messing around with the tone sliders. However, if you want to become skilled at color correction, it’s a good idea to practice correcting the white balance manually.
The auto white balance feature also isn’t perfect, and you may need to manually adjust your temperature and tint to get the colors just right.
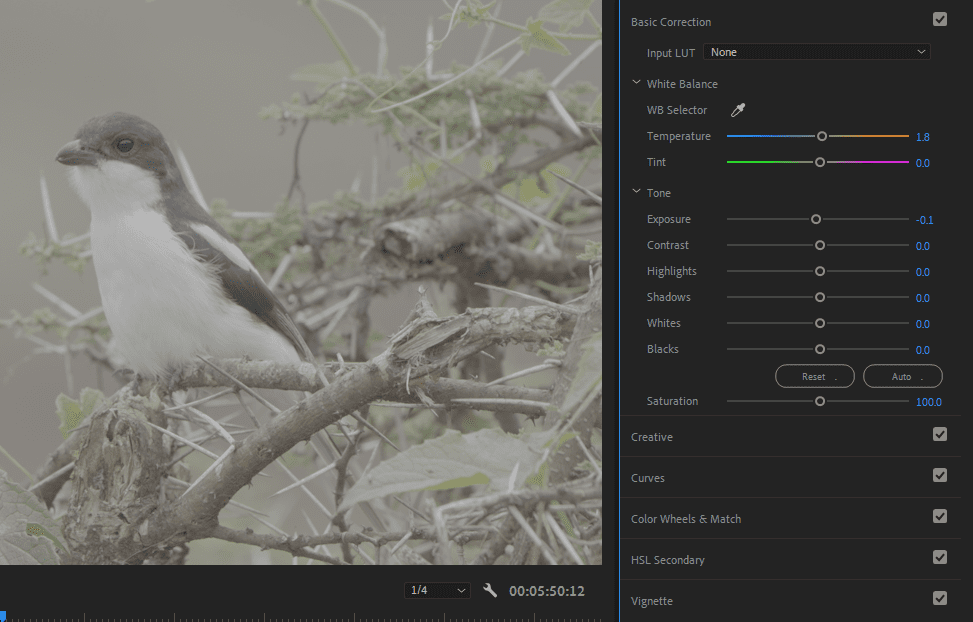
Correct the exposure
Now that the white balance is correct, playback the footage and scan over the lighter and darker areas to see if you need to make any changes. If the image is a little too dark, increase the Exposure setting to increase the overall brightness.
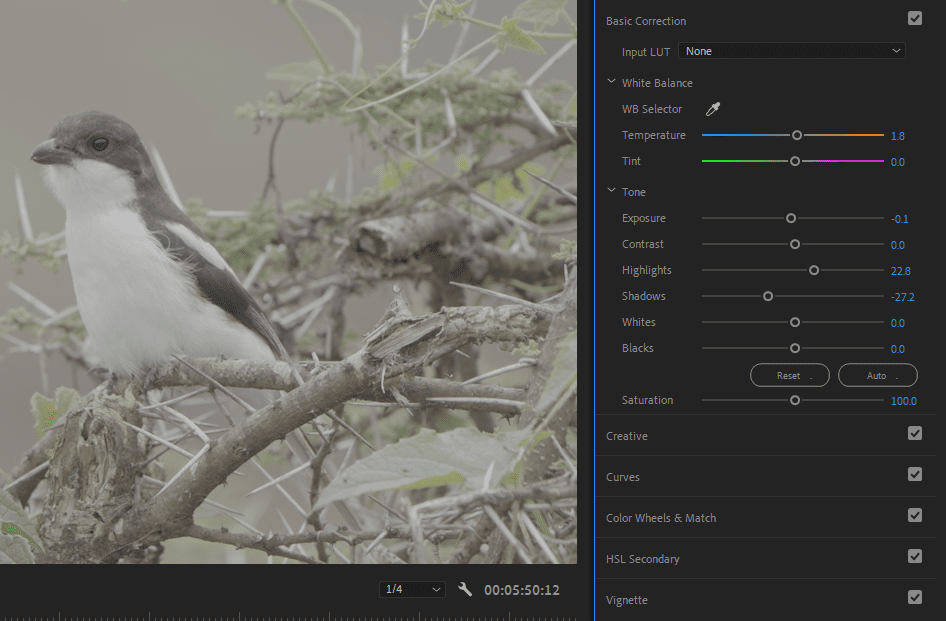
Fine-tune the highlights and shadows
With your exposure corrected, you might have blown out your footage or created shadows that are too dark. To compensate for overexposed bright areas, bring the Highlights slider down.
By using the Shadows setting, we can increase or decrease the darker areas of the footage without affecting the lighter areas.
It is generally recommended to not push any slider parameters above 30 or 40. The higher you go, the more video noise/grain you will introduce into the footage. If your videos are only for the web, or YouTube for example, and do not need to follow any broadcast standards, feel free to increase the sliders however much you prefer.
However, pumping the settings too high will go against the whole point of color correction, which is to correct the footage, not to make it unnatural. With video editing, less is often more.
Adjust the contrast
Now that we’ve adjusted the footage using some of the main settings let’s use the Contrast slider to further make some adjustments. Adjusting the contrast low will wash out the footage making the darker areas much lighter. Increasing the Contrast slider to a high setting will darken the overall image, making it appear more dramatic looking.

Many video editors prefer to slightly increase the contrast of their footage. Keep in mind this is a creative choice, and it’s completely up to you how contrasty or washed out you want your footage to appear.
Fine-tune the exposure
The Blacks and Whites sliders help you adjust the brightness in separate parts of the image. Whites will help you adjust the brightest areas without affecting the rest of the image, while blacks will help you fine-tune the darkest areas.

To make sure you have got these settings right, you can check the Lumetri Scopes panel. Press the Wrench icon and select RGB Waveform. Here, you’ll see a graph filled with colored values for each of your color channels. You can use this graph to make sure you aren’t losing detail in the dark and bright parts of your footage. You can also reference these as you’re adjusting white balance, making sure the waveform looks balanced.
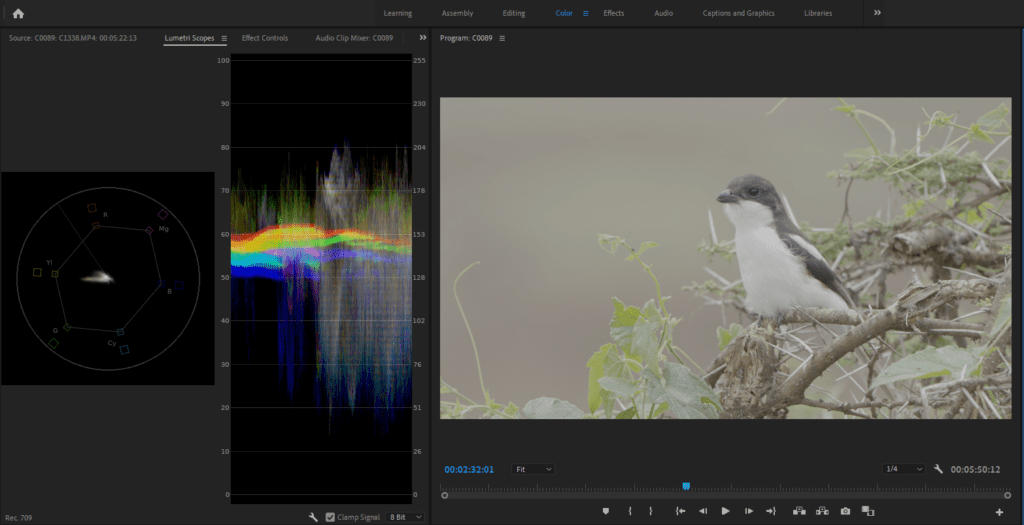
As you play around with the tone sliders, watch the graph. If any section goes over 100, it means that part of the image is overexposed. If it goes under 0, it’s underexposed. Keep adjusting the settings until your footage looks natural, without clipping the whites or blacks.
Increase the saturation
Adjusting the Saturation is common in color-correcting footage. Depending on the footage you’re working with (and the final result you’d like to achieve) saturation can drastically change the look of your footage.
Setting the saturation to 0 will remove all of the colors and provide you with a black-and-white look. Setting the saturation high will enrich all of the colors, making them very vibrant.
When it comes to increasing saturation, it’s best to not push it too high—similar to the general rule for the other settings mentioned earlier. It may look great as a still frame, but as video playing, high saturation will introduce a lot of video noise.
Use the RGB curves
At this stage, we’ve completed working in the Basic Correction tab inside Lumetri Color. Now let’s click on the Curves tab and open RGB Curves.
The RGB Curves setting can isolate colors by clicking on the red circle and adjusting the curves to increase the amount of red in the footage. You can do this for green or blue as well.
Most commonly, you’ll want to change the red, blue, and green channels at the same time. To do so, make sure to select the white circle.
The bottom third of the graph represents the shadows, the middle third represents the midtones, and the top third represents the highlights. By increasing or decreasing the different parts of the curve, you can get better control over your image tone.
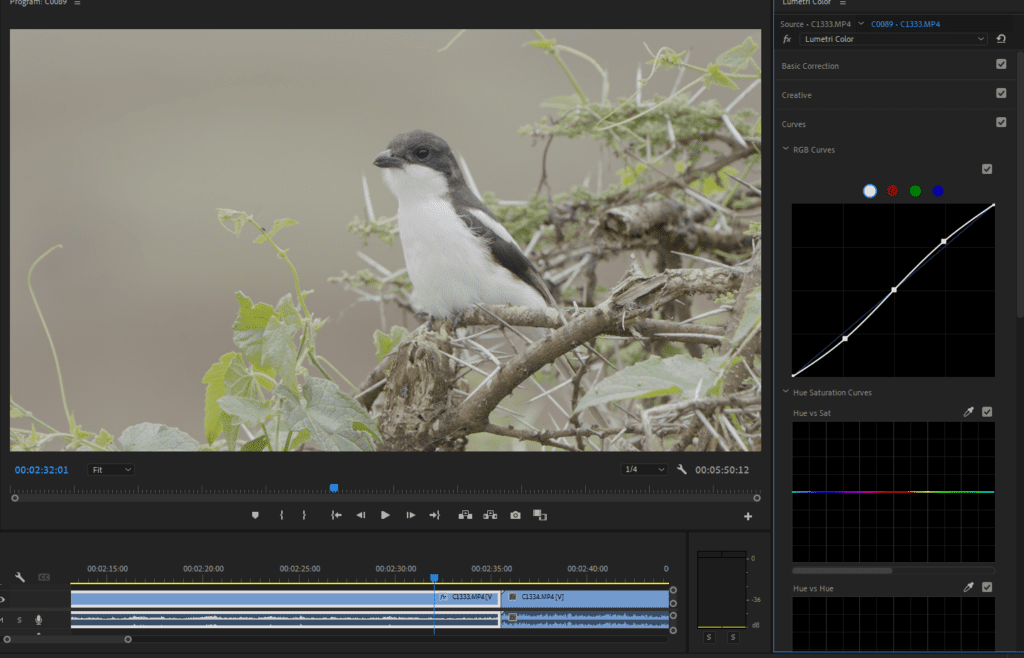
In this example, we’ve introduced more contrast to the image using a slight S curve. To manipulate the curve, click and drag the line. Dragging the line up will increase the brightness while dragging it down will make it darker.
Use the Color Wheels to optimize your color
If you’re happy with the color correction you’ve done, your work is now complete. As an additional step, under the Color Wheels & Match tab, there are three color wheels where you can continue to adjust the various tones in your footage and fine-tune the color you’re going for.
These wheels let you change the color cast of your shadows, midtones, and highlights. To change these, click within the color wheel and drag the point to the color you want to add. The further you drag it to the edge of the circle, the more saturated that color will be.
One common practice in cinematic footage is to add a blue tint to the shadows and an orange tint to the midtones or highlights. The orange tint compensates for the blue shadows, creating a visually appealing look.

How to apply color correction to all clips in Premiere Pro
Applying color correction to all of your clips can take a long time, especially if you’re using clips from different sources. Below, we’ll explain how to apply color correction to all clips at once and how to match your colors between different types of footage.
How to apply color correction to similar clips
If all of your clips are very similar— for example, they’ve come from the same camera under similar lighting conditions—then applying universal color correction is easy. All you need to do is add an adjustment layer over your footage and use it to apply your color effects.
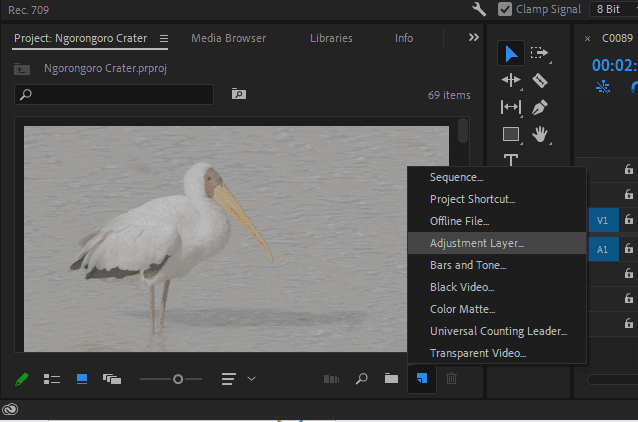
To do so, press the + symbol in your Project window. Select Adjustment layer, then drag this into your timeline and adjust the duration to match all of your clips. Now, open the Lumetri Color panel and use the steps above to apply color correction.
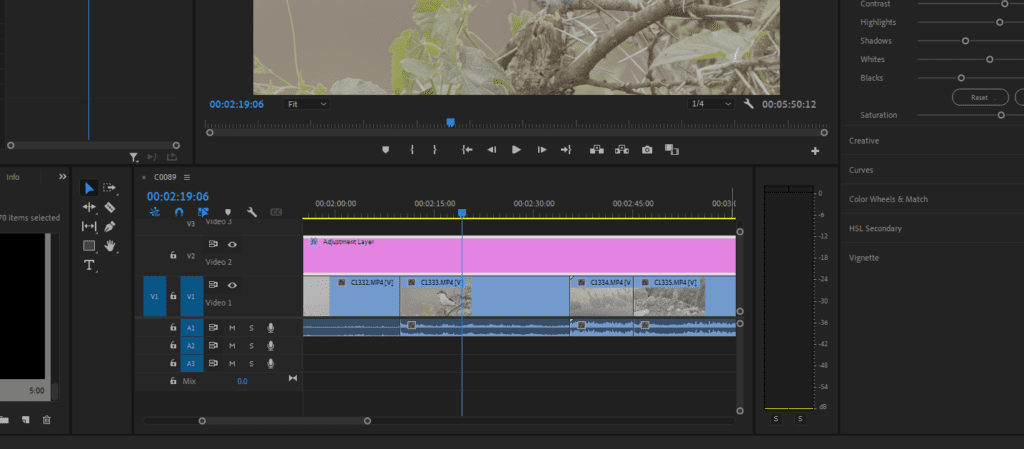
Because the settings are applied to the adjustment layer, they’ll also apply to anything underneath it. That means all of your clips receive the same treatment.
How to apply color correction to clips from different sources
If you’re using clips from various sources, they likely have different color profiles and exposures. This means you may have to manually edit each clip to match their colors. You can do this using the Color Wheels & Match section in the Lumetri Color panel.
Select Color Wheels & Match, then select Comparison View. Choose the two clips you want to match, then press Apply match and let Premiere Pro work its magic.
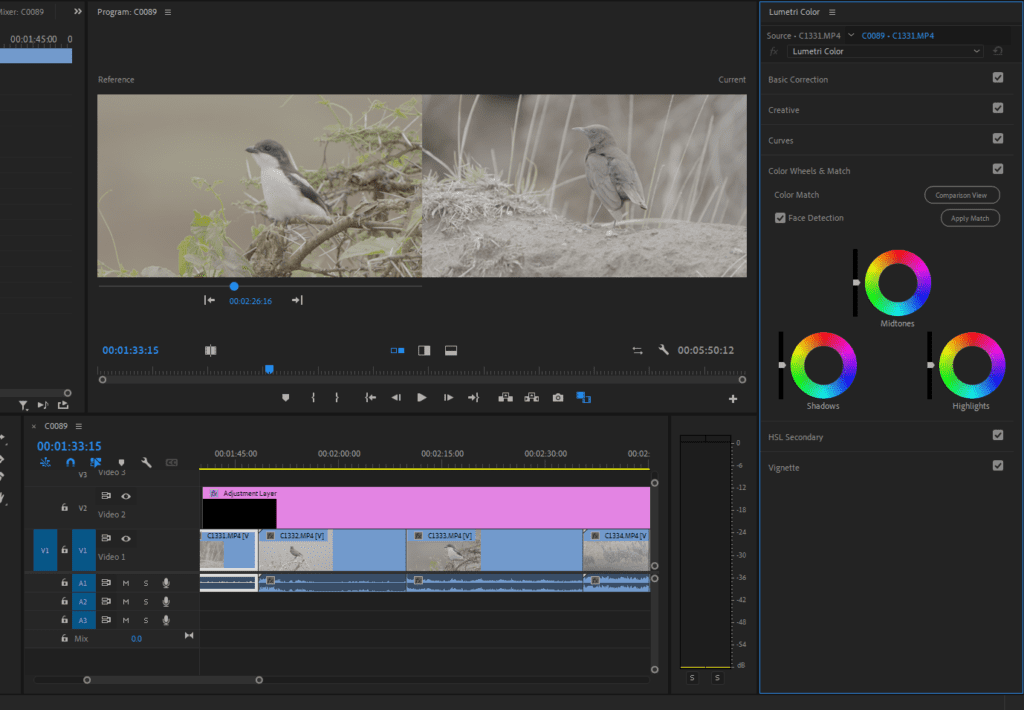
It should align the colors on both of your clips so that they’re similar, though you might need to do some manual tweaking to perfect the match.
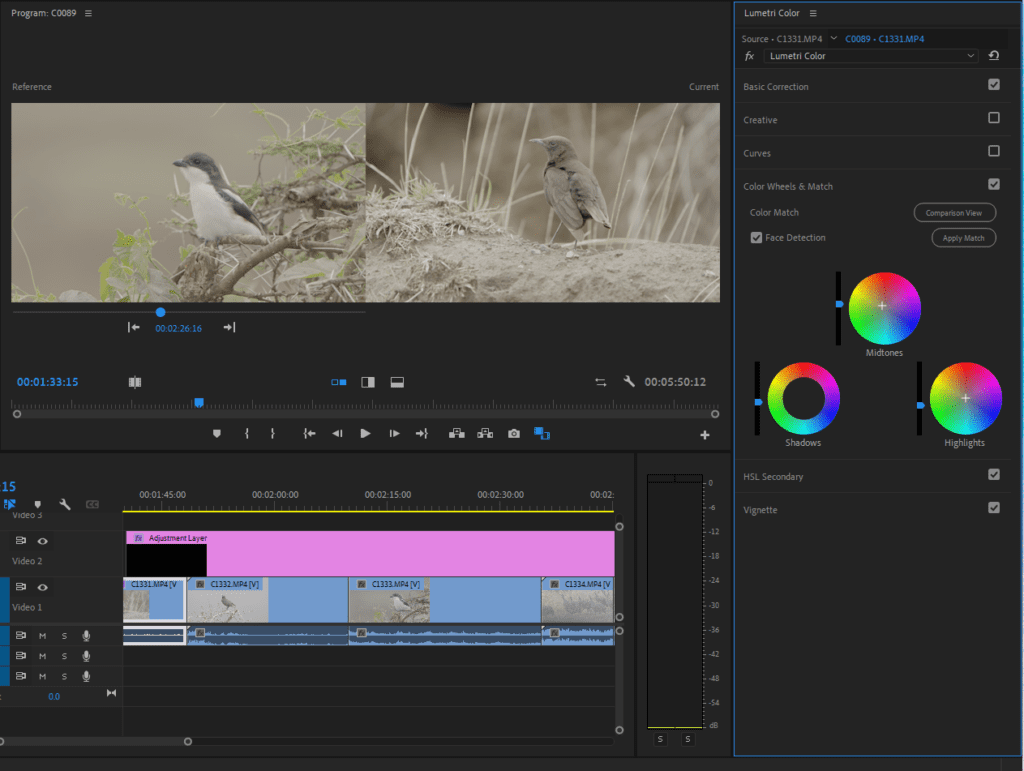
As you can see, Premiere Pro made some minor adjustments to the second clip to align the colors more with those of the first.
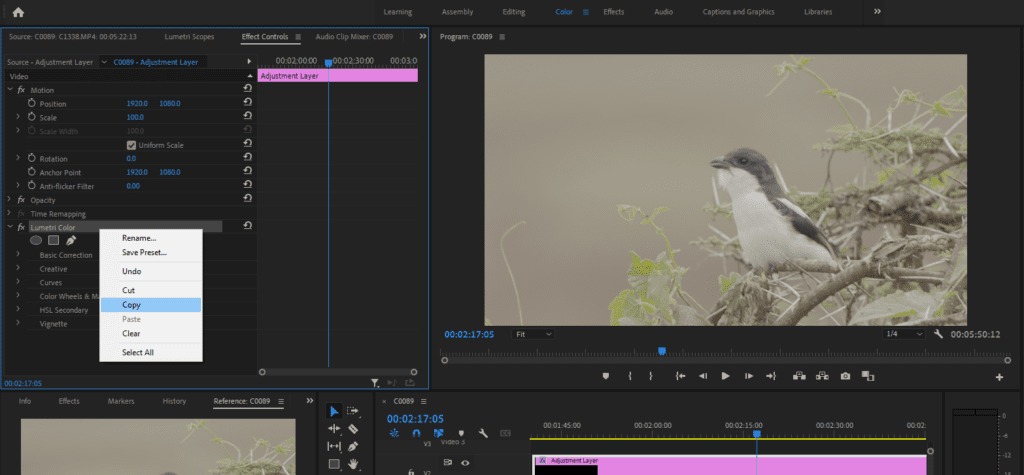
How to copy and paste color correction in Premiere Pro
If you want to use the same color correction settings for two clips, you can simply copy and paste the settings across. First, select your clip. Then, open the Effect Controls window. Right-click the Lumetri Color entry and select copy. Finally, select the clip you want to apply the effects to, then right-click in the reference window and select Paste.
How to save color correction presets in Premiere Pro
Once you’re happy with your color correction, you can save it as a preset for quick use later on. This is handy when you’re working with a lot of footage from the same camera. You can simply apply the preset and then do a bit of tweaking for each clip, saving you a stack of time.
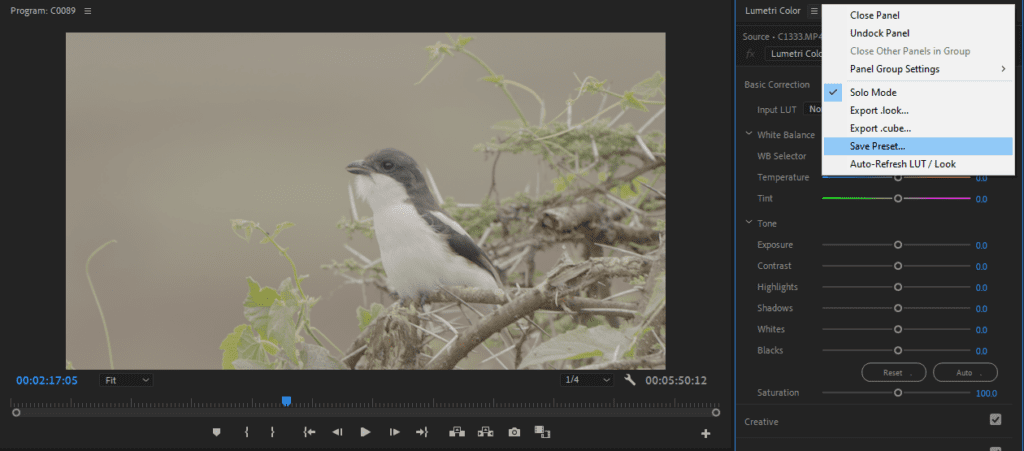
To save your color correction Premiere Pro settings as a preset, select the hamburger icon in the Lumetri Color tab and choose Save Preset.
You can also save the preset as a .cube file which is useful if you want to use the preset on another computer. Exporting the preset as a .look file will create a LUT that you can use in the Creative tab of the Lumetri Color panel.
Additional tips for color correction
Here are a few video editing tips you can use to improve your color correction workflow:
- Shoot in a flat or log profile. If your camera supports it, flat profiles or log profiles preserve greater details in the highlights and shadows. This can give you a lot more flexibility when editing colors during the post-production process.
- Preview your videos where they will be shown. Color space can get very complicated quickly. It’s always good to preview the video at the same final destination that it will be presented. For example,. if you’re making a video for social media, make sure that you preview it on your phone as the colors will look slightly different.
- Use Storyblocks presets and templates. Storyblocks has an extensive selection of Premiere Pro templates that can help you add effects quickly, without needing to learn After Effects. We also have several color presets in our library as well as Premiere Pro project files with the looks built-in.
- Get the white balance right, first. Getting your white balance right up front is a key step to maintaining natural colors throughout the editing process. Start with the primary colors (red, green, blue) before moving on to secondary colors.
- Use reference images from scenes or other films. While learning to color correct, it’s a good idea to have a reference image to refer to. This will help you learn how to match your footage to a properly corrected example. Exploring the waveform of your reference image is a powerful way to see what it looks like in different color spaces.
- Feedback is a gift. If you can, always get feedback from your colleagues or peers who have more experience to help your footage look the best it can.
Understanding color correction vs color grading
Color correction and color grading are two different processes in the post-production workflow. So, what is color grading and color correction, and how do they differ?
Color correction is the initial step that focuses on correcting issues with the footage, like white balance, exposure, contrast, and saturation. The goal is to achieve a balanced, natural look, with accurate and consistent colors.
Color grading, on the other hand, is a more creative process that comes after correction. It involves creating a signature style for your videos by applying specific coloration, LUTs, and effects. For example, you might create a warm, inviting atmosphere for a wedding video or a cold, desaturated look for a sci-fi film.
Color grading in Premiere Pro is generally achieved by using the RGB curves, color wheels, and HSL secondary sliders. To save time, many creators use pre-made LUTs that apply stylistic effects quickly and easily.
Final thoughts
By following the basic steps of color correction like adjusting white balance, exposure, contrast, and saturation, you can make your videos look better than ever. Try experimenting with different adjustments and styles to create more impactful footage. With practice, you’ll be able to make visually stunning videos that captivate your audience.
Don’t forget to use Storyblocks to find all the stock you need for your video projects, including footage, templates for Premiere Pro, royalty-free music, and templates with color presets. With a Storyblocks subscription, you can also use the Storyblocks plugin for Creative Cloud to easily browse our library right inside your editor.
Editor’s Note: This post has been updated to include additional information. It was originally published on January 16, 2020.

