Dave Chapelle may have been right when he said that everything looks better in slow motion. Even the simplest footage can take on a bit of drama or seriousness when you slow it down. Improvements in technology mean that more and more cameras are shooting high FPS (frames per second) footage that is ideal for slowing down in post-production. Even your smartphone can likely capture footage that will look brilliant when slowed down.
In this post, I’ll take you through some information about when you might want to use the slow-mo effect. Next, I’ll go over a quick explanation of FPS before diving into a tutorial for how to make a slow-motion video. While you can use any video program to add a slow-mo effect, I’ll use Adobe Premiere to demonstrate slowing down standard-speed video footage.
When Should You Use Slow-Mo?
It may or may not be true that everything can look better in slow motion, but some scenes lend themselves to slow-motion footage better than others. Let’s take a look at several types of footage that benefit from a little slow-mo magic.
Add Drama to Action Footage
If you’re a sports fanatic, you’re pretty familiar with the advantages of slow-motion footage. Slowing down the action so that you can see if the receiver kept his feet in bounds or who touched the ball last are just two classic examples. Even if you aren’t filming the big game, any action footage can benefit from slower playback. Slow down your action footage so that your audience can see the detail.
Dive Into Deeply Detailed Footage
The image quality of modern cameras continues to improve and amaze with each successive generation of gear. Footage has become so good that it almost takes more time to digest what’s happening. Slowing down a rapid sequence to show even more detail can bring a scene to life. The fact of the matter is that even most smartphones can capture high FPS footage, so why not try adding a bit of slow-mo action to your next video project?
Create Suspense and Drama
We’ve all seen movies where the director tortures us with the decisive moment by delaying the critical moment with slow motion. As a moviegoer, it drives me nuts. As a video editor, I love using slow motion to delay that pivotal moment when the hero delivers the crushing punch, or James Bond fires the final bullet. Consider using slow motion to leave the audience in suspense by slowing down the scene.
What is High FPS Footage?
Before we jump into slow motion in Adobe Premiere, it helps to understand how cameras capture footage and the FPS rates that work best for slow motion video. You probably already know that video footage is a series of rapidly captured images pieced together to show motion. The **frames per second** of a piece of footage describes how many images are stitched together within a single second. For example, 240 FPS footage means that there are 240 individual frames in each real-time second of video captured.
It’s easier to notice this when you see a movie. One of the defining parts of a “cinematic look” is that films are shot at 24 FPS. Most television shows are broadcast in 30 FPS, and if you’re lucky, you might get to see sports in 60 FPS to really hone in on the action.
When you create video projects in apps like Final Cut Pro or Adobe Premiere, the project has an FPS setting—but, you might be using footage from different cameras with a variety of FPS settings. High-FPS footage lends itself perfectly to slow-motion effects. Think about it: if you have 120 or 240 different frames of a single second of real-life action, there’s just more detail to pull out of the raw video footage. Taking high-FPS footage and slowing it down to a 30 FPS project creates a natural-looking slow-mo effect. It’s possible to slow down footage that was captured at a more natural setting like 30 FPS and slow it down as well. Now it’s time to learn how to create these slow-motion videos in Adobe Premiere with practically any type of footage.
How to Create Slow Motion Video in Adobe Premiere
You might be surprised how easy it is to slow your footage down in an app like Adobe Premiere. I’ll walk you through the process in Premiere.
Here are the steps you can follow to create slow-mo using standard footage in Adobe Premiere:
1. Import your Footage
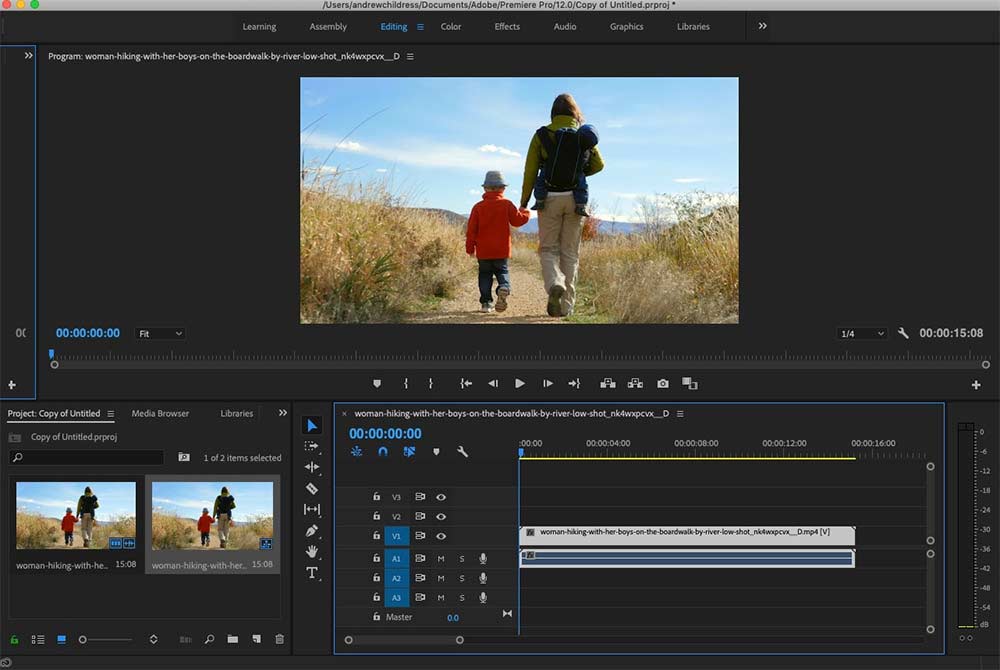
I grabbed this clip from the Storyblocks library that was shot at 30 FPS and imported it into my project. Next, I dragged it into my timeline and Premiere brought it in at the native frame rate.

2. Change the Speed/Duration
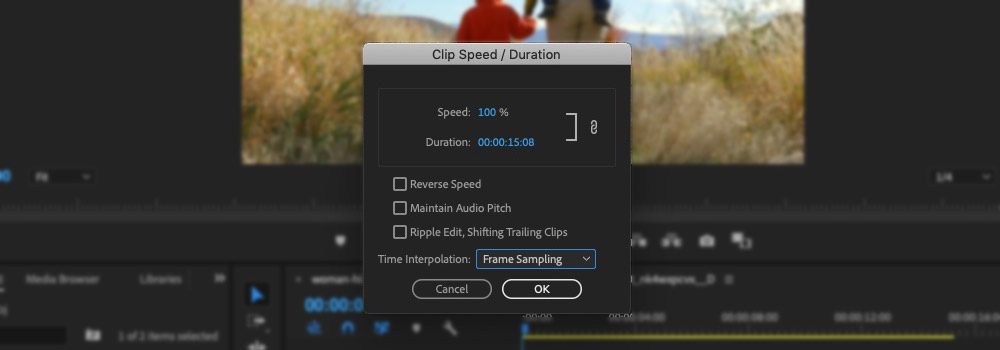
Right click on the clip in your timeline and choose Speed/Duration from the context menu, then choose a slower speed. In my example, I chose 70%.

3. Set “Optical Flow”
On the same pop-up menu, choose Optical Flow from the Time Interpolation drop-down. This is the best option to choose when you’re slowing down footage. Then, just press okay and play your clip to see it slowed down.

That’s it! If you’re like me, learning how easy it is to make a slow-motion video will have you experimenting with all kinds of footage. Premiere Pro does a nice job of slowing down footage with a standard framerate, but the Storyblocks library has a ton of slow-motion video footage that can help you speed up your workflow. These are clips that were captured with high FPS settings and slowed down in post-production.
Interested in learning more? Learn how to speed up and slow down videos in iMovie, then read about finding the perfect music for slow-mo videos.


