In the wide world of photo editing, there’s a misconception that Adobe Lightroom is simply the little brother to the mighty Photoshop—but for photographers, Lightroom offers a tool that is tailor made to suit the needs of photo editors, without all the bells and whistles needed for heavy retouching, photo manipulation, or graphic design. It’s fantastic for quick batch processing, and it’s also a powerful tool for organizing and cataloguing your photos. And unlike Photoshop, Lightroom specializes in RAW processing and non-destructive editing.
But chances are, if you’re reading this post, you already understand all the benefits of using Lightroom for your photo editing, so we’ll just get to it. One of the greatest tools for single-click, batch processing is Lightroom’s presets function. While the name may sound intimidating, Adobe presets really aren’t that complicated, and once you get the basics down, they’ll save you hours of slogging through all the photos from last weekend’s shoot.
What is a Lightroom Preset?
Lightroom presets are image editing settings that are saved so that they can be easily applied to future images with one click. They are Lightroom’s solution to the frustration you feel when you adjust all your sliders and create a really cool effect, but want to remember how to apply those same edits to future images as well. They’re also a major time saver and are perfect for batch editing.
Creating Presets in Adobe Lightroom
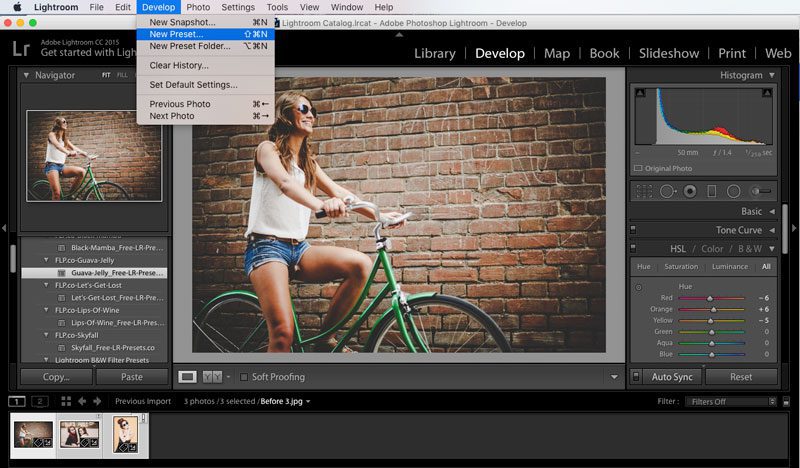
Creating presets may sound complicated, but it’s actually really simple. Once you have edited a photo the way you want it, click Develop, then New Preset. You will be prompted to give your preset a title and select your folder—you want your presets to be easy to find and identify, so the more descriptive, the better.
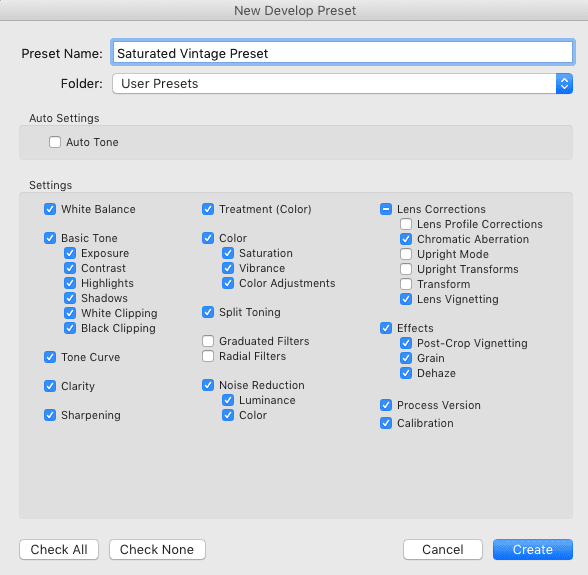
Go ahead and make sure only the settings you want to keep are saved. For example, if you created a really cool effect on a photo that happened to also need it’s exposure corrected, you may not want to keep the exposure settings in the preset. Otherwise, you would only be able to use it on other photos that have the same exposure issues!
Click “Create” and you’re all set!
How to Import and Install Lightroom Presets
Although Lightroom comes with a few pre-installed presets, there are many amazing presets available to download and import on the web—and a number of them (including the ones used in this post) are free. Follow these steps to easily add presets to Adobe Lightroom.
First, go ahead and download your presets to your computer and unzip the file by double clicking on the download.
If you’re on a Mac, go to Lightroom > Preferences > Presets and select Show Lightroom Presets. Now, double click on Lightroom > Develop Presets. A new box will pop up where you can drag and drop in the presets you downloaded.
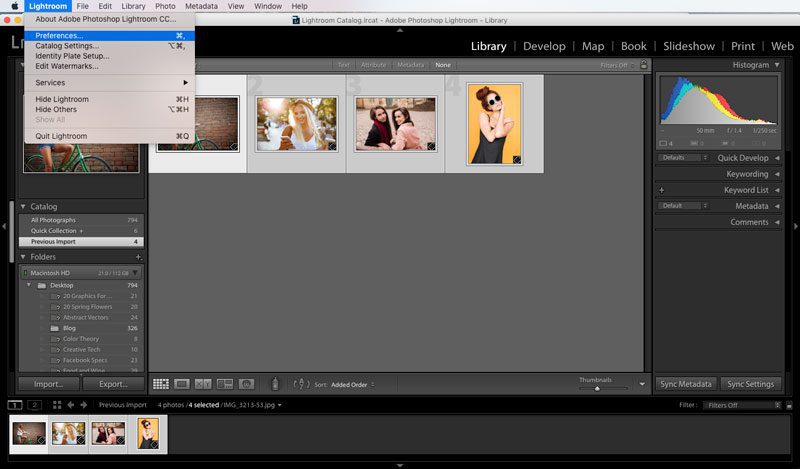
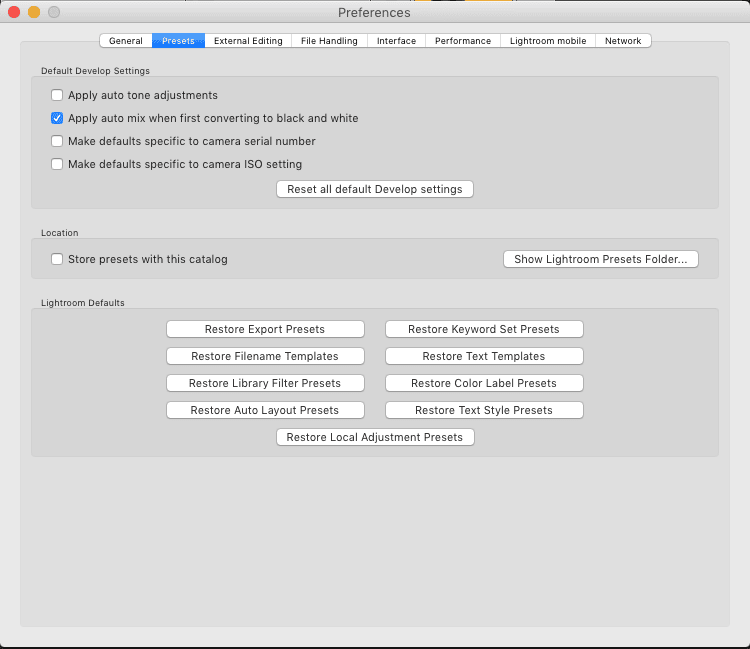
If you’re on a Windows computer, the process is almost exactly the same. Go to Edit > Preferences > Presets and click on Show Lightroom Presets. Now, double click on Lightroom > Develop Presets. A new box will pop up where you can drag and drop in the presets you downloaded.
Now just go ahead and restart Lightroom and your new presets will be installed!
Editing With Lightroom Presets
Once you import your photos and you are in the Develop Module, take a look in your left panel and you will find a drop down labelled Presets. Once you open your drop down, you should see all the presets listed.
With an image selected, go ahead and hover over a preset that you are interested in applying (you may have to click the little arrow next to the preset name first). This should apply the preset to your thumbnail so you can get a sense of what it will look like.
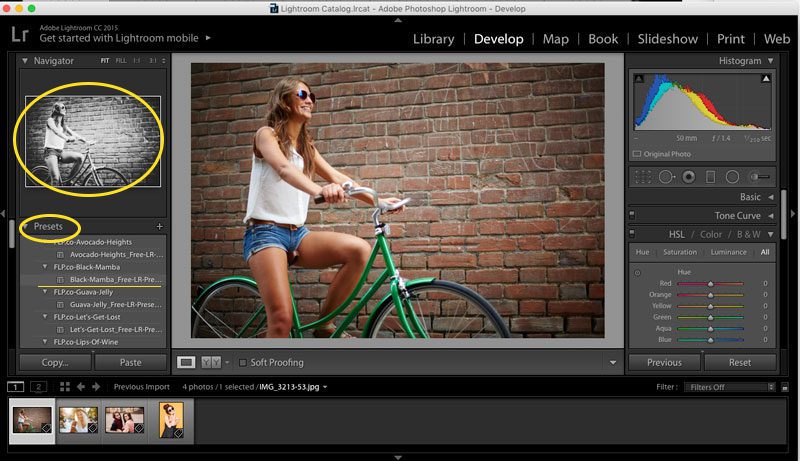
If you’re happy with the effect, go ahead and double-click your preset and it will be applied to your image.
Before:
After applying the “Lips of Wine” preset:

Before:
After applying the “Guava Jelly” preset:

If you realize after the fact that the thumbnail lied and you’re not happy with your image after all, never fear! A simple Ctrl-Z or a click of the Reset button in the module will revert your image to its original state.
Batch Editing With Presets
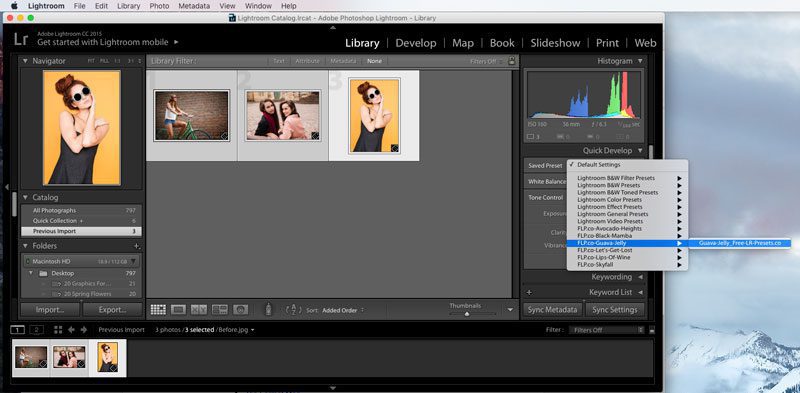
Now, the above instructions are perfect if you want to edit your photos one-by-one, but one of the best things about presets is that you can apply a preset to as many images as you want, all at once. Back in the Library Module, just select all the photos you want to apply the edits to so that they are highlighted. On the right, you’ll see your Quick Develop panel. Click into that drop down, and the very first option is Saved Presets. Select your desired preset from the drop down list and voilà!
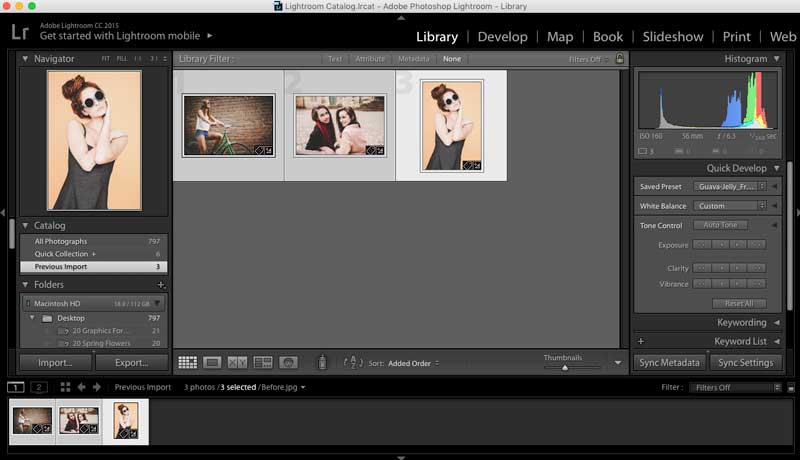
And there you have it! You’re just a few clicks away from fast, easy, and non-destructive editing with custom or downloaded Lightroom presets. If you’re interested in exploring just how much time Lightroom can save you, don’t forget to check out our tutorial on blurring backgrounds in Adobe Lightroom and our Quick Start Guide to Resizing Images in Adobe Lightroom.
When you don’t have time to shoot and edit your own image, save time and money with royalty-free stock graphics. After all, even the fastest editing tricks aren’t quite as quick as clicking “Download.”


